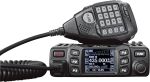
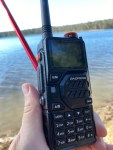
Radioditty sent the new GS-10B Pro to me before it was released as they wanted you to see it first. When sending it, they never told me what to say, only to review it. So below is what I honestly experienced.
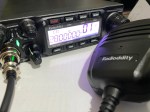
This handheld radio is not only dualband UHF, VHF radio, it also receives HF, single sideband, and CW. It has a waterfall display as well, plus a load of other goodies which I hadn’t seen in a handheld before. So, let’s have a look.
Some of the things this radio includes is a realtime spectrum display, which is the same as a waterfall. It’s got full HF, single sideband and CW reception. It’s an all band scanner receiver that covers most of UHF, VHF, HF, airband, and FM radio stations. It also connects to the weather station if you have them in your country.
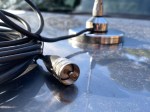
It has two SMA connectors on the top. One that does for UHF and VHF and the other one is for the donut antennas that’s supplied which I will look at soon. You can program the radio either via computer or even by your mobile phone or direct input or each frequency. The direct option is a lot easier than has been before as the menu seems a lot better.
It has a 250 milliamp rechargeable battery that can be charged using USB-C cord and it has dual PTT and dual watch as well.
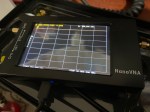
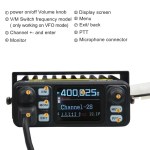
The 1.77 inch color screen is fantastic especially for the waterfall and I love the display how it shows not only the frequency the frequency name and the channel number when in memory mode it shows a whole lot more like signal strength and all sorts of things.
This upgraded PRO model has 999 channels, so you can store a lot more in there than you ever have before. It can transmit on the normal VHF and UHF bands, but it will also receive right down to 150 kHz.
Looking at the radio itself, the speaker is behind the keypad, which gives the radio a little bit more real estate.
They got quite a lot of menus in the radio making it a lot more functional. I have done a video below on this, which I receomend you watch it.
As an example, menu item 32 is autolock. So you can change that to how many seconds.
So one of the things you might like to do is to listen to HF. So how do you do that? If you go into the menu and I’m going to go to menu 2 4 (which takes me to menu 24). This menu item is where you program what the PF3 key is. I’m going to make sure that that is set to radio, then press confirm. So then if I press this PF3, it’ll go to radio. The next thing you should do is change the antenna to the donut antenna.
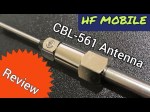
Take off the VHF/UHF antenna and next to it is a knob that screws off to reviel where you attach the donut antenna. You can plug in an external antenna if you like.
When listening to HF, if you press and hold down the home key, you get a waterfall right across the band.
The Radioddity GS-10B Pro is a high-power 8W handheld ham radio designed for long-range communication. At the time of this video, it had not been released yet. This new radio is built as an upgraded version of the popular tri-band radio, however, this portable transceiver features a real-time spectrum analyser (waterfall display) on a 1.77-inch color display, allowing you to instantly scan, view, and locate active frequencies in your area. Its precious model without all the extras is widely used by amateur radio operators for satellite communication, emergency readiness, and Parks on the Air (POTA) activations.

This handheld radio has advanced shortwave listening. The GS-10B Pro handheld transceiver includes wideband HF monitoring with SSB (Single Sideband) and CW modes. Unlike standard analog radios, it has a dual-antenna path system with two SMA ports to keep high-frequency and VHF/UHF signals clear and separate. It also comes with two donut antennas.
To make setup simple, the radio features built-in Bluetooth wireless programming, so you can easily configure channels, update your codeplug, and manage repeater offsets directly from an Android or iOS smartphone app without a computer programming cable.
The hardware is optimized for survival gear and off-grid use, with a 2500mAh USB-C rechargeable battery that supports 2A fast charging. It comes equipped with dual PTT (Push-to-Talk) switches for seamless dual-band monitoring and an extra physical channel knob for quick frequency tuning. If you are buying your first ham radio or looking for a budget-friendly backup radio, custom noise reduction, and standard Kenwood 2-pin accessories.
If you go via this link, you will get a discount:
https://radioddity.refr.cc/bensangster then search for your item
If you enjoyed this, here are some more posts you may enjoy:
- HF on a Hand Held?
 Radioditty sent the new GS-10B Pro to me before it was released as they wanted you to see it first. When sending it, they never told me what to say, only to review it. So below is what I honestly experienced. This handheld radio is not only dualband UHF, VHF radio, it also receives HF,…
 - CW Skimmer
 CW Skimmer is a popular amateur radio software program used for decoding Morse code signals on the HF bands. The program is widely used by ham radio operators, DX chasers, and contest stations because it can monitor and decode many CW signals at the same time. Unlike traditional Morse code listening, CW Skimmer displays signals…
 - 15 Metre band
 The 15 metre band is one of the most popular HF amateur radio bands for long-distance communication, offering an excellent balance between reliability and worldwide reach. Frequency Range The standard frequency range for the 15m band is 21.000 MHz to 21.450 MHz. Within this range, different segments are commonly used for specific modes: CW (Morse…
 - Maximum Usable Frequency (MUF) in HF Radio Propagation
 Maximum Usable Frequency (MUF) is an important concept in HF radio propagation and amateur radio communications. It refers to the highest frequency that can be used for reliable communication between two locations by reflecting off the ionosphere. If a radio signal is transmitted above the MUF, it will not return to Earth and will instead…
 - Baofeng UV-5R Mini
 The Baofeng UV-5R Mini handheld radio is a popular and affordable dual-band amateur radio transceiver widely used by beginners and experienced ham radio operators. Designed as a compact version of the original UV-5R, this small and lightweight VHF/UHF walkie talkie offers solid performance for everyday communication, making it a common choice for those getting started…
 - Lightning Storm & HF Radio
 HF radio and lightning storms are closely connected because lightning creates strong radio frequency interference that affects HF radio communication (3–30 MHz). High Frequency radio is commonly used for amateur radio (ham radio), marine radio, aviation HF communication, emergency communications, and long-distance shortwave listening. HF signals travel long distances by reflecting off the ionosphere, which…
 - OpenHamClock
 OpenHamClock is an open-source amateur radio dashboard designed as a modern successor to the original HamClock used by radio amateurs worldwide. It provides a real-time visual display of essential ham radio propagation data, world clocks, DX activity, and space weather information in a single, easy-to-read interface. Built with modern web technology, OpenHamClock runs in any…
 - Radtel P8 PoC radio
 The Radtel P8 PoC radio is a Push-to-Talk over Cellular (PoC) device that looks like a traditional walkie-talkie but communicates using 4G/LTE mobile networks instead of UHF/VHF radio frequencies. This means its effective range is not limited to a few kilometres like standard two-way radios, but instead depends on cellular coverage, allowing communication across cities,…
 - What is an Antenna Coupler
 An antenna coupler (also called an antenna tuner or matching network) is a device used in radio systems to ensure impedance matching between a transmitter and an antenna. Most transmitters are designed for a specific impedance, commonly 50 ohms, while antennas often vary depending on frequency and design. When the impedance is not matched, reflected…
 - Antennas
 Amateur radio operators use many different antenna types, each designed for specific bands, space limits, and operating goals. Here’s a clear overview of the most common ones and why hams choose them. Wire Antennas These are some of the simplest and most popular antennas that include: Dipole Antennas End-fed wire Inverted-V Vertical antennas Vertical antennas…
 - Dipole Antenna for Portable Use – Make your own!
 A dipole antenna is a basic radio antenna made of two conductive elements fed at the center. It is typically a half-wavelength long and is widely used as a reference antenna in antenna theory and practice. Dipole antennas work by converting alternating current into electromagnetic waves. Their radiation pattern is strongest perpendicular to the antenna…
 - Interference
 Interference in Amateur Radio refers to unwanted signals that disrupt radio communication. This interference can reduce signal clarity, make contacts difficult, or completely block communication between amateur radio operators. Radio Frequency Interference (RFI) is one of the most common problems in amateur radio. It often comes from man-made electronic devices such as phone chargers, computers,…
 - 6m and TV Channel 0
 Prior to 1989, it was illegal to operate between 50 MHz and 52 MHz in Australia. It was a real pain as that was where all the action was when the band opened up. However, after many requests from the WIA to the DoTC back in 1989, it was agreed that this section of the…
 - Dipole Antennas Vs Long Wire Antennas
 I’ve heard a lot about dipole antennas, and I’ve heard a lot about long wire antennas also. I would say I’ve seen more dipoles than long wire antennas. So why is that? What is the difference between them? Which is better? If one is a clear winner, why does anyone build the other? A dipole antenna is…
 - Repeater-START
 Repeater-START is a multi-platform app designed for ham radio and radio-operator enthusiasts who need fast access to repeater information. The app provides a detailed repeater map as well as a distance-sorted list, allowing users to easily locate nearby communication points wherever they travel. Because it uses open repeater databases, the information remains current, community-supported, and…