
I bought this wireless keyboard/mouse which was very cheap. It does come with a USB dongle. It has a fantastic range since it is 2.4GHz RF. The back also has good grip which apparently isn’t common on all models. You can select what colour you want the plastic to be also.
Setup
Setup couldn’t be easier. Make sure it has batteries installed, some come with a rechargeable, mine required triple A batteries. Make sure the switch on the top side of the keyboard it to the left position for it to turn on – it should light up when you do this. Then in the battery compartment will be the USB dongle. Just plug in the USB dongle before powering up (if it is into an Android box), then it will connect and work fine straight away. If your model came with the battery, there may be a cord to charge the unit also.

Touch Pad
The top part of the keyboard in the touch pad area controls your mouse position. Using two fingers will scroll up and down the scroll bars. Unfortunately two finger zooming does not work. Right click can be done by a simultaneous two finger tap. You can turn the touch pad on or off by pressing Fn + F8.
Changing the Touch Pad Tracking Speed
All you have to do is press the blue Fn (function) button down the bottom left corner, then press the space bar.
Shortcuts
The keyboard comes with the following shortcuts at the top of the keyboard.
Far left Shortcuts
Over the far left side are media buttons, including volume up and down, pause and play, next track
Middle shortcuts
Either side of the touch pad are shortcuts, then are the following from top to bottom in order
| Left Side of Touch Pad | Right Side of Touch Pad |
| 1. Open Music Player App | 1. Open Google Search |
| 2. Open Email App | 2. Go home button |
| 3. Mute button | 3. Internet Browser |
| 4. Mouse left button ( this is also on the far left of the letters below on the top) | 4. Mouse right button (this is also on the far left of the letters below on the bottom) |
Far right Shortcuts
Over the right side at the top are directional buttons with an OK button in the middle.
Sleep Mode
The Keyboard will auto sleep and wake-up to save the battery. When the keyboard is idle for 3 minutes, it will go into auto sleep mode, and all LED indicators will turn off.
Keyboard Glowing Colours
Some keyboards glow at night. Unfortunately mine foes not, but if yours does, you just press blue the Fn key down the bottom left and the F2 key to change the colours. Press Fn-F2 again to change to the next colour and so on. This will give you the three standard colours. However, if your feeling nerdy, you can press and hold down the Fn key, then using your thumb on the touch pad, move it left and right to get all the other colours. There are 7 different colours in total.
If you want to be a geek of all the nerds, you can do the RGB spectrum, but pressing and holding F2 and then scrolling your thumb across left to right on the touch pad, then let go. It will scroll through all the colours automatically. You can still use the touch pad as normal while it automatically changes colours. I guess not having this saves some power also, however it does turn off every 30 or so seconds. There is a switch up the top right on the side of the keyboard that will turn it off also.
Fuction Keys
Apart from what I have already mentioned, you can do the following functions using the blue function key (Fn) found down the bottom left corner.
- Fn + Fn = Enter into pair mode
- Fn + F7 = take a screen shot
- Fn + F8 = turn on or off the touch pad
- Fn + F9 = F11 key
- Fn + F10 = F12 key
- Fn + Back = Delete
- Fn + Page Up = Home
Other Keyboards
Here is a review on several other keyboards of similar size. This is not my video, but thought it gave a good quick overview of several models available.
Conclusion
The size of the keyboard is just right, not to small so you can’t find it or use it easily, but not to big so it takes over the desk or armchair. It works well with my Android TV device, but understand it does work on other devices such as windows, Raspberry Pi etc.
If I was going to buy it again, I may get the one with the inbuilt battery installed that can be re-charged, however once the batter goes, you almost have to replace it. My model could be loaded up with rechargeable batteries you can buy from anywhere.
Before I was using this Keyboard, I used a USB mouse, and while in some ways that is easier than a touch pad, to have a full keyboard and the touch pad all cordless with a good range is fantastic.
Other things to read
Enjoyed the read, why not subscribe to this site. Here are some other interesting reads:
- HF on a Hand Held?
 Radioditty sent the new GS-10B Pro to me before it…
 - CW Skimmer
 CW Skimmer is a popular amateur radio software program used…
 - ADIF Master
 ADIF Master is a popular amateur radio logging software tool…
 - 15 Metre band
 The 15 metre band is one of the most popular…
 - AOR AR1000XLT Fix
 The AOR AR1000XLT is a popular wideband scanner receiver that…
 - Maximum Usable Frequency (MUF) in HF Radio Propagation
 Maximum Usable Frequency (MUF) is an important concept in HF…
 - World Amateur Radio Day
 World Amateur Radio Day is celebrated every year on April…
 - Amateur TV
 Amateur Radio Television (ATV), often called “ham TV,” is a…
 - Baofeng UV-5R Mini
 The Baofeng UV-5R Mini handheld radio is a popular and…
 - Lightning Storm & HF Radio
 HF radio and lightning storms are closely connected because lightning…
 - OpenHamClock
 OpenHamClock is an open-source amateur radio dashboard designed as a…
 - Radtel P8 PoC radio
 The Radtel P8 PoC radio is a Push-to-Talk over Cellular…
 - What is an Antenna Coupler
 An antenna coupler (also called an antenna tuner or matching…
 - Antennas
 Amateur radio operators use many different antenna types, each designed…
 - Dipole Antenna for Portable Use – Make your own!
 A dipole antenna is a basic radio antenna made of…
 - Interference
 Interference in Amateur Radio refers to unwanted signals that disrupt…
 - 6m and TV Channel 0
 Prior to 1989, it was illegal to operate between 50…
 - Dipole Antennas Vs Long Wire Antennas
 I’ve heard a lot about dipole antennas, and I’ve heard…
 - Repeater-START
 Repeater-START is a multi-platform app designed for ham radio and…
 - The 6-Meter Amateur Radio Band
 What Is the 6m Band? The 6-meter band, spanning roughly…
 - Anytone AT-778UV
 Overview The Anytone AT-778UV is a dual-band VHF/UHF mobile transceiver…
 - 160 Meters Band160 meters band is known as the “Gentlemen’s band”. It…
- What does this Antenna do?
 Have you ever had an antenna and forgotten what it…
 - Olivia Digital Mode MFSK
 Yes, this popular girl name is actually an Amateur Radio…
 - Yaesu FT-620The Yaesu FT-620 (and its updated version, the FT-620B) is a vintage amateur…
- FreeDV
 I came across something different, FreeDV. The name FreeDV insinuates…
 - Anytone 778UV Key Assignment
 Key Assignment For some reason, not all the key assignment…
 - Kenwood – did you know this?
 Everyone that has been into radio for a while will…
 - VK3AHR Ron
 Today (20/06/25) I head Ron, VK3AHR, on the 7.100 40-meter…
 - The History Of Yaesu
 As licensed Amateur Radio operators, we have all heard about…
 - Parks & Peaks App
 I’ve been using the Parks and Peaks app on iphone…
 - DMR Explained
 With digital radio changing so quickly, below is a bit…
 - Baofeng K5 Plus Radio
 I managed to get one of these radios and was…
 - Zastone D9000 Number Lock
 I purchased this radio from a friend, and it worked…
 - HamClock
 HamClock has always fascinated me, as it seems such an…
 - Baofeng Radios
 You could say every amateur radio operator knows about the…
 - Yaesu 857D
 A great radio that does all bands up to 70cm.…
 - Hiroyasu IC-980 Pro
 I recently got my hands on the Hiroyasu IC-980 Pro…
 - Flowerpot Antennas
 Have you heard of a flowerpot antenna? I hadn’t until…
 - Daiwa CN-460M Meter
 The Daiwa CN-460M is a small cross-needle meter displays both forward and…
 - Yaesu FT-225RThe 2m band has always been an interesting one for…
- RH1 Radio Cup Holder
 Why does a radio need a cup holder? I agree…
 - Radioddity RA-UV712 Magnet Mount Antenna
 There are lots of duel band antennas available, but most…
 - Remote testing Antennas
 I’ve always wanted to take the radio with me while…
 - HF Mobile Antenna CBL-561
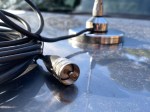
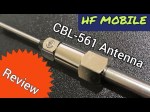 CBL-561 Review The new CBL-561 antenna is strong and light…
 - Radioddity QT80
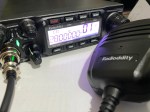 The new QT80 radio by Radioddity is a fantastic radio…
 - Baofeng GT-5R ProThe first thing I noticed after receiving the radio was…
- Do you cut or lengthen the antenna?
 When measuring SWR, I always forget if I should lengthen…
 - NanoVNA H4 USB Control to PC
 If you haven’t seen my previous blog on the NanoVNA…
 - Flrig
 Flrig is a transceiver control program designed to be used…
 - Fishing Line Antenna DIY
 With so many different HF antennas available, I often wondered…
 - Band Stacking
 Have you ever tried Band Stacking before? This is where…
 - 10 metres 28.490
 On the 10-metre band, 28.490 is the unofficial calling frequency…
 - Portable HF all band Antenna and MountI recently got the Radioddity M916 Heavy duty antenna magnetic…
- DNR – Digital Noise Reduction
 As per the Yaesu FT-710 manual, the Digital Noise Reduction…
 - Baofeng UV-17R Plus Series ReviewI recently got my hands on a new Baofeng UV-17R…
- Radioddity GD77After using this radio for years, this is my summary…
- Retevis RT73 – Kydera CDR300UV
 The Retevis RT73 and Kydera CDR300UV are identical radios. They…
 - Converting dB to S-metre
 The S-meter is an instrument on most radio receivers that…
 - VARA – VARAC
 Ever heard this sound on HF / VHF / UHF?…
 - DXHeat.com
 DXHeat.com is a great website that can update you the…
 - NanoVNA-H 4 Antenna Analyser
 The Nano VNA-H 4 is my new toy that has…
 - EchoLink CQ
 I’ve been using EchoLink well before smartphones where the only…
 - Diamond Antenna W-8010 and expanding it to all bandsI purchased the Diamond W series W8010 antenna and quickly…
- Barefoot
 I’ve heard several amateur radio operators say they are running…
 - NetTime
 When using digital over the radio, it is particularly important…
 - Cables, how to organise trick
 A simple tip that you may always use after reading…
 - Solar Data & Propagation
 There are several website that tell you what bands are…
 - HamAlert
 It has been a while since I have completed another…
 - M17
 So what is the new digital mode M17? It sounds…
 - GD-77 Won’t connect to PC
 I have been using my Radioddity now for some years…
 - DudeStar
 Here is a free windows program that will connect your…
 - Easy Radio Rack
 Sometimes we try and build things and a lot of…
 - Welle.io
 Welle.io is a DAB and DAB+ software defined radio (SDR).…
 - Hotspot Fixing Packet Loss with AutoCal
 The thing with digital communications, it can be extremely complicated.…
 - OpenSpot from the Start
 I have spoken to a few people who have felt…
 - Treehouse
 An unusual name, but a catchy name no less, just like Peanut that was written by the same person, David PA7LIM. If you like Peanut, then you will like this project also. This project, like Peanut, includes some amazing coding and thinking.…
 - DROID-Star
 After talking to a friend just to the north of…
 - Software Defined Radio (SDR)
 If you don’t have one of the latest and greatest…
 - SMS via Radio or Hotspot
 One of the most underutilised by very cool feature that…
 - Portable Hot Stop with Battery Pack
 The new OpenSpot3 has come out with an internal battery.…
 - BlueDV Windows 10 GD-77
 I found it hard to find useful information on how to run the OpenGD-77 hotpot mode with Windows 10. At the time of writing this, there is a lot about this topic using a pistar and even android or ISO, but not much with Windows 10. This is my experence with BlueDV and Open GD-77 using a Windows 10 PC.…
 - Iphone won’t download photos
 I get the “Device is unreachable” Error message when trying to import media from iPhone to Windows 10 PC. …
 - Australian DMR RepeatersThere are several DMR networks around the world, and more…
- Upgrade to OpenGD77
 This page is just a help to friends I have spoke to who are interested in upgrading the Radioditty GD-77 to the OpenGD77 software. This is not my work, however I really do appreciate Roger and his team have done to put this together. I claim no responsibility if it breaks your radio, however I have not hear this happen now in some time. I am not an expert at all with OpenGD77, I have just put this together to help people who have asked me how to do it.…
 - Basic Antenna Fundamentals
 A good friend of mine, Mike VK5ZC, put the information below together and asked me to put it on my web site. He has spent a lot of time putting it together with pictures and videos, so I encourage you to have a good read.…
 - The History of Ham RadioA good friend of mine, Mike VK5ZC, put the information below together and asked me to put it on my web site. He has spent a lot of time putting it together with pictures and videos, so I encourage you to have a good read.…
- ProScan and ProScan Client Update
 I recently started using ProScan after years of using FreeScan. I have always enjoyed using FreeScan as it is easy to setup, I can download outputs from the software, and the main reason “it works”. However ProScan seems to be more graphical and has different features also.…
 - ProScan and ProScan ClientI recently started using ProScan after years of using FreeScan. I have always enjoyed using FreeScan as it is easy to setup, I can download outputs from the software, and the main reason “it works”. However ProScan seems to be more graphical and has different features also.…
- USB Device Error PL2303HXA
 I went into the device manager and found the error, my cable no longer worked. This same issue happened to a USB Card reader also.…
 - Amateur Radio NetsA list of Radio nets we have gathered from web pages around the world, as well as friends etc.…
- The Radio Box
 How do you stop a hand held radio from falling…
 - WizNet DMR
 The WizNet DMR app is still in beta testing, and…
 - Mini Keyboard Options
 I bought this wireless keyboard/mouse which was very cheap. It does not come with batteries, but come with a USB dongle. It has a fantastic range since it is 2.4GHz RF. The back also has good grip which apparently isn’t common on all models. You can select what colour you want the plastic to be also.…
 - Orion Push to Talk
 Orion is an app that isn’t really known in my…
 - Using an Android TV Box for Ham Radio
 If you want to get onto Digital Radio for less…
 - Welcome to the siteHi there from Down Under, Melbourne Australia. Thank you for…
- Power without PowerIn 2019 my family and I went on a five…
- ChirpCHIRP is a free, open-source tool for programming your amateur…
- Updating GD-77 Firmware
 Updating the firmware on the GD-77 can be daunting, as…


