
I recently started using ProScan after years of using FreeScan. I have always enjoyed using FreeScan as it is easy to setup, I can download outputs from the software, and the main reason “it works”. However ProScan seems to be more graphical and has different features also.
Anyway, if you go to the following website, there are several programs available.
There are three software options available via the above link.
- ProScan
- ProScan Client
- RadioFeed
Details on the above three are below. Please remember, this is not an instruction manual, more of a review and should help you get started.
ProScan
Installing
Installing is very simple. Simply go to the above web site and download the latest version. Then open the file. If using Windows 10, Windows will give you a Windows Defender SmartScreen warning. Simply select More Info then Run anyway. I am using version 15.4 for this review.
Installing takes seconds, and does not require a re-boot. If you have a license key then put it in, if not, you have 30 days to access the software which I think is very reasonable. A lot of Apps these days you don’t get the opportunity to check it is what you want or not.
Connecting to the Scanner
First select the scanner you are connecting to via the drop-down list. Then from the Comm Port dialog box, either select the Port, or click on the red Auto Detect button where you can then see the scanner on the list. If you don’t, then make sure the scanner is on, connected and been connected to Windows for a while. You can also press the Windows Device Manager option to make sure Windows see’s the scanner connected.
After selecting the scanner and port, press Set Selected Available Port so the port number is updated at the top of the screen. Then after setting the baud rate, select the red set box. The highest Baud Rate the scanner supports, the better reliability. After selecting set select close to continue.
It will then ask if you want to create a new database. If it is your first time, then you will want to select yes. I usually create a file with the date in the file name and the scanner model. If I ever make a mistake, then I can go back to the original file.
Once you have done this, you will get a graphical display of your scanner at the top of the screen and it will pick up where your scanner is up to. If you are using a hand held scanner, it will come up with a remote head version of the scanner. For example, my 396xt scanner looks like the UBC-RH96 remote screen. Check that your scanner model is listed at the top of the display, if not you will want to adjust your scanner model via the Scanner Type menu.
Display
There are two parts of the screen, the top graphical part (highlighted by my yellow line below), then the tab data area below (shown in red). Also, above the graphical part is the menus which go across top.

Menus
The menus available across the top of the display include:
- Database – here you can start a new, save a current or open an old database, or scanner setup. You can also import a data base from a current file, or via a selected few web sites. Another option is to export or print the database. Last option is to exit and close the software.
- Export / Print – this option is very customisable, where you can export to csv, HTML or Sentinel HPE file. You can also print to your printer also. You can select which systems are to be included and what information is to be included in the export or print.
- Options – This brings up a large dialog box which looks a little overwhelming at first, but after a closer look, is actually very well laid out. The dialog box has the following tabs:
- Start Up – simple settings are available here such as if the software is to load up the current database or not at start-up? Checking for latest version, logging history and so on.
- General – general settings such as colours, date and time format, and other settings are available here.
- Logging – This tab is broken up into three areas where History Grid settings are available, UID Grid settings are available, and FTO Grid settings are available.
- Recorder – this tab allows you to customise what is recorded and what is not. Settings such as transmissions < 2 seconds can be turned off. You can set the maximum recording time, and auto delete recordings after a period of time.
- Scanner Specific – this tab allows you to change specific details according to the scanner selected such as colours etc. Depending on the model selected, depends on what is available to change and what is not.
- Recording Text Tags – You can select the file output and title, artist etc for each recording made.
- Scanner Type – this menu allows you to change the scanner type should you not have the correct one selected.
- Comm Port – you can change the comm port settings if you are having trouble connecting to your scanner. From the Comm Port dialog box, either select the Port, or click on the red Auto Detect button where you can then see the scanner on the list. If you don’t, then make sure the scanner is on, connected and been connected to Windows for a while. You can also press the Windows Device Manager option to make sure Windows see’s the scanner connected. After selecting the scanner and port, press Set Selected Available Port so the port number is updated at the top of the screen. Then after setting the baud rate, select the red set box. The highest Baud Rate the scanner supports, the better reliability. After selecting set select close to continue.
- View – You can change how and what you want to display. You may want a small display or a normal display depending on how much screen space you have. You can also select to always be on top if required.
- Tools – There are four options available on this menu item
- Google Maps & Lookup – this will allow you to look up locations using Google Maps. There are a lot of settings available here, and some great things you can display or not display on the map. This includes a range map etc.
- FCC Callsign Lookup – Here you can put in a call sign and look it up. These don’t work very well outside of USA.
- Location Converter – Here you can convert positions to other formats
- Remove Activation – use this to transfer your licence to another PC
- Support – There are four options available on this menu
- Manual – a searchable PDF manual which is a great help and well written
- ProScan Home Page
- Check for newest version
- About
Download from Scanner
If you already have a scanner setup, you may want to press the download from scanner button from the Database tab then Systems tab. If the window below says database locked, then you may want to start a new one via the Database menu. Select all systems and configuration and download from the scanner. This is a good starting point to make sure the scanner and ProScan software are the same.
This post is not intended to replace the manual, it is more about getting you started and reviewing the software. The above is enough to get anyone started, so here are some things I have liked in this program.
History Logging
Under the History Logging tab is a great feature if you want to just scan a set of programmed frequencies and see how often you receive them, and what their signal was like. This is good if you want to just let the scanner just tick away. I find this option as one of the better parts to the software that other software seems to lack. For example, you could have a set of frequencies scanning for a few days, and then see how often the scanner stopped on that frequency, when the first and last time it was, and the total duration it spent on that frequency. Some frequencies are hardly used, where others like freight and transport services are more used which this report highlights.
Each column is sortable which is fantastic. So you can sort in order of Frequency, RSSI (Received Signal Strength Indicator) or time first or last time the scanner heard a transmission on that frequency. You can tick the box for Each Transmission New Row, or as I do just have that un-ticked so each frequency is only listed once, so you can see how often each frequency was heard. If you tick the Active Row In View the displayed list will always include the current active frequency on screen.
However, the best part is you can copy or move any selected rows, or all rows, to a database or another file such as a text file that can easily be imported into Excel. Now you can have a spreadsheet with all your frequencies, and next to them have data such as when you last heard it talk, what the RSSI was and so on. Frequencies change all the time, so this is a very handy feature if you are not sure if the one you are interested in is still in use or not.
You can also adjust how it is logged, via the Options menu at the top of the screen and go to the Logging tab. Here you can state the file you want to save your logs to, if you only want to log frequencies that have a signal for longer than 2 seconds and so on.
Recording Tab
This sometimes can be hard to set up in some software packages, however in ProScan, I found it very easy. You will first need to set up the settings on the Audio Control tab which has a fantastic graphical display of the usually hard to understand settings.
Database Tab
This by far is the busiest tab, and has 15 tabs within it. It is here that all your frequencies and how they are stored is saved. This page will not go into how to save and store frequencies, and how systems and groups work, as this page is more about the ProScan software.
The Systems tab is where all your frequency data is stored and is set out in a very easy way to understand. Along the top of this tab though is some options in red. While most of them are obvious by how they are named, the Get Clipboard is something that needs to seen. Here you can copy from an excel file or database, and import it easily into the ProScan software. You can set special ignorer’s etc, it is well worth spending some time here.
The Statistics option will make sure you don’t overload your scanners memory.
Source Client Tab
This is a great tab if you want to easily connect your scanner to some on-line broadcasting services such as Broadcastify, Icecast2 and SHOUTcast.
Remote Scanner Over IP
This tab is where you can be a server or client to the rest of the world. You can allow others access to your scanner if you choose to, or you can select others who have shared theirs via client mode. If you just want to use the software as a client, then you might as well get the client software which is free and just has this part of the software as part of the insulation.
Audio Control
This tab will help you set up your recording and sound into you PC from your scanner and from your PC. The settings are very well laid out in a graphical display making it very easy to setup. The last tab, Audio Scope allows you to check the audio levels also. I routed my microphone to it and could then check base and tone levels which was an added bonus.
Band Scope
The Band Scope tab is one of the best parts of this software. Simply press the start sweep red button and the software will take over your scanner by sweeping across the bands drawing a graphical display on received signal levels. This not only graphically shows you where the signals are, but also shows the amount of notice on each different band also and how much noise you may be receiving in a range of frequencies.

You can see on the above picture, the frequencies in the 53 Mhz area have a low noise level of reception, but above that the next band scanned has more. Move the graph my sliding the Window marker, then move the Marker slider to change the frequency. Press Stop Sweep to stop sweeping. You can save the data to a file also, or open one. It is a shame you can’t just press on the graph to update the frequency on the scanner, but this really isn’t a big deal.
If you want to adjust the frequencies scanned, press the Get / Set Custom Search In the Scanner button and adjust.
Updates
Under the Options menu if you go to the Startup tab there is an option to Check For Newest Version Upon Start Up And Once A Day which is a great feature as often I just leave it on for days or weeks. However, when an update is found, a pop up window as shown below will be displayed while the program continues to work as per normal until you click on next.
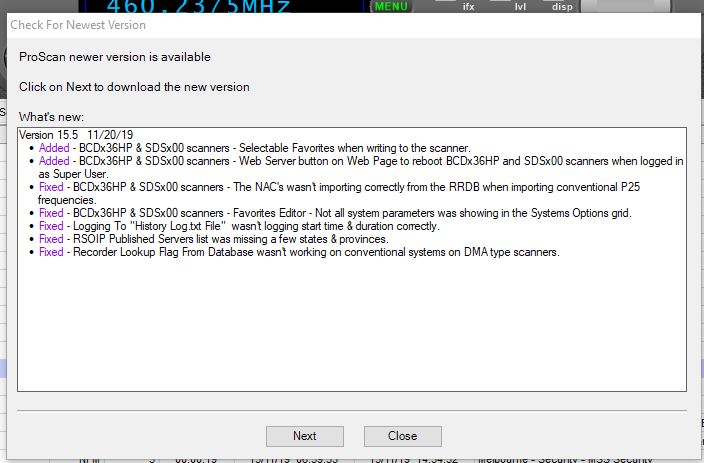
The screen has a list of what the update includes which is great. You can either install the update by pressing next or run with the current version by pressing close. If you select next if will close the program, download the update, then all you have to do is run the downloaded software and it will automatically install and pick up from where you were as if nothing has happened. Very easy for anyone.
Costs
At the time of writing this, the cost of this software is $50 which can be used on two different computers. You can deactivate it on a PC to activate it on another PC. This can be done via the Tools menu. You can use it free with all functions for 30 days though. More information is available here: https://www.proscan.org/purchase_info.html
Features
Occording to the ProScan website, the ProScan Features include:
- Scanner Support – Supports 18 different Uniden models
- Scanner Programming – Upload and download data to and from scanner.
- Database – Full featured database with Find & Replace, Find Duplicates, Export and Imports data from ProScan database files, Uniden UASD database files, and RadioReference Web Service.
- Source Client – Streams real time audio to Broadcastify, Icecast, and ShoutCast servers. Source Client can replace Edcast/Oddcast and SimpleCast types of programs. If you are a Broadcastify stream provider then the Source Client can be configured automatically.
- Web Server – Servers a web page and serves real time audio and folders / files. Audio and folders / files can be password protected.
- Logger – Extensive logging with many options.
- Remote Control Scanner Over IP – Control scanner remotely with streaming audio.
- Recorder – No loss audio recorder. Stereo or Mono.
- Audio Flow Diagram – Shows audio flow along with the volume controls and level meters.
- Band Scope – Great for testing antenna’s and interference tracking
- Control Channel Data Monitoring – Monitor the trunking control channel data. Works with XT series scanners only.
- Sessions Manager – Manages multiple instances of ProScan running on same computer.
- Virtual Display – With keypad and knobs emulates the scanner front panel.
- Serial Port – Auto Detect.
- Test Tab – Bonus items such as sending commands to the scanner and viewing returned data from scanner.
- Tabbed layout – For easy navigation. Each tab contains a major feature.
Model Support
According to the ProScan website at the time of writing this, the following models are supported:
- BCT15,
- BCT15X,
- BC250D,
- BC296D,
- BR330T,
- BC346XT,
- BC346XTC,
- BCD325P2,
- BCD396T,
- BCD396XT,
- BCD436HP,
- BCD536HP,
- BC780XLT,
- BC785D,
- BC796D,
- BCD996T,
- BCD996XT,
- BCD996P2,
- SDS100, SDS200,
- SDS100E,
- SDS200E,
- UBCD3600XLT, &
- USDS100 scanners
ProScan is available via the above link. You can see some screen shots of the software via this link also.
Please note – we will soon be posting a review on this software.
ProScan Client
If you don’t have a scanner and are thinking about getting one, then this is for you.
This is a stripped down version of ProScan for connecting to ProScan RSOIP (Remote Server Over IP) Servers in Monitor Client mode only. Basically it is a list of peoples scanners who have chosen to share them online allowing you access to listen in to what they here at their location. The Audio Recordings and Logging features are enabled, so you can even record what you hear at your location if you want to.
You may want to share your own scanner and then you can listen to is when you are out and about and don’t have a scanner with you.
ProScan Client is available via the above link.
How to use the ProScan Client software
Once downloading and installing the software, click on the Remote Scanner Over IP tab. Select the Update button to generate a list of available published servers in the box below. You can sort the service in the box according to country and region if required by clicking on the headings. If you widen the software, or move across this box, you can see the description and type of scanner and further details of each server. All headings can be sorted.
Once you find the server you want to listen to, click on it so it appears in the boxes on the left side, then select the Start box. The server you selected may not work, details will be in the box down the bottom right. In this case select another server or try again later. When selecting a new server, make sure the server ID updates on the left side.
Once connected, the display of the scanner will update to the type of scanner you have selected.

When the scanner stops on signal, you can see it listed on the History Logging tab. You can select to list each transmission in a new row (which could end up being a lot of rows), or just list each different Talk Group ID/Frequency. The Fire Tone-Out Logging tab is interesting also if the correct frequency / scanner is compliant.
You can record via the Recorder tab. Select the Recorder button and then it will list all the recordings. Select Colors Defined to see what the colours mean. Once this is on, you can then play each recording on demand. You can adjust the Column headings by click and dragging them as required.
When you have finished with a server, select Stop to disconnect.
RadioFeed
This program will stream the audio from your scanner to Broadcastify, Icecast and Shoutcast servers. I think you can create your own web server also.
I have not used this program as yet.
RadioFeed is available via the above link.
Summary
So, what is your experience with these three software packages? Is it great for you? What would you like to see changed in the software? How long have you been using it? Do you agree with our comments? Please leave your comments below.
Other Apps and Software
- Baofeng UV-17R Plus Series Review
 I recently got my hands on a new Baofeng UV-17R Plus Series radio. It didn’t take long at all to arrive and was not expensive at all. People these days pay more for a UHF CB radio than a radio that does all this can do. You can purchase it via this link: https://www.radioddity.com/products/baofeng-uv-17r-plus However,…
 - ChirpCHIRP is a free, open-source tool for programming your amateur radio. It supports a large number of manufacturers and models, as well as provides a way to interface with multiple data sources and formats. Supported Radios Supported radios can be found on their web site at https://chirp.danplanet.com/projects/chirp/wiki/Home. This list is updated as the software is…
- USB Device Error PL2303HXA
 I went into the device manager and found the error, my cable no longer worked. This same issue happened to a USB Card reader also.…
- Orion Push to Talk
 Orion is an app that isn’t really known in my world, perhaps because it isn’t available on all platforms, or because it does transmit your exact location to everyone on the channel. However there are some benefits to this mode and does add another communication mode to your list. You can also create your…
 - Repeater-START
 Repeater-START is a multi-platform app designed for ham radio and radio-operator enthusiasts who need fast access to repeater information. The app provides a detailed repeater map as well as a distance-sorted list, allowing users to easily locate nearby communication points wherever they travel. Because it uses open repeater databases, the information remains current, community-supported,…
 - Solar Data & Propagation
 There are several website that tell you what bands are open in your area. Most people paste them on their QRZ page, but there are some examples below that update every hour. You can see more on their webpage https://www.hamqsl.com/solar.html where all you have to do is paste the code and put on your…
 - WizNet DMR
 The WizNet DMR app is still in beta testing, and at the time of writing this, you have to not only have a currently have a licence as an Amateur Radio Operator, but approved to be part of the beta testing group. You can do this by googling the web site, submitt a few…
Android Apps
- Repeater-STARTRepeater-START is a multi-platform app designed for ham radio and radio-operator enthusiasts who need fast access to repeater information. The app provides a detailed repeater map as well as a distance-sorted list, allowing users to easily locate nearby communication points wherever they travel. Because it uses open repeater databases, the information remains current, community-supported, and…
- EchoLink CQ
 I’ve been using EchoLink well before smartphones where the only way I knew how to connect to a different station was via the radio. The internet wasn’t as extensive as it is now and you had to dial the node you wanted via the radio. You can still do this today but I don’t think…
 - Solar Data & PropagationThere are several website that tell you what bands are open in your area. Most people paste them on their QRZ page, but there are some examples below that update every hour. You can see more on their webpage https://www.hamqsl.com/solar.html where all you have to do is paste the code and put on your website.…
- DROID-Star
 After talking to a friend just to the north of me, he told me about the app DROID-Star for Android. As I only have apple devices, this wasn’t initially an option for me, however I do have an Android TV box which I use for Amateur Radio, so will review it from that device. At…
 - WizNet DMRThe WizNet DMR app is still in beta testing, and at the time of writing this, you have to not only have a currently have a licence as an Amateur Radio Operator, but approved to be part of the beta testing group. You can do this by googling the web site, submitt a few details,…
- Mini Keyboard Options
 I bought this wireless keyboard/mouse which was very cheap. It does not come with batteries, but come with a USB dongle. It has a fantastic range since it is 2.4GHz RF. The back also has good grip which apparently isn’t common on all models. You can select what colour you want the plastic to be also.…
 - Orion Push to TalkOrion is an app that isn’t really known in my world, perhaps because it isn’t available on all platforms, or because it does transmit your exact location to everyone on the channel. However there are some benefits to this mode and does add another communication mode to your list. You can also create your own…
- Using an Android TV Box for Ham Radio
 If you want to get onto Digital Radio for less (way less) than $100, then you may be interested in this. I have Apple equipment, and therefore miss out on a lot of the testing apps that are only available on Android. There seem to be more and more there all the time! I don’t…
Apple Apps
- EchoLink CQI’ve been using EchoLink well before smartphones where the only way I knew how to connect to a different station was via the radio. The internet wasn’t as extensive as it is now and you had to dial the node you wanted via the radio. You can still do this today but I don’t think…
- Iphone won’t download photos
 I get the “Device is unreachable” Error message when trying to import media from iPhone to Windows 10 PC. …
 - Orion Push to TalkOrion is an app that isn’t really known in my world, perhaps because it isn’t available on all platforms, or because it does transmit your exact location to everyone on the channel. However there are some benefits to this mode and does add another communication mode to your list. You can also create your own…
- Parks & Peaks App
 I’ve been using the Parks and Peaks app on iphone and ipad for a little while now and quite enjoyed it. There don’t seem to be many iphone apps compared to android, so when there is one, I usually have a look. This one caught my eye as it was not only free, but useful.…
 - Repeater-STARTRepeater-START is a multi-platform app designed for ham radio and radio-operator enthusiasts who need fast access to repeater information. The app provides a detailed repeater map as well as a distance-sorted list, allowing users to easily locate nearby communication points wherever they travel. Because it uses open repeater databases, the information remains current, community-supported, and…
- Solar Data & PropagationThere are several website that tell you what bands are open in your area. Most people paste them on their QRZ page, but there are some examples below that update every hour. You can see more on their webpage https://www.hamqsl.com/solar.html where all you have to do is paste the code and put on your website.…
