An unusual name, but a catchy name no less, just like Peanut that was written by the same person, David PA7LIM. If you like Peanut, then you will like this project also. This project, like Peanut, includes some amazing coding and thinking.
Launched in 2020, the main website for Treehouse is found off David’s web site. This project is a YSF reflector with multiple rooms.
Dashboard
You can see the dashboard via this link http://europelink.pa7lim.nl/ it is a remarkably similar layout to the Peanut one.
If you open the above dashboard, you will see down the left side in the Room Control section, a message stating your hotspot is not logged in to this reflector.

There are several ways you can connect, but here are a few in no particular order.
BlueDV
A friend of mine, Chris, put this video together. He uses BlueDV to get onto it.
YSF – via your hotspot
As I use an Openspot2, my instructions will show you how I do it, however I am sure you can apply similar to your hotspot should you have a different one.
First you need to connect to the YSF reflector called EUROPELINK, and according to the YSD reflector register, this has an ID number of 00007. If you don’t know how I found this, go to the YSF Reflector Registry page and type in EUROPELINK in the search box, and you can see the ID number of 0007.
Back to the Openspot2, I select Quick Setup, then I select DMR, as I am using a DMR radio, then select YSFReflector then in the Server box, I type in 00007 or EUROPELINK, to select that reflector. Doing this will connect my DMR radio to the YSF system.
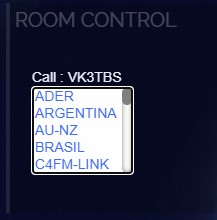
Almost instantly, the Room Control section of the dashboard has updated to my call sign and I now have a drop-down list where I can select which room I want to connect to. You can then select the room you want.
As you transmit, you will see your call in the Active QSO’s screen.
While this is not connected to the Peanut Dashboard, there will be rooms that go across to each other. The Online Stations section of the Dashboard has the time stations connected.
There is a new AU-NZ room which is good and was quickly made after it was requested to David. Some rooms link just to themselves, like the English room and so on, while others connect beyond the internet. Remember this reflector will get busier as time goes on.
Also, this setup is still very new, and like Peanut, it took a little while to become popular. Having said that, Peanut took off quickly and given the success of that, and a lot of people at home during the 2020 Pandemic, I believe this will take off quickly also.
Hope you enjoyed this post. Please remember to follow this blog by putting in your email address so you get posts as soon as they are posted.
Want to see other projects that are similar?
Here are some other posts we have done that are similar:
- CW Skimmer
 CW Skimmer is a popular amateur radio software program used for decoding Morse code signals on the HF bands. The program is widely used by ham radio operators, DX chasers,…
 - ADIF Master
 ADIF Master is a popular amateur radio logging software tool used for editing and managing ADIF log files. ADIF stands for Amateur Data Interchange Format, which is the worldwide standard…
 - 15 Metre band
 The 15 metre band is one of the most popular HF amateur radio bands for long-distance communication, offering an excellent balance between reliability and worldwide reach. Frequency Range The standard…
 - Maximum Usable Frequency (MUF) in HF Radio Propagation
 Maximum Usable Frequency (MUF) is an important concept in HF radio propagation and amateur radio communications. It refers to the highest frequency that can be used for reliable communication between…
 - World Amateur Radio Day
 World Amateur Radio Day is celebrated every year on April 18, marking the founding of the International Amateur Radio Union (IARU) in 1925. The organisation was established in Paris when…
 - Amateur TV
 Amateur Radio Television (ATV), often called “ham TV,” is a niche part of amateur television where licensed radio operators transmit live video and audio over radio frequencies instead of traditional…
 - Baofeng UV-5R Mini
 The Baofeng UV-5R Mini handheld radio is a popular and affordable dual-band amateur radio transceiver widely used by beginners and experienced ham radio operators. Designed as a compact version of…
 - Lightning Storm & HF Radio
 HF radio and lightning storms are closely connected because lightning creates strong radio frequency interference that affects HF radio communication (3–30 MHz). High Frequency radio is commonly used for amateur…
 - OpenHamClock
 OpenHamClock is an open-source amateur radio dashboard designed as a modern successor to the original HamClock used by radio amateurs worldwide. It provides a real-time visual display of essential ham…
 - What is an Antenna Coupler
 An antenna coupler (also called an antenna tuner or matching network) is a device used in radio systems to ensure impedance matching between a transmitter and an antenna. Most transmitters…
 - Antennas
 Amateur radio operators use many different antenna types, each designed for specific bands, space limits, and operating goals. Here’s a clear overview of the most common ones and why hams…
 - Dipole Antenna for Portable Use – Make your own!
 A dipole antenna is a basic radio antenna made of two conductive elements fed at the center. It is typically a half-wavelength long and is widely used as a reference…