
Updating the firmware on the GD-77 can be daunting, as you can easily “brick” your radio. So be extremely careful.
Make sure you understand why you are updating your firmware first. Since there is the option of “Bricking” your radio, and I only have the one digital radio, I decided not to update the firmware unless I had the need and then was sure it was a stable version. Remember, don’t fix something that isn’t broken. Once it is broken, you can’t fix it if it becomes a brick.
At the time of writing this, I was told version 3.1.8 was the latest most stable version. Clearly this will change, so do your own current research. So the first step is to download that version, and the software to download it onto the radio.
Download latest firmware updater software from https://www.radioddity.com/pages/radioddity-download and save it on your PC.
Then after extracting the downloaded file, go into the Update Software folder and into the English folder and run the Update.exe file.
Browse to find the firmware you have chosen to download to the radio. It will be a .sgl file.
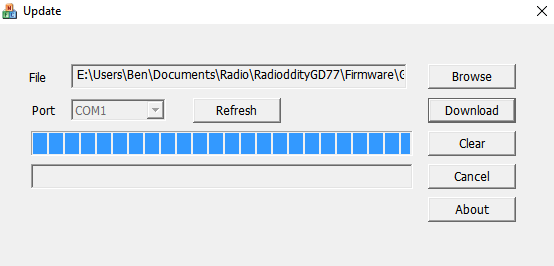
Then, plug in the radio via the USB cable and before turning on the radio, press both buttons at the same time bellow the PTT button, then turn radio on. Only the green light should turn on with a blank display.
Make sure you have selected the correct port on the update software. Then press download to update the firmware on the radio.
Once download has completed, turn radio off, disconnect and turn it back on to check it works.
You might want to updated to the OpenGD-77 firware though. I show you how to do that here.
Other Reads
Here are some other posts I have done on a similar topic
- Radioddity GD77
 After using this radio for years, this is my summary…
 - GD-77 Won’t connect to PC
 I have been using my Radioddity now for some years…
 - SMS via Radio or Hotspot
 One of the most underutilised by very cool feature that…
 - Portable Hot Stop with Battery Pack
 The new OpenSpot3 has come out with an internal battery.…
 - BlueDV Windows 10 GD-77
 I found it hard to find useful information on how to run the OpenGD-77 hotpot mode with Windows 10. At the time of writing this, there is a lot about this topic using a pistar and even android or ISO, but not much with Windows 10. This is my experence with BlueDV and Open GD-77 using a Windows 10 PC.…
 - Upgrade to OpenGD77
 This page is just a help to friends I have spoke to who are interested in upgrading the Radioditty GD-77 to the OpenGD77 software. This is not my work, however I really do appreciate Roger and his team have done to put this together. I claim no responsibility if it breaks your radio, however I have not hear this happen now in some time. I am not an expert at all with OpenGD77, I have just put this together to help people who have asked me how to do it.…
 - The Radio Box
 How do you stop a hand held radio from falling…
 - Updating GD-77 Firmware
 Updating the firmware on the GD-77 can be daunting, as…
 - My Radio Diddity GD-77
 Starting in digital can be a little overwhelming to start with, no matter how many years you have had your licence.…
