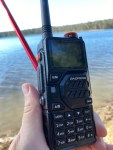
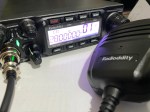
I have been using my Radioddity now for some years and love it. Though upgrading this to the OpenGD77 opened a whole new world and it gets better all the time.
One issue I had for a period was not being able to connect to it via my PC. For some time, it worked, then it stopped. It was most frustrating as I could not run the radio as a local repeater anymore. I almost never update the codeplug now and update the firmware every few weeks, but I could not do any of this without my PC connection.
After checking I had the latest community programming software, I was stumped.

Roger, who is behind all the programming of this radio and who lives nearby, kindly gave me some advice over email. He suggested it was a Com-Port issue. And he was correct. So, I have put this together to help others who may have the same problem as I did.
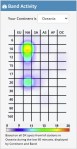
From windows 10, type in the search box Device Manager. Then you will get a box like the following.
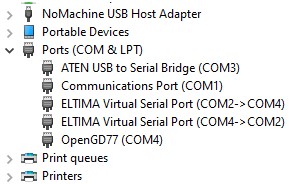
If you expand out the Ports section, you can see the issue I had straight away, I had the OpenGD77 on com port 4, and an Eltima Virtual Serial Port on com port 2-4 also.
I disabled the Eltima com ports listed by right clicking on them and nothing seemed to stop working, so then I uninstalled them both. And straight away the com port worked through to the radio like it used to.
Great to have my GD77 back in action! Hopefully this has helped you, if it has, please let me know.
There are some more interesting reads below that you may enjoy also.
- CW Skimmer
 CW Skimmer is a popular amateur radio software program used for decoding Morse code signals on the HF bands. The program is widely used by ham…
 - ADIF Master
 ADIF Master is a popular amateur radio logging software tool used for editing and managing ADIF log files. ADIF stands for Amateur Data Interchange Format, which…
 - OpenHamClock
 OpenHamClock is an open-source amateur radio dashboard designed as a modern successor to the original HamClock used by radio amateurs worldwide. It provides a real-time visual…
 - HamClock
 HamClock has always fascinated me, as it seems such an amazing program specifically set up for Amateur Radio. I have seen countless videos on it but…
 - NanoVNA H4 USB Control to PC
 If you haven’t seen my previous blog on the NanoVNA Analyser, then I suggest you look at that first before reading this blog. This one will…
 - Flrig
 Flrig is a transceiver control program designed to be used either stand alone or as an adjunct to fldigi (see my review on this). The supported…
 - VARA – VARAC
 Ever heard this sound on HF / VHF / UHF? I know I have more and more recently. After a bit of research, someone told me…
 - EchoLink CQ
 I’ve been using EchoLink well before smartphones where the only way I knew how to connect to a different station was via the radio. The internet…
 - NetTime
 When using digital over the radio, it is particularly important you have the correct time. Even a second out will stop you from making contacts. I…
 - GD-77 Won’t connect to PC
 I have been using my Radioddity now for some years and love it. Though upgrading this to the OpenGD77 opened a whole new world and it…
 - DudeStar
 Here is a free windows program that will connect your PC to: DMR Yaesu Fusion DStar M17 P25 NXDN You can do all this without needing…
 - Welle.io
 Welle.io is a DAB and DAB+ software defined radio (SDR). It runs on Windows, Linux and embedded devices like the Raspberry Pi 2 and 3. You…
 - Treehouse
 An unusual name, but a catchy name no less, just like Peanut that was written by the same person, David PA7LIM. If you like Peanut, then you will like this project also. This project, like Peanut, includes some amazing coding and thinking.…
 - Software Defined Radio (SDR)
 If you don’t have one of the latest and greatest expensive scanners, you will struggle to listen to a lot of transmissions. While there is still…
 - BlueDV Windows 10 GD-77
 I found it hard to find useful information on how to run the OpenGD-77 hotpot mode with Windows 10. At the time of writing this, there is a lot about this topic using a pistar and even android or ISO, but not much with Windows 10. This is my experence with BlueDV and Open GD-77 using a Windows 10 PC.…
 - Iphone won’t download photos
 I get the “Device is unreachable” Error message when trying to import media from iPhone to Windows 10 PC. …
 - ProScan and ProScan Client Update
 I recently started using ProScan after years of using FreeScan. I have always enjoyed using FreeScan as it is easy to setup, I can download outputs from the software, and the main reason “it works”. However ProScan seems to be more graphical and has different features also.…
 - ProScan and ProScan ClientI recently started using ProScan after years of using FreeScan. I have always enjoyed using FreeScan as it is easy to setup, I can download outputs from the software, and the main reason “it works”. However ProScan seems to be more graphical and has different features also.…
- USB Device Error PL2303HXA
 I went into the device manager and found the error, my cable no longer worked. This same issue happened to a USB Card reader also.…
- DMR Explained
 With digital radio changing so quickly, below is a bit of an update in regards to DMR radio networks. DMR stands for Digital Mobile Radio and is…
 - RH1 Radio Cup Holder
 Why does a radio need a cup holder? I agree it’s a bit odd. But this isn’t a product that involves a cup. Rather it uses a…
 - Radioddity RA-UV712 Magnet Mount Antenna
 There are lots of duel band antennas available, but most required extra mounting brackets. These brackets often restrict you as to where you can mount the antenna…
 - Radioddity GD77After using this radio for years, this is my summary on how I find it. While I want to replace it to a base station that puts…
- GD-77 Won’t connect to PCI have been using my Radioddity now for some years and love it. Though upgrading this to the OpenGD77 opened a whole new world and it gets…
- SMS via Radio or Hotspot
 One of the most underutilised by very cool feature that comes with some digital networks is the ability to send and receive SMS messages. You can send…
 - Portable Hot Stop with Battery Pack
 The new OpenSpot3 has come out with an internal battery. You might ask why? Well there is two common issues that is mostly raised with almost all…
 - BlueDV Windows 10 GD-77I found it hard to find useful information on how to run the OpenGD-77 hotpot mode with Windows 10. At the time of writing this, there is a lot about this topic using a pistar and even android or ISO, but not much with Windows 10. This is my experence with BlueDV and Open GD-77 using a Windows 10 PC.…
- Upgrade to OpenGD77
 This page is just a help to friends I have spoke to who are interested in upgrading the Radioditty GD-77 to the OpenGD77 software. This is not my work, however I really do appreciate Roger and his team have done to put this together. I claim no responsibility if it breaks your radio, however I have not hear this happen now in some time. I am not an expert at all with OpenGD77, I have just put this together to help people who have asked me how to do it.…
 - The Radio Box
 How do you stop a hand held radio from falling and being damaged? Do you sometimes put the radio down on a bench or desk between overs…
 - Updating GD-77 Firmware
 Updating the firmware on the GD-77 can be daunting, as you can easily “brick” your radio. So be extremely careful. Make sure you understand why you are…
 - My Radio Diddity GD-77
 Starting in digital can be a little overwhelming to start with, no matter how many years you have had your licence.…