There are lots of duel band antennas available, but most required extra mounting brackets. These brackets often restrict you as to where you can mount the antenna on your car.
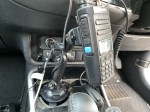
One of my first mobile antennas for the car was a magnet mount antenna. I used it on the family car before I even had a driver’s license. I could mount it right in the centre of the roof, giving me excellent reflection from the car.
It was also easy to remove when I wasn’t in the car, or if we had to park the car in a low garage.

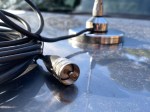
The dual band antenna is easy to put together on the magnetic base, and heavy-duty cable with PL-259 connector.
It comes with a very strong magnetic base that measures 91mm /3.6’’ across. After using it on the car, I doubt any wind or speed will blow it off the car like my older smaller magnet base antennas.
See our video for more information:
Purchasing Tips
If you go via this link, and search for your item, you will get a discount:
https://radioddity.refr.cc/bensangster
A direct link to this antenna is available here: https://www.radioddity.com/products/radioddity-ra-uv712-antenna-kithttps://www.radioddity.com/products/radioddity-ra-uv712-antenna-kit
Other option
While this antenna comes in silver with a PL259 plug, the other option is a black antenna with a SMA plug. That is the RA-UV713 available here https://www.radioddity.com/products/radioddity-ra-uv713-antenna-kithttps://www.radioddity.com/products/radioddity-ra-uv713-antenna-kit
Other Reads
- 15 Metre band
 The 15 metre band is one of the most popular HF amateur radio bands for long-distance communication, offering an excellent balance between reliability and worldwide reach. Frequency Range The standard frequency…
 - AOR AR1000XLT Fix
 The AOR AR1000XLT is a popular wideband scanner receiver that became well known among radio enthusiasts, amateur radio operators, aviation listeners, and shortwave hobbyists during the late 1980s and early 1990s.…
 - Maximum Usable Frequency (MUF) in HF Radio Propagation
 Maximum Usable Frequency (MUF) is an important concept in HF radio propagation and amateur radio communications. It refers to the highest frequency that can be used for reliable communication between two…
 - World Amateur Radio Day
 World Amateur Radio Day is celebrated every year on April 18, marking the founding of the International Amateur Radio Union (IARU) in 1925. The organisation was established in Paris when amateur…
 - Amateur TV
 Amateur Radio Television (ATV), often called “ham TV,” is a niche part of amateur television where licensed radio operators transmit live video and audio over radio frequencies instead of traditional broadcast…
 - Baofeng UV-5R Mini
 The Baofeng UV-5R Mini handheld radio is a popular and affordable dual-band amateur radio transceiver widely used by beginners and experienced ham radio operators. Designed as a compact version of the…
 - Lightning Storm & HF Radio
 HF radio and lightning storms are closely connected because lightning creates strong radio frequency interference that affects HF radio communication (3–30 MHz). High Frequency radio is commonly used for amateur radio…
 - OpenHamClock
 OpenHamClock is an open-source amateur radio dashboard designed as a modern successor to the original HamClock used by radio amateurs worldwide. It provides a real-time visual display of essential ham radio…
 - Radtel P8 PoC radio
 The Radtel P8 PoC radio is a Push-to-Talk over Cellular (PoC) device that looks like a traditional walkie-talkie but communicates using 4G/LTE mobile networks instead of UHF/VHF radio frequencies. This means…
 - What is an Antenna Coupler
 An antenna coupler (also called an antenna tuner or matching network) is a device used in radio systems to ensure impedance matching between a transmitter and an antenna. Most transmitters are…
 - Antennas
 Amateur radio operators use many different antenna types, each designed for specific bands, space limits, and operating goals. Here’s a clear overview of the most common ones and why hams choose…
 - Dipole Antenna for Portable Use – Make your own!
 A dipole antenna is a basic radio antenna made of two conductive elements fed at the center. It is typically a half-wavelength long and is widely used as a reference antenna…
 - Interference
 Interference in Amateur Radio refers to unwanted signals that disrupt radio communication. This interference can reduce signal clarity, make contacts difficult, or completely block communication between amateur radio operators. Radio Frequency…
 - 6m and TV Channel 0
 Prior to 1989, it was illegal to operate between 50 MHz and 52 MHz in Australia. It was a real pain as that was where all the action was when the…
 - Dipole Antennas Vs Long Wire Antennas
 I’ve heard a lot about dipole antennas, and I’ve heard a lot about long wire antennas also. I would say I’ve seen more dipoles than long wire antennas. So why is…
 - Repeater-START
 Repeater-START is a multi-platform app designed for ham radio and radio-operator enthusiasts who need fast access to repeater information. The app provides a detailed repeater map as well as a distance-sorted…