CW Skimmer is a popular amateur radio software program used for decoding Morse code signals on the HF bands. The program is widely used by ham radio operators, DX chasers, and contest stations because it can monitor and decode many CW signals at the same time. Unlike traditional Morse code listening, CW Skimmer displays signals visually on a waterfall screen and automatically shows callsigns as they appear on the band.

The software works especially well with SDR radios and modern HF transceivers. Many amateur radio operators connect CW Skimmer to radios such as the Icom IC-7300, IC-7610, FlexRadio systems, SDRplay receivers, and RTL-SDR dongles. When connected to a software defined radio, CW Skimmer can monitor a large section of the amateur radio band and decode multiple Morse code transmissions simultaneously.
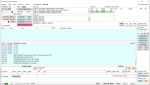
One of the main features of CW Skimmer is its real-time waterfall display. Signals appear as visible traces on the screen, allowing operators to quickly find active stations. Users can click directly on a signal to tune their radio to that frequency. This makes CW contesting and DX hunting much faster and easier compared to manually tuning across the band.
CW Skimmer also includes advanced DSP filtering and automatic Morse code decoding technology. The program can identify callsigns, display signal strength, filter background noise, and improve weak signal readability. Many operators use the software together with amateur radio logging programs and DX cluster networks to track stations around the world.
The program is well known for its connection to the Reverse Beacon Network. Thousands of CW signals are automatically uploaded by monitoring stations using CW Skimmer. This allows amateur radio operators to instantly check where their signal is being heard and how strong it is on different HF bands around the world.
CW Skimmer is especially popular during major amateur radio contests because it helps operators quickly identify CQ stations and multipliers. Contest stations often use the software to improve band awareness and increase operating efficiency during events such as CQ World Wide DX Contest and ARRL contests.
CW Skimmer is commercial Windows software created by amateur radio operator Alex Shovkoplyas VE3NEA. A free trial version is available, and the program remains one of the most widely used Morse code decoder applications in amateur radio today.
I have made contact with Alex a few times, and he was very responsive. I have done a short video below showing how I went installing it and using it. The website is at https://dxatlas.com/cwskimmer/
While at this website, you can see a lot of other programs he has written, most are free.
If you have enjoyed this read, here are a few more you may enjoy:
- ADIF Master
 ADIF Master is a popular amateur radio logging software tool used for editing and managing ADIF log files. ADIF stands for Amateur Data Interchange Format, which is the worldwide standard used by ham radio operators to share QSO log information between different logging programs and online logbook services.…
 - BlueDV Windows 10 GD-77
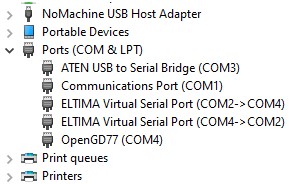
 I found it hard to find useful information on how to run the OpenGD-77 hotpot mode with Windows 10. At the time of writing this, there is a lot about this topic using a pistar and even android or ISO, but not much with Windows 10. This is my experence with BlueDV and Open GD-77 using a Windows 10 PC.…
 - CW Skimmer
 CW Skimmer is a popular amateur radio software program used for decoding Morse code signals on the HF bands. The program is widely used by ham radio operators, DX chasers, and contest stations because it can monitor and decode many CW signals at the same time. Unlike traditional…
 - DudeStar
 Here is a free windows program that will connect your PC to: DMR Yaesu Fusion DStar M17 P25 NXDN You can do all this without needing to purchase a radio. I prefer to use a radio, however I thought I would put this review together to help others…
 - EchoLink CQ
 I’ve been using EchoLink well before smartphones where the only way I knew how to connect to a different station was via the radio. The internet wasn’t as extensive as it is now and you had to dial the node you wanted via the radio. You can still…
 - Flrig
 Flrig is a transceiver control program designed to be used either stand alone or as an adjunct to fldigi (see my review on this). The supported transceivers all have some degree of CAT. The flrig user interface changes to accommodate the degree of CAT support available for the…
 - GD-77 Won’t connect to PC
 I have been using my Radioddity now for some years and love it. Though upgrading this to the OpenGD77 opened a whole new world and it gets better all the time. One issue I had for a period was not being able to connect to it via my…
 - HamClock
 HamClock has always fascinated me, as it seems such an amazing program specifically set up for Amateur Radio. I have seen countless videos on it but the draw back was always needing to have a Raspberry Pi. While I am not afraid to get one, and learn how…
 - Iphone won’t download photos
 I get the “Device is unreachable” Error message when trying to import media from iPhone to Windows 10 PC. …
 - NanoVNA H4 USB Control to PC
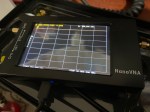
 If you haven’t seen my previous blog on the NanoVNA Analyser, then I suggest you look at that first before reading this blog. This one will talk about how to connect your NanoVNA to your PC via the USB cable, so I am assuming you know the basics…