A dipole antenna is a basic radio antenna made of two conductive elements fed at the center. It is typically a half-wavelength long and is widely used as a reference antenna in antenna theory and practice.
Dipole antennas work by converting alternating current into electromagnetic waves. Their radiation pattern is strongest perpendicular to the antenna and weakest along its axis, forming a donut-shaped pattern in three dimensions.
The orientation of a dipole antenna determines its polarization. A horizontal dipole produces horizontally polarized waves, while a vertical dipole produces vertically polarized waves. Matching polarization improves signal strength.
A half-wave dipole has an impedance of about 73 ohms in free space, which closely matches common coaxial cables. Proper impedance matching improves efficiency and reduces signal reflections.
When a dipole is installed close to the ground, near objects, or in an inverted-V shape, its impedance naturally drops from ~73 ohms toward 50 ohms. Many real-world dipoles end up near 50 ohms without extra components.
A folded dipole has about 300 ohms impedance, but using a 4:1 balun converts it to 75 ohms, and further matching can bring it to 50 ohms if needed.
Common types include half-wave, folded, short, and inverted-V dipoles. Dipole antennas are used in FM radio, television, amateur radio, and as components of directional antenna arrays.
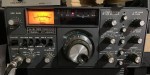
My Antenna
Below is the antenna I made and tested. This video will show you how I did it, and why. I share some tips I learned along the way. But I would also value your thoughts.
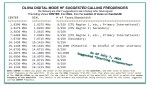
The app I used to get the measurements from is this one:
CW Skimmer is a popular amateur radio software program used for decoding Morse code signals on the HF bands. The program is widely used by ham radio operators, DX chasers, and contest stations because it can monitor and decode many CW signals at the same time.…
ADIF Master is a popular amateur radio logging software tool used for editing and managing ADIF log files. ADIF stands for Amateur Data Interchange Format, which is the worldwide standard used by ham radio operators to share QSO log information between different logging programs and online…
The 15 metre band is one of the most popular HF amateur radio bands for long-distance communication, offering an excellent balance between reliability and worldwide reach. Frequency Range The standard frequency range for the 15m band is 21.000 MHz to 21.450 MHz. Within this range, different…
The AOR AR1000XLT is a popular wideband scanner receiver that became well known among radio enthusiasts, amateur radio operators, aviation listeners, and shortwave hobbyists during the late 1980s and early 1990s. The scanner was designed to receive a massive range of radio frequencies, making it one…
Maximum Usable Frequency (MUF) is an important concept in HF radio propagation and amateur radio communications. It refers to the highest frequency that can be used for reliable communication between two locations by reflecting off the ionosphere. If a radio signal is transmitted above the MUF,…
World Amateur Radio Day is celebrated every year on April 18, marking the founding of the International Amateur Radio Union (IARU) in 1925. The organisation was established in Paris when amateur radio societies from around the world joined together to represent radio operators and protect access…
Amateur Radio Television (ATV), often called “ham TV,” is a niche part of amateur television where licensed radio operators transmit live video and audio over radio frequencies instead of traditional broadcast networks. It is essentially an extension of amateur (ham) radio, using higher bandwidth signals to…
The Baofeng UV-5R Mini handheld radio is a popular and affordable dual-band amateur radio transceiver widely used by beginners and experienced ham radio operators. Designed as a compact version of the original UV-5R, this small and lightweight VHF/UHF walkie talkie offers solid performance for everyday communication,…
Prior to 1989, it was illegal to operate between 50 MHz and 52 MHz in Australia. It was a real pain as that was where all the action was when the band opened up.
My original 6m radio – still works today
However, after many requests from the WIA to the DoTC back in 1989, it was agreed that this section of the 6m band could be used with some minor amendments.
VK5, VK6, VK8, VK9 & VK0
It was decided VK5, VK6, VK8, VK9 & VK0 stations may operate anywhere between 50 – 52 MHz provided there was no interference caused to the reception of Channel 0 transmissions up to a maximum of 400 watts.
VK2, VK3, VK4 & VK7 (eastern states)
Stations located in VK2, VK3, VK4 & VK7 are permitted to operate provided there was no interference caused to the reception of Channel 0 in the sub-band 50.05 – 50.20 MHz provided they are:
120 km from Channel 0 main television stations
60 km from Channel 0 translator stations
60 km from translator stations with Channel 0 inputs, and
They must only use emission modes of CW and SSB with a maximum of 100 watts.
VK1 ACT
Stations in VK1 can do the same as other eastern states but without the distance restrictions.
Today
Well that was back in 1989, today TV is all digital and the band is less restrictive now.
A short time ago I happened to make contact with Japan on 6m and also happened to be recording as well. You can watch the whole thing here:
I personally love 6m and the challenge of it. It works well locally and well when the band is open. But it can close suddenly without notice. Sometimes I’ve spoken long distances and either has received no signal strength at all, but a full S5 copy.
I also enjoy adjusting between vertical and horizontal polarisation.
If you enjoyed this read, please take the time to like and follow this blog. Or let me know what you think of 6m from where you are in the comments below.
If you enjoyed this read, here are some others you may enjoy.
CW Skimmer is a popular amateur radio software program used for decoding Morse code signals on the HF bands. The program is widely used by ham radio operators, DX chasers, and contest stations because…
ADIF Master is a popular amateur radio logging software tool used for editing and managing ADIF log files. ADIF stands for Amateur Data Interchange Format, which is the worldwide standard used by ham radio…
The 15 metre band is one of the most popular HF amateur radio bands for long-distance communication, offering an excellent balance between reliability and worldwide reach. Frequency Range The standard frequency range for the…
The AOR AR1000XLT is a popular wideband scanner receiver that became well known among radio enthusiasts, amateur radio operators, aviation listeners, and shortwave hobbyists during the late 1980s and early 1990s. The scanner was…
Maximum Usable Frequency (MUF) is an important concept in HF radio propagation and amateur radio communications. It refers to the highest frequency that can be used for reliable communication between two locations by reflecting…
World Amateur Radio Day is celebrated every year on April 18, marking the founding of the International Amateur Radio Union (IARU) in 1925. The organisation was established in Paris when amateur radio societies from…
Amateur Radio Television (ATV), often called “ham TV,” is a niche part of amateur television where licensed radio operators transmit live video and audio over radio frequencies instead of traditional broadcast networks. It is…
The Baofeng UV-5R Mini handheld radio is a popular and affordable dual-band amateur radio transceiver widely used by beginners and experienced ham radio operators. Designed as a compact version of the original UV-5R, this…
I’ve heard a lot about dipole antennas, and I’ve heard a lot about long wire antennas also. I would say I’ve seen more dipoles than long wire antennas. So why is that? What is the difference between them? Which is better? If one is a clear winner, why does anyone build the other?
A dipole antenna is one of the simplest and most widely used antenna types. It consists of two equal-length conductive elements, each about a quarter wavelength long, making the total length approximately half a wavelength. The antenna is center-fed, meaning the feedline connects at the midpoint, where the impedance is around 73 ohms, allowing for easy matching with standard coaxial cables.
The radiation pattern of a dipole is broadside to the antenna, producing a figure-eight pattern in the horizontal plane. This means it radiates most strongly in directions perpendicular to the wire. The dipole provides a predictable, efficient, and balanced pattern, making it ideal for both HF and VHF communication systems where simplicity and reliability are important.
A long wire antenna, on the other hand, is a single conductive wire that is much longer than half a wavelength—often several wavelengths long. It is typically end-fed, with one end connected to the transmitter through an antenna tuner or matching network because the impedance is very high, often several hundred to several thousand ohms.
As the wire length increases, the radiation pattern of the long wire antenna becomes more directional and complex, forming multiple lobes with maximum radiation along the wire’s axis. This makes it useful for long-distance (DX)communication and applications where directional gain is advantageous.
In summary, the dipole antenna is a balanced, center-fed, half-wavelength antenna with a simple broadside pattern, while the long wire antenna is an unbalanced, end-fed, multi-wavelength antenna with a directional, multi-lobed pattern. Dipoles are preferred for efficient single-band operation, whereas long wire antennas are favored for multi-banduse and HF communications when space permits long installations.
So what is your experience with these antennas? Which one do you prefer and why? Have you made your own or have you bought it? Please leave your comments below.
If you enjoyed this read, see below for more interesting information:
On the 10-metre band, 28.490 is the unofficial calling frequency for Australia and New Zealand. This is interesting as the Band plans state it is 28.390 as the recommended intra-VK calling frequency.
That said, 28.490 is more recognised as the unofficial calling frequency down under.
Most amateurs down under will listen to 28.490 on ten metres and put out a call there, but then QSY to another frequency 10 or 20 kHz away either after making contact, or before contacting another station by announcing where you plan to go.
The 15 metre band is one of the most popular HF amateur radio bands for long-distance communication, offering an excellent balance between reliability and worldwide reach.
Frequency Range
The standard frequency range for the 15m band is 21.000 MHz to 21.450 MHz. Within this range, different segments are commonly used for specific modes: CW (Morse code), digital modes like FT8 cluster around 21.074 MHz, and SSB voice communications are usually active above 21.150 MHz. These frequency allocations make it easy for operators to find activity depending on their preferred operating mode. Check your area as this is Australia settings.
Set Frequencies
On the lower end of the band, CW (Morse code) activity is concentrated but they can be anywhere within the band.
For digital modes, there are a few very well-known frequencies. The most popular is 21.074 MHz, which is the standard calling frequency for FT8, one of the most widely used weak-signal digital modes. Just above that, around 21.090–21.100 MHz, you’ll find modes like FT4, PSK31, and other digital activity depending on band conditions and operator preference.
In the upper portion of the band, SSB voice communications dominate. A widely recognised DX calling frequency is 21.300 MHz, where stations often call CQ looking for international contacts. General SSB ragchewing and contesting typically take place between 21.150 and 21.450 MHz, with activity spreading out depending on how busy the band is.
There are also a few special-purpose or informal gathering spots. For example, 21.360 MHz is sometimes used by international nets, and various maritime or traveller nets may appear in the upper SSB segment. During contests, however, these informal frequencies can become very busy or shift as operators spread across the band.
Overall, these set frequencies on 15 metres act like meeting points:
21.000–21.450 MHz → CW DX activity
21.074 MHz → FT8 digital frequency
21.070 – 21.150 MHz → other digital modes
21.300 MHz → SSB DX calling frequency
21.150–21.450 MHz → general SSB voice
Knowing these frequencies helps you quickly find activity and understand what to expect when tuning across the 15m band.
Ionosphere
The 15 metre band works primarily through ionospheric propagation, specifically via the F layer of the ionosphere. Signals transmitted on 21 MHz travel upward and are refracted back to Earth, allowing DX (long-distance communication) over thousands of kilometres. This band is highly dependent on solar activity, especially the sunspot cycle. During periods of high solar activity, the maximum usable frequency (MUF) increases, allowing 15m signals to propagate globally with strong signals. During low solar activity, the band can appear quiet or “closed,” especially for long-distance paths.
What can you expect
Operators can expect fast-changing propagation conditions on 15 metres. When the band is open, signals are often strong, with low noise compared to lower HF bands like 40m or 80m. This makes it ideal for DX contacts, contesting, and digital modes. However, when the band is closed, there may be little to no activity except for occasional short skip (regional contacts) or sporadic openings. Unlike lower bands, 15m does not usually support reliable nighttime propagation, as the ionosphere loses its ability to refract higher frequencies after sunset.
Antennas
Common 15 metre antennas include dipole antennas, vertical antennas, and directional beam antennas (Yagi). A simple half-wave dipole for 15m is about 7 metres long (total length), making it relatively compact and easy to install. Vertical antennas are popular for low-angle radiation, which is ideal for long-distance DX. More advanced operators often use Yagi beams mounted on towers, which provide gain and directionality, significantly improving performance on this band.
Performance
The interaction with ionospheric layers is key to understanding 15m performance. The F1 and F2 layers are responsible for most long-distance propagation, particularly during the daytime. The D layer, which forms during daylight hours, can absorb lower-frequency signals but has less effect on 15m, helping keep noise levels lower. Occasionally, sporadic E propagation can also open the band, especially in summer, allowing unexpected medium-distance contacts even when the F layer is weak.
Band opens
The 15 metre band is generally open during daylight hours, especially from mid-morning to late afternoon. Peak performance often occurs around local noon, when the ionosphere is most ionised. Openings are more frequent during solar maximum years, and less reliable during solar minimum. The band typically closes after sunset, although limited openings can sometimes occur around greyline (sunrise and sunset), offering unique DX opportunities.
Overall, the 15 metre amateur radio band is valued for its strong DX capability, low noise levels, and relatively small antenna size requirements. It is an excellent band for both beginners and experienced operators who want to explore worldwide HF communication, especially during favourable solar conditions.
160 meters band is known as the “Gentlemen’s band”. It is right next to the AM commercial band, known as medium wave.
The 160-meter band is the radio frequencies between 1.8 and 2 MHz. For many decades it was the lowest radio frequency band allocated for use by amateur radio, before the 630 and 2200 meter bands were introduced.
Amateur operators often refer to the 160 meters as the Top Band because it was for some time.
The 160-meter band is the oldest amateur band. Antennas are usually huge in size due to the wavelength at this frequency, making the higher bands a lot easier to get into given they have shorter wavelengths, requiring smaller antennas. Small antennas lead to less space required and less cost.
During the day propagation is limited to local contacts, but long distance contacts are possible at night, especially around sunrise and sunset.
How it started for me
The hobby started for me on Medium Wave, where I was shocked to receive long distance AM radio signals from interstate radio stations. The distances were huge, across countries if I was in Europe. As a kid I loved listening to interstate radio and sometimes phoned them to let them know. They were shocked I could hear them and often mentioned me by name soon after my phone call.
My Antenna’s
I’ve tried several antennas on this band. They include:
A horizontal dipole antenna. This worked really well though it was huge. The problem I had with this antenna was most people in my area use vertical antennas so they couldn’t hear me well.
A horizontal long wire antenna. This antenna was also huge, and also not vertical. So it worked well for close contacts, but not as good if I tried to contact a few suburbs away.
An inverted L antenna. This worked the best as my local contacts used vertical antennas. I tried to get the vertical part as high and as long as I could before doing that horizontal part. Given the length of the wire needed, most of the wire was still horizontal, but at least the first but was vertical. Though the secret to this antenna was the ground wires. I started with two of them and ran one around the house about 2 feet from the ground. The other was around the fence. I will put at least two more out which should also help improve things.
Summary
Getting on 160m was a bit of a challenge due to the wavelength. I could be heard on SSB, but AM was the biggest challenge. With AM, my radios would put out less watts so I had to rely more on my antenna.
Below is a small video of my 160m antenna and how I made the inverted L. With amateur radio, there will always be improvements and I am sure this setup isn’t the best, but it is a start and I learned what I could from the other amateurs who had already mastered this band.
Below is an extended video which goes into a bit more detail of how and why I did what I did. I adjusted all my HF antennas to make this 160m antenna work while not upsetting any of the other bands.
As I mentioned in both videos, I am not a professional, but an amateur radio operator and as keen to learn as anyone else. If you have any thoughts on this, I would value them in the comments below. It will not only help me, but others reading this. So don’t forget to have a look at what others have to say.
160m Coffee Break Net
Each weekday in Melbourne, there is a 160m Coffee Break Net. This net is a bit of a challenge to get onto because you must:
Have a full licence
Have a vertical antenna (which is the biggest challenge for 160m)
Have a radio that does AM, and puts a few watts out
As you can see above, I was able to make a 160m vertical antenna, so once I got this working, I was on the air! Many people try their dipole antenna, as did I at first, but on AM, it just doesn’t go far, and since everyone on the net is vertically polarised, they couldn’t hear me. I saw this as a challenge, and one worth trying.
Prior to 1989, it was illegal to operate between 50 MHz and 52 MHz in Australia. It was a real pain as that was where all the action was when the band opened up.
My original 6m radio – still works today
However, after many requests from the WIA to the DoTC back in 1989, it was agreed that this section of the 6m band could be used with some minor amendments.
VK5, VK6, VK8, VK9 & VK0
It was decided VK5, VK6, VK8, VK9 & VK0 stations may operate anywhere between 50 – 52 MHz provided there was no interference caused to the reception of Channel 0 transmissions up to a maximum of 400 watts.
VK2, VK3, VK4 & VK7 (eastern states)
Stations located in VK2, VK3, VK4 & VK7 are permitted to operate provided there was no interference caused to the reception of Channel 0 in the sub-band 50.05 – 50.20 MHz provided they are:
120 km from Channel 0 main television stations
60 km from Channel 0 translator stations
60 km from translator stations with Channel 0 inputs, and
They must only use emission modes of CW and SSB with a maximum of 100 watts.
VK1 ACT
Stations in VK1 can do the same as other eastern states but without the distance restrictions.
Today
Well that was back in 1989, today TV is all digital and the band is less restrictive now.
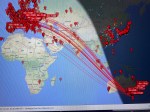
A short time ago I happened to make contact with Japan on 6m and also happened to be recording as well. You can watch the whole thing here:
I personally love 6m and the challenge of it. It works well locally and well when the band is open. But it can close suddenly without notice. Sometimes I’ve spoken long distances and either has received no signal strength at all, but a full S5 copy.
I also enjoy adjusting between vertical and horizontal polarisation.
If you enjoyed this read, please take the time to like and follow this blog. Or let me know what you think of 6m from where you are in the comments below.
If you enjoyed this read, here are some others you may enjoy.
ADIF Master is a popular amateur radio logging software tool used for editing and managing ADIF log files. ADIF stands for Amateur Data Interchange Format, which is the worldwide standard used by ham radio operators to share QSO log information between different logging programs and online logbook services. Many amateur radio enthusiasts use ADIF Master to organise contacts, repair corrupted log files, and prepare logs for upload to systems such as Logbook of The World, QRZ, Club Log, and eQSL.
The software is designed mainly as an ADIF editor rather than a full live logging program. One of the reasons ADIF Master is widely used in the amateur radio community is because of its simple spreadsheet-style layout. The rows and columns make it easy to edit callsigns, frequencies, modes, signal reports, dates, times, DXCC information, and other ham radio logging details quickly and easily.
ADIF Master includes many useful features for amateur radio operators. It can open, edit, merge, sort, filter, and convert ADIF files from different logging software programs. The software can also import Cabrillo contest logs and convert older log formats into modern ADIF files. This makes it very useful for contest operators, portable activators, DX hunters, and digital mode users.
Many radio amateurs use ADIF Master for cleaning up FT8 and FT4 logs created by WSJT-X or other digital mode software such as what I show you in the video, my excel log book. It is also commonly used to remove duplicate contacts, correct incorrect time entries, fix formatting problems, and prepare logs for awards and confirmations. The software supports modern ADIF standards and works well with current amateur radio digital modes.
Another advantage of ADIF Master is that it is lightweight and easy to run on most Windows computers, including Windows 10 and Windows 11 systems. Because the program is small and portable, many ham radio operators keep a copy on a USB drive or shack computer for quick log maintenance and backup work.
ADIF Master is especially helpful for amateur radio operators who regularly exchange log files between different ham radio programs. It provides a fast and simple way to manage amateur radio contacts while keeping logs accurate and compatible with modern logging systems and online amateur radio databases.
Below is a list of Radio nets we have gathered from web pages around the world, as well as friends etc.
Clearly nets change all the time, so please let me know if there is anything you notice as potentially being wrong, needing to be updated, not clear of if you would like to add one you know.
You can then sync this calendar to your device so you have all the nets available just by clicking on the Add to Google Calendar button down the bottom. It will update as we are notified of changes.
I suggest you click on the weekly or daily view of the calendar below to see it correctly.
If you found something missing, or incorrect, or just have some suggestions, please send us a message via the form below. It will be great to hear from you.
While you are here, there is lots of other useful information on this site:
Amateur Radio Television (ATV), often called “ham TV,” is a niche part of amateur television where licensed radio operators transmit live video and audio over radio frequencies instead of traditional broadcast networks. It is essentially an extension of amateur (ham) radio, using higher bandwidth signals to carry moving images, typically on UHF and microwave bands. Unlike commercial TV, ATV is non-commercial and used for experimentation, hobby activity, and technical learning.
In Melbourne Australia, amateur radio TV activity is centred around the well-known VK3RTV system. This is a digital amateur television repeater that broadcasts across much of the metropolitan area, allowing operators to transmit and receive video signals. It operates continuously and uses modern digital TV standards (DVB-T2 HD), transmitting on 445.5 MHz. The system supports multiple input formats (such as DVB-S/S2 and DVB-T) and provides wide coverage across Melbourne and even towards Geelong.
Melbourne’s ATV community has a long history, with amateur television transmissions dating back to the late 1970s. Originally analogue, the system transitioned to digital broadcasting in the 2000s and was re-established in 2020 after a temporary shutdown. Today it is considered technically advanced, featuring multiplexed digital channels, HD video, and even internet-linked streaming to international amateur TV networks.
Activity in Melbourne ATV is typically community-driven. Enthusiasts participate in scheduled “net nights” (weekly on-air meetups), experimental broadcasts, and live video contacts between stations. Operators may transmit a wide range of content including technical demonstrations, hobby projects, model aircraft footage, or informal chats. Voice coordination is often done on separate 2meter FM frequency, 147.400 MHz, while video is transmitted through the ATV repeater.
Amateur TV is also known as High-Scan TV. A related but distinct mode is Slow-Scan Television, which is also used by amateur radio operators in Australia. Instead of live video, SSTV sends still images over radio, taking several seconds to minutes per picture. This mode is popular for long-distance (HF) communication and even space-related transmissions, complementing the faster “full-motion” ATV systems used locally in Melbourne.
Overall, amateur Radio TV in Melbourne is a small but technically rich hobby combining radio engineering, digital broadcasting, and experimentation. It operates outside mainstream media, relying on licensed operators, shared infrastructure like VK3RTV, and a collaborative community that keeps the technology evolving.
This view shows how I got involved, and found out how to reveive it with the help of people in this video. Although I only show one set top box, I actually have two, plus two screens, so I can receive channel 1 and 2 at the same time. These two channels are independent of each other in some ways, but transmit from the same site.
I really hope you enjoy this video, and it encourages you to this part of the hobby. Please put what comments or questions you have below as I will try to answer them. I am not an expert in this area at all, but still learning and hope to one day transmit onto VK3RTV. If you live away from Melbourne, you can still access it via Discord (see link on video) or via Youtube as shown in the video.
Thank you again to Peter, Steven and Clint for your your endless help.
Amateur radio operators use many different antenna types, each designed for specific bands, space limits, and operating goals. Here’s a clear overview of the most common ones and why hams choose them.
Wire Antennas
These are some of the simplest and most popular antennas that include:
Dipole Antennas
Two equal wire sections fed in the center
Very efficient and easy to build
Works well on HF bands
Often used as a first antenna
End-fed wire
Fed at one end instead of the center
Easy to install in limited space
Needs a matching unit (tuner or transformer)
Inverted-V
A dipole with the center high and the ends sloping down
Takes up less horizontal space
Good all-around performance
Vertical antennas
Vertical antennas stand upright and radiate equally in all directions.
Popular for HF, VHF, and UHF
Good for DX (long-distance) contacts
Require a good ground system or radials
Common on small lots or rooftops
Verticals are great when you want omnidirectional coverage without rotating an antenna.
Directional antennas
These antennas focus energy in specific directions. They include:
Yagi Antennas
One driven element with reflector(s) and director(s)
High gain and directivity
Common on HF, VHF, and UHF
Usually mounted on towers and rotors
Beam Antennas
General term for directional antennas
Help reduce noise and interference
Ideal for contesting and DXing
Loop antennas
Loop antennas use a closed loop of wire or tubing. They include:
Full-wave loops
Large, efficient, and low noise
Often used on HF bands
Magnetic loops
Much smaller
Useful in apartments or noisy environments
Narrow bandwidth, needs careful tuning
VHF/UHF antennas
Used mainly for local and line-of-sight communication. They include:
Ground-plane
Simple vertical antenna
Common for 2 m and 70 cm
Collinear
Stacked vertical elements
More gain for repeater and FM use
Handheld “rubber duck”
Compact and portable
Less efficient but very convenient
Portable and special-purpose antennas
Whip antennas for mobile use
NVIS antennas for regional HF coverage
Stealth antennas designed to be hidden
Satellite antennas (often crossed Yagis)
Choosing the right antenna
Amateur Radio Operators usually decide what antenna to used based on:
Available space
Frequency bands
Operating style (local, DX, portable)
Budget and installation limits
A simple, well-installed antenna often outperforms a complex one installed poorly.
How do I increase Antenna Gain?
Increasing antenna gain means focusing the radio signal more efficiently rather than increasing transmitter power. One of the most effective ways is to use a directional antenna, like a Yagi or beam, instead of an omnidirectional antenna such as a dipole or vertical. Directional antennas concentrate energy in a specific direction, providing stronger signals and reducing interference from unwanted directions.
You can also look at mounting your antenna higher. The old thought of Height is Might come into play. It’s true to a point, especially if you go higher and can now talk over obstacles like hills or buildings.
Another way to increase gain is by adding more elements to antennas like Yagis. Each additional director slightly increases forward gain, allowing for stronger transmission over long distances. Similarly, antenna height plays a major role in effective gain: raising antennas above obstacles improves the radiation angle, enhances long-distance (DX) contacts, and benefits line-of-sight communication on VHF and UHF bands.
Advanced techniques include stacking antennas, where two or more identical antennas are combined with proper spacing and phasing to achieve extra gain. Even without changing antennas, improving efficiency can boost effective gain. This includes using low-loss coax, keeping feedlines short, installing sufficient radials for verticals, and tuning the antenna to achieve a low SWR, which ensures most energy is radiated rather than lost.
In short, achieving higher gain relies on focusing energy, increasing elements, raising antenna height, and reducing losses. Choosing the right antenna depends on your operating goals, such as DX contacts or local coverage, and your available space and budget.
What about you?
So what antenna have you used and has it worked well or not at all? Which antenna did I miss above?
I’m keen to get your thoughts so please add a comment below.
If you enjoyed this read, hear are some other ones you may enjoy also:
For some reason, not all the key assignment options are in the manual and after a bit of searching, I found no complete list. Hopefully this below helps you in selecting your Key Assignments on the main unit P1-P6 keys, as well as on the microphone PA-PD keys. I have listed them in alphabetical order however under it I have how I have my radio set up.
Selection
Description
A/B
Switch Main Display from A or B
BND
Bandwidth (adjust for low signals)
CAL
Calibration (non-functional)
CDT
CTCSS / DCS options
DIR
Direction of display
MON
Disables squelch
NULL
Will make button do nothing.
POW
Power Level, Low Med Hi
RDW
Dual Watch
REV
Reverse transmit offset and frequency
SCN
Scan, channels or frequencies
SFT
Frequency Offset
SQL
Squelch
TALK
Turns TX off for any particular channel
TRF
Busy channel lockout
VOL
Volume Level, press to change volume instead of channel
VOX
Vox toggle on or off
V/M
Switch from VFO to Memory Channel
Please let me know if I got any wrong or have missed one.
This is how I have set mine up, but as I use the radio, I will change this to suit my needs:
P1
A/B
P2
V/M
P3
MON
P4
SCN
P5
SQL
P6
VOL
P1 mode 2
DIR
P2 mode 2
SFT
P3 mode 2
RDW
P4 mode 2
POW
P5 mode 2
CDT
P6 mode 2
BND
PA
SCN
PB
VOL
PC
POW
PD
RDW
So what are your thoughts on this? How do you setup your radio? Please let me know via the comments below.
The Anytone AT-778UV is a dual-band VHF/UHF mobile transceiver designed for amateur radio operators. It operates on the 136–174 MHz (VHF) and 400–490 MHz (UHF) bands, offering reliable two-way communication for both ham radio and commercial use (depending on firmware version).
Power Output
This transceiver provides selectable power levels — typically 25 W, 15 W, and 5 W. These adjustable settings allow users to manage power efficiency, heat, and battery draw when operating from a 12 V vehicle power system.
Channel Capacity
The AT-778UV supports 200–250 programmable memory channels, making it versatile for storing repeaters, simplex frequencies, and emergency channels. Channel naming and scanning functions simplify navigation during mobile operation.
Display and Design
It features a color TFT LCD display with 180-degree rotation, allowing flexible mounting in various vehicles. The metal chassis and integrated cooling system improve durability and heat dissipation, especially during extended transmission periods.
Signaling and Features
Key functions include CTCSS/DCS, DTMF encoding/decoding, 2-tone/5-tone signaling, and ANI/PTT ID. These options make it suitable for both amateur repeaters and commercial communication networks, enhancing identification and access control.
Software and Programming
Users often mention programming challenges, particularly with USB cable drivers and COM port errors on newer Windows systems. The Anytone programming software or CHIRP can be used, but compatibility varies depending on firmware version.
Dual Watch
Some people hate Dual Watch, but this is mainly because they do not understand it. I think this radio does dual watch better than most and the reason is:
There is a sperate signal meter per zone making it clear which one you are listening to. I wish all radio’s did this.
When Dual Watch is on, you can see both the A band and B band, but when it is off, you can only see one band on the screen. Again, I wish all radio’s did this.
It says clearly on the bottom of the screen if you are on A or B band. I really wish all radio’s did this.
If you are not sure what Dual watch is, then have a look at this video. It is great when you are listening, but not talking to anyone and the repeaters are a bit quiet.
I had a few mic gain issues my my radio. Some have drilled holes in the microphone to fix this, but before you do this, it might pay to watch the following video.
Most owners praise its value for money, build quality, and audio clarity. Common complaints include menu complexity, occasional freezing, and scan delays. Overall, it’s regarded as a solid budget mobile ham radio with a rich feature set.
I do love how you can change the display on this radio and re-program the buttons. The following video with help you with this and show you what I mean.
The AOR AR1000XLT is a popular wideband scanner receiver that became well known among radio enthusiasts, amateur radio operators, aviation listeners, and shortwave hobbyists during the late 1980s and early 1990s. The scanner was designed to receive a massive range of radio frequencies, making it one of the most versatile handheld scanners available at the time. Many people used the AR1000XLT for aircraft monitoring, emergency service listening, marine radio, amateur radio, and shortwave reception.
One of the biggest features of the AOR AR1000XLT scanner is its extremely wide frequency coverage. The receiver can monitor frequencies from around 500 kHz up to 1300 MHz depending on the model version. This allows users to listen to HF shortwave bands, VHF communications, UHF signals, FM broadcast radio, aircraft radio channels, marine frequencies, and amateur radio bands all in one portable device. The scanner supports AM, FM, and Wide FM modes, giving users flexibility across different radio services.
The AR1000XLT scanner became popular because of its advanced features for the time. It included 1000 memory channels, fast scanning speeds, search banks, and strong receiver sensitivity. Radio hobbyists appreciated how quickly it could scan channels and search for unknown frequencies. Many users connected external antennas to improve reception for long-distance radio monitoring and weak signal listening.
Another reason the AOR AR1000XLT gained popularity was its compact handheld design. The radio was portable, battery powered, and easy to carry for field use. Aviation enthusiasts often used it for airband listening at airports, while amateur radio operators used it for monitoring repeaters and HF communications. Shortwave listeners also enjoyed using the scanner to explore international radio stations and utility frequencies.
Although the AOR AR1000XLT is still respected by vintage scanner collectors and radio hobbyists today, it does have limitations compared to modern digital scanners. The radio does not support modern digital communication modes such as P25, DMR, NXDN, or trunked radio systems. Because many emergency services now use digital or encrypted communications, the scanner is mainly used today for analog radio monitoring, aircraft listening, amateur radio, marine radio, and shortwave scanning.
Even many years after its release, the AOR AR1000XLT remains a well-known classic scanner receiver in the radio hobby community. Its wide frequency coverage, strong analog performance, and portable design helped make it one of the most recognised handheld scanners of its era.
My keyboard on the scanner stopped working and even though this is an old scanner, I wanted to get it working mainly for old time sake. I knew if I could get the keyboard out, I could clean it and hopefully get it working. But see in my video as to how I went and what I discovered.
There are several DMR networks around the world, and more and more start all the time. The Australian DMR network currently covers the entire country and is for Australian residents only.
It can often be hard to find which DMR repeaters are online, offline and where they are, especially if you travel a bit like me.
Here is a few links that may be of some use. Please let me know if these links no longer work.
If you want to check the status of these above repeaters, have a look at this page. It shows which ones are currently online, or offline.
Online repeater map is a great page showing all repeaters around Australia. It is well worth the look at if you are traveling or are going to be in Australia. https://www.onlinerepeatermap.com/
Another way is via the DMR database. If you put the start of the repeater call sign in the middle repeater section it will list the repeaters in your area. For example, all repeaters in my area start with VK3, so I put in VK3 in the middle callsign box and selected begins with and got a list of registered repeaters. This will work all over the world. https://www.radioid.net/database/search#!
Further Reading
Enjoyed what you read, here is some more interesting articles on this site you may enjoy.
Have you ever tried Band Stacking before? This is where you have three options per band every time you go to that band. For example, you may have one set up on SSB, one on CW and another on Data, all on the same band. You can easily switch between them all.
For example, if you are on 20 metres, press band and 14 again, and if band stacking is on, it will keep you on 20 metres but to the different stack. This different stack could have a different mode. You usually have three per band.
Have a look at the video for more on how to use it and turn it on:
CW Skimmer is a popular amateur radio software program used for decoding Morse code signals on the HF bands. The program is widely used by ham radio operators, DX…
ADIF Master is a popular amateur radio logging software tool used for editing and managing ADIF log files. ADIF stands for Amateur Data Interchange Format, which is the worldwide…
The 15 metre band is one of the most popular HF amateur radio bands for long-distance communication, offering an excellent balance between reliability and worldwide reach. Frequency Range The…
The AOR AR1000XLT is a popular wideband scanner receiver that became well known among radio enthusiasts, amateur radio operators, aviation listeners, and shortwave hobbyists during the late 1980s and…
Maximum Usable Frequency (MUF) is an important concept in HF radio propagation and amateur radio communications. It refers to the highest frequency that can be used for reliable communication…
World Amateur Radio Day is celebrated every year on April 18, marking the founding of the International Amateur Radio Union (IARU) in 1925. The organisation was established in Paris…
Amateur Radio Television (ATV), often called “ham TV,” is a niche part of amateur television where licensed radio operators transmit live video and audio over radio frequencies instead of…
The Baofeng UV-5R Mini handheld radio is a popular and affordable dual-band amateur radio transceiver widely used by beginners and experienced ham radio operators. Designed as a compact version…
HF radio and lightning storms are closely connected because lightning creates strong radio frequency interference that affects HF radio communication (3–30 MHz). High Frequency radio is commonly used for…
OpenHamClock is an open-source amateur radio dashboard designed as a modern successor to the original HamClock used by radio amateurs worldwide. It provides a real-time visual display of essential…
The Radtel P8 PoC radio is a Push-to-Talk over Cellular (PoC) device that looks like a traditional walkie-talkie but communicates using 4G/LTE mobile networks instead of UHF/VHF radio frequencies.…
An antenna coupler (also called an antenna tuner or matching network) is a device used in radio systems to ensure impedance matching between a transmitter and an antenna. Most…
Amateur radio operators use many different antenna types, each designed for specific bands, space limits, and operating goals. Here’s a clear overview of the most common ones and why…
A dipole antenna is a basic radio antenna made of two conductive elements fed at the center. It is typically a half-wavelength long and is widely used as a…
160 meters band is known as the “Gentlemen’s band”. It is right next to the AM commercial band, known as medium wave.
The 160-meter band is the radio frequencies between 1.8 and 2 MHz. For many decades it was the lowest radio frequency band allocated for use by amateur radio, before the 630 and 2200 meter bands were introduced.
Amateur operators often refer to the 160 meters as the Top Band because it was for some time.
The 160-meter band is the oldest amateur band. Antennas are usually huge in size due to the wavelength at this frequency, making the higher bands a lot easier to get into given they have shorter wavelengths, requiring smaller antennas. Small antennas lead to less space required and less cost.
During the day propagation is limited to local contacts, but long distance contacts are possible at night, especially around sunrise and sunset.
How it started for me
The hobby started for me on Medium Wave, where I was shocked to receive long distance AM radio signals from interstate radio stations. The distances were huge, across countries if I was in Europe. As a kid I loved listening to interstate radio and sometimes phoned them to let them know. They were shocked I could hear them and often mentioned me by name soon after my phone call.
My Antenna’s
I’ve tried several antennas on this band. They include:
A horizontal dipole antenna. This worked really well though it was huge. The problem I had with this antenna was most people in my area use vertical antennas so they couldn’t hear me well.
A horizontal long wire antenna. This antenna was also huge, and also not vertical. So it worked well for close contacts, but not as good if I tried to contact a few suburbs away.
An inverted L antenna. This worked the best as my local contacts used vertical antennas. I tried to get the vertical part as high and as long as I could before doing that horizontal part. Given the length of the wire needed, most of the wire was still horizontal, but at least the first but was vertical. Though the secret to this antenna was the ground wires. I started with two of them and ran one around the house about 2 feet from the ground. The other was around the fence. I will put at least two more out which should also help improve things.
Summary
Getting on 160m was a bit of a challenge due to the wavelength. I could be heard on SSB, but AM was the biggest challenge. With AM, my radios would put out less watts so I had to rely more on my antenna.
Below is a small video of my 160m antenna and how I made the inverted L. With amateur radio, there will always be improvements and I am sure this setup isn’t the best, but it is a start and I learned what I could from the other amateurs who had already mastered this band.
Below is an extended video which goes into a bit more detail of how and why I did what I did. I adjusted all my HF antennas to make this 160m antenna work while not upsetting any of the other bands.
As I mentioned in both videos, I am not a professional, but an amateur radio operator and as keen to learn as anyone else. If you have any thoughts on this, I would value them in the comments below. It will not only help me, but others reading this. So don’t forget to have a look at what others have to say.
160m Coffee Break Net
Each weekday in Melbourne, there is a 160m Coffee Break Net. This net is a bit of a challenge to get onto because you must:
Have a full licence
Have a vertical antenna (which is the biggest challenge for 160m)
Have a radio that does AM, and puts a few watts out
As you can see above, I was able to make a 160m vertical antenna, so once I got this working, I was on the air! Many people try their dipole antenna, as did I at first, but on AM, it just doesn’t go far, and since everyone on the net is vertically polarised, they couldn’t hear me. I saw this as a challenge, and one worth trying.
Don’t forget to subscribe to this page, as I am sure I will have a version 2 of these antennas out one day!
If you enjoyed this, here are some other reads you may enjoy:
ADIF Master is a popular amateur radio logging software tool used for editing and managing ADIF log files. ADIF stands for Amateur Data Interchange Format, which…
The 15 metre band is one of the most popular HF amateur radio bands for long-distance communication, offering an excellent balance between reliability and worldwide reach.…
The AOR AR1000XLT is a popular wideband scanner receiver that became well known among radio enthusiasts, amateur radio operators, aviation listeners, and shortwave hobbyists during the…
Maximum Usable Frequency (MUF) is an important concept in HF radio propagation and amateur radio communications. It refers to the highest frequency that can be used…
World Amateur Radio Day is celebrated every year on April 18, marking the founding of the International Amateur Radio Union (IARU) in 1925. The organisation was…
Amateur Radio Television (ATV), often called “ham TV,” is a niche part of amateur television where licensed radio operators transmit live video and audio over radio…
The Baofeng UV-5R Mini handheld radio is a popular and affordable dual-band amateur radio transceiver widely used by beginners and experienced ham radio operators. Designed as…
HF radio and lightning storms are closely connected because lightning creates strong radio frequency interference that affects HF radio communication (3–30 MHz). High Frequency radio is…
OpenHamClock is an open-source amateur radio dashboard designed as a modern successor to the original HamClock used by radio amateurs worldwide. It provides a real-time visual…
The Radtel P8 PoC radio is a Push-to-Talk over Cellular (PoC) device that looks like a traditional walkie-talkie but communicates using 4G/LTE mobile networks instead of…
An antenna coupler (also called an antenna tuner or matching network) is a device used in radio systems to ensure impedance matching between a transmitter and…
Amateur radio operators use many different antenna types, each designed for specific bands, space limits, and operating goals. Here’s a clear overview of the most common…
Interference in Amateur Radio refers to unwanted signals that disrupt radio communication. This interference can reduce signal clarity, make contacts difficult, or completely block communication between…
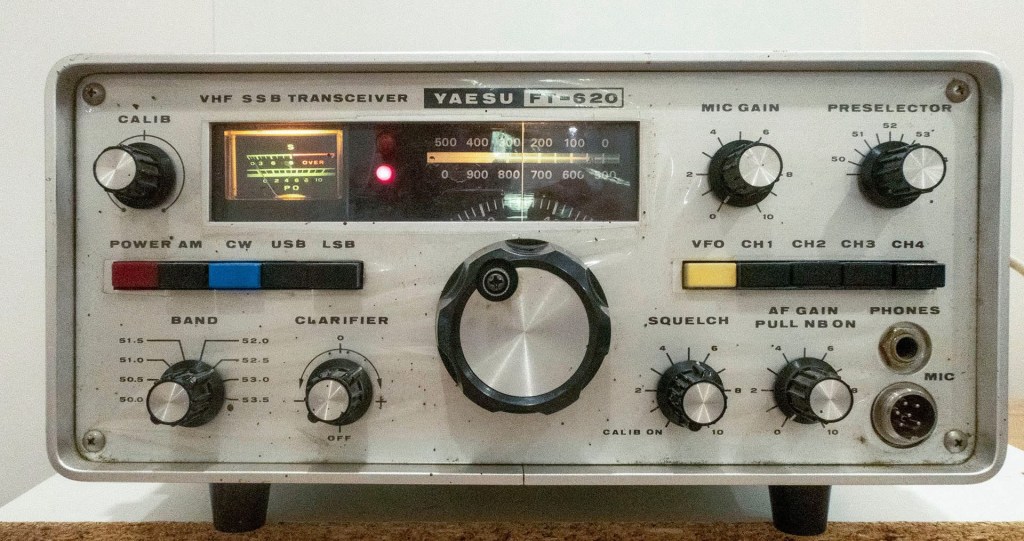
The Yaesu FT-620 (and its updated version, the FT-620B) is a vintage amateur radio transceiver designed specifically for the 6-meter band (50–54 MHz). Produced in the 1970s, it offers support for AM, CW, and SSB (USB/LSB) modes, making it a versatile rig for its time, especially during the era when 6 meters was gaining popularity for both local and DX communications. It was part of Yaesu’s early generation of VHF monoband rigs, built with a solid metal chassis and analog controls, reflecting the rugged, durable engineering of the period.
In terms of performance, the FT-620 delivers approximately 20 watts PEP on SSB and CW, and around 4–8 watts on AM. Receiver sensitivity is quite good for a rig of its era, typically around 0.5 µV for 10 dB S/N in SSB/CW modes. The transceiver divides the 6-meter band into multiple segments using a bandswitch, and offers decent selectivity for SSB and CW operation. It can be powered from AC mains or 12–14 VDC, providing some flexibility for mobile or backup use. However, it lacks FM capability, which limits its use with modern 6m FM repeaters or simplex FM operations.
While the FT-620 is highly regarded for its build quality and straightforward analog operation, it does show its age. There’s no digital display, DSP, or modern filtering, and some units may require refurbishment—such as replacing aging capacitors or realigning circuits for optimal performance. Its bulk and weight (~8 kg) also make it less convenient for portable use. Nonetheless, for those interested in classic radios or operating 6 meters on SSB/CW, it remains a capable and enjoyable rig, particularly when paired with a good antenna.
Overall, the FT-620 is best suited to enthusiasts who appreciate vintage gear and are willing to maintain it. It still holds practical value today in the right hands—especially for those focused on SSB or CW operation during band openings. While it won’t compete with modern rigs in terms of features or integration, its simplicity, durability, and vintage charm continue to appeal to collectors and seasoned hams alike.
See my video below where I fire it up and give it a test.
See me fire up this old girl
More interesting reads
If you enjoyed this read, here are some more I think you will like.
ADIF Master is a popular amateur radio logging software tool used for editing and managing ADIF log files. ADIF stands for Amateur Data Interchange Format, which…
The 15 metre band is one of the most popular HF amateur radio bands for long-distance communication, offering an excellent balance between reliability and worldwide reach.…
The AOR AR1000XLT is a popular wideband scanner receiver that became well known among radio enthusiasts, amateur radio operators, aviation listeners, and shortwave hobbyists during the…
Maximum Usable Frequency (MUF) is an important concept in HF radio propagation and amateur radio communications. It refers to the highest frequency that can be used…
World Amateur Radio Day is celebrated every year on April 18, marking the founding of the International Amateur Radio Union (IARU) in 1925. The organisation was…
Amateur Radio Television (ATV), often called “ham TV,” is a niche part of amateur television where licensed radio operators transmit live video and audio over radio…
The Baofeng UV-5R Mini handheld radio is a popular and affordable dual-band amateur radio transceiver widely used by beginners and experienced ham radio operators. Designed as…
HF radio and lightning storms are closely connected because lightning creates strong radio frequency interference that affects HF radio communication (3–30 MHz). High Frequency radio is…
OpenHamClock is an open-source amateur radio dashboard designed as a modern successor to the original HamClock used by radio amateurs worldwide. It provides a real-time visual…
The Radtel P8 PoC radio is a Push-to-Talk over Cellular (PoC) device that looks like a traditional walkie-talkie but communicates using 4G/LTE mobile networks instead of…
An antenna coupler (also called an antenna tuner or matching network) is a device used in radio systems to ensure impedance matching between a transmitter and…
Amateur radio operators use many different antenna types, each designed for specific bands, space limits, and operating goals. Here’s a clear overview of the most common…
For some reason, not all the key assignment options are in the manual and after a bit of searching, I found no complete list. Hopefully this below helps you in selecting your Key Assignments on the main unit P1-P6 keys, as well as on the microphone PA-PD keys. I have listed them in alphabetical order however under it I have how I have my radio set up.
Selection
Description
A/B
Switch Main Display from A or B
BND
Bandwidth (adjust for low signals)
CAL
Calibration (non-functional)
CDT
CTCSS / DCS options
DIR
Direction of display
MON
Disables squelch
NULL
Will make button do nothing.
POW
Power Level, Low Med Hi
RDW
Dual Watch
REV
Reverse transmit offset and frequency
SCN
Scan, channels or frequencies
SFT
Frequency Offset
SQL
Squelch
TALK
Turns TX off for any particular channel
TRF
Busy channel lockout
VOL
Volume Level, press to change volume instead of channel
VOX
Vox toggle on or off
V/M
Switch from VFO to Memory Channel
Please let me know if I got any wrong or have missed one.
This is how I have set mine up, but as I use the radio, I will change this to suit my needs:
P1
A/B
P2
V/M
P3
MON
P4
SCN
P5
SQL
P6
VOL
P1 mode 2
DIR
P2 mode 2
SFT
P3 mode 2
RDW
P4 mode 2
POW
P5 mode 2
CDT
P6 mode 2
BND
PA
SCN
PB
VOL
PC
POW
PD
RDW
So what are your thoughts on this? How do you setup your radio? Please let me know via the comments below.
Here are some video’s you may enjoy also:
If you enjoyed this, here are some more reads you may enjoy:
The Retevis RT73 and Kydera CDR300UV are identical radios. They are a DMR/FM duel band radio for Amateur radio use. This is great, as most of the early DMR radios available were commercial radios that…
I recently got my hands on a new Baofeng UV-17R Plus Series radio. It didn’t take long at all to arrive and was not expensive at all. People these days pay more for a UHF…
As per the Yaesu FT-710 manual, the Digital Noise Reduction (DNR) system is designed to reduce the level of ambient noise found on the HF and 50 MHz bands. The (DNR) system is especially effective…
I recently got the Radioddity M916 Heavy duty antenna magnetic mound with the Radioditty HF-008 all band portable antenna. I had always wanted to use HF more while camping or going on adventures around Australia…
The first thing I noticed after receiving the radio was the size of the radio. It is small yet not to small that it is hard to use. It fits comfortably in your hand. Not…
The new QT80 radio by Radioddity is a fantastic radio and I have a lot of contacts on it already. QT60 Vs QT80 This is a QT80 model but there is also the QT60 model…
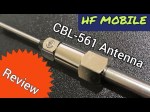
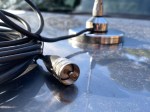
CBL-561 Review The new CBL-561 antenna is strong and light that is fit for mobile work, camping or remote radio use. I plan to use this on our next outback trip! This antenna supports a…
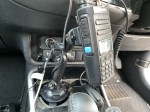
There are lots of duel band antennas available, but most required extra mounting brackets. These brackets often restrict you as to where you can mount the antenna on your car. One of my first mobile…
Why does a radio need a cup holder? I agree it’s a bit odd. But this isn’t a product that involves a cup. Rather it uses a cup holder. Almost every car now has a…
The 2m band has always been an interesting one for me. It used to be swamped with pager interference, but it actually is a great band. Inversion allows your signal to travel long distances at…
Everyone that has been into radio for a while will know the brand Kenwood. And most know Kenwood isn’t only into Amateur radio, they are bigger than that, and have been also. But are you sure it started in Japan? What else do they make? How big are they today? And what does the name Kenwood stand for?
Kenwood is a Japanese brand of consumer electronics.
In December 1946, Kenwood was established as the Kasuga Radio Co. Ltd. in Komagane, Nagano Prefecture, Japan
In 1958 the company put its first amateur radio on sale.
In 1960, the company was renamed Trio Corporation.
In 1962 they launched the industry’s first transistor amplifier
In 1963, the company established its first overseas office in Los Angeles County, California, United States. It began to sell overseas.
During the 1960s, Trio’s products were rebranded and sold by the Lafayette Radio Company, which focused on citizens band (CB) radio.
The name Kenwood was invented by Kasuga as a combination of
“Ken” which is a name common to Japan and North America and was considered acceptable to American consumers, and
“Wood” which was referring to the material wood, as well as suggesting a relation to Hollywood, California.
In 1966 they introduced the fully transistorised audio products for the first time in the industry.
In 1969 the TR-7100 2m amateur radio for the car goes on sale.
In 1979 the company established the first production overseas in Singapore.
In 1986, Trio acquired Kenwood and subsequently rebranded itself as Kenwood Corporation. This was because Kenwood was more widely recognised than Trio.
In 1991 Kenwood signs an official supply contract with McLearen to provide wireless radio equipment for the F1 Championship
In 1992 they produced their first car navigation system
In 1995, the Mir Space Station carries Kenwood’s amateur wireless equipment.
In 1996 the company was renamed from Tri-Kenwood to Kenwood which coincided with the company’s 50th anniversary.
In 1997 Kenwood made Japan’s first car mounted DAB receivers.
In 2001, Kenwood releases its first digital transceiver operating on P25.
In 2002 they withdrew from the test and measuring equipment business
In 2005, Kenwood joins up with Icom to jointly research the standardisation of technical specifications for digital wireless radio equipment (NXDN).
Since October 2008, Kenwood has been owned by JVC-Kenwood because of a merger between Kenwood Corporation and JVC.
Kenwood has manufactured electronic equipment such as
AM/FM stereo receivers,
cassette tape decks/recorders,
amateur radio (ham radio) equipment,
radios,
televisions,
mobile phones,
speakers, and
other consumer electronics.
Radio
Kenwood has produced two-way radios for a variety of communications standards, including:
wireless DECT intercom systems,
the radio frequency PMR446 and its digital counterpart DPMR446,
DPMR, the Project 25 standards suite,
DMR and
NXDN
Kenwood Today
The Kenwood radio catalogue of today shows what radios they are selling now.
These include
hand held radios that are single, dual and tri band radios
Mobile dual band radios some complete with remote heads. Again single and dual band radios.
All band HF radios some small, some are large and covered in buttons and options
And all band HF, VHF and UHF radios
Today their website shows they are into
Car electronics including digital technology and enhanced in-car comfort and navigation. They have some very cool photos of their motorsports equipment on their website. https://www.kenwood.com/e/motorsports/
Communications using digital technology handheld and base stations, from Professional through to CB radios
Audio and digital communications
Kenwood Logo
So, what do you know about the Kenwood logo?
If you go to their smart website, you can see the red triangle in the logo isn’t there to just look pretty.
The red triangle is the core part of their logo and represents the three values of the Kenwood brand.
Advanced
High Quality
Sharpness
But it doesn’t stop there, the four corners of the W stands for
Precision
Innovation
Emotion
Communication
Your thoughts
So, what do you think, does Kenwood measure up to your expectations? Tell me in the comments below.
What Kenwood radios did, or do you have? What did you think of it? I’d love to know.
For me, I have had a few but still use occasionally the Kenwood TS-120V. It was one of my first HF radio’s and I bought it before the internet was available. I though it was the 100W version, but quickly found out it is not. That said, I enjoy using it every now and then.
So, what did what you learn? I know I learnt a bit. I’m keen to hear what you learnt today.
How many of the Kenwood Radios do you know that I have shown in this video?
If you enjoyed that read, then you may enjoy some of these, including my post on Yaesu which is just as informative.
CW Skimmer is a popular amateur radio software program used for decoding Morse code signals on the HF bands. The program is widely used by ham radio operators, DX chasers, and contest stations because it can monitor and decode many CW signals at the same…
ADIF Master is a popular amateur radio logging software tool used for editing and managing ADIF log files. ADIF stands for Amateur Data Interchange Format, which is the worldwide standard used by ham radio operators to share QSO log information between different logging programs and…
The 15 metre band is one of the most popular HF amateur radio bands for long-distance communication, offering an excellent balance between reliability and worldwide reach. Frequency Range The standard frequency range for the 15m band is 21.000 MHz to 21.450 MHz. Within this range,…
The AOR AR1000XLT is a popular wideband scanner receiver that became well known among radio enthusiasts, amateur radio operators, aviation listeners, and shortwave hobbyists during the late 1980s and early 1990s. The scanner was designed to receive a massive range of radio frequencies, making it…
Maximum Usable Frequency (MUF) is an important concept in HF radio propagation and amateur radio communications. It refers to the highest frequency that can be used for reliable communication between two locations by reflecting off the ionosphere. If a radio signal is transmitted above the…
World Amateur Radio Day is celebrated every year on April 18, marking the founding of the International Amateur Radio Union (IARU) in 1925. The organisation was established in Paris when amateur radio societies from around the world joined together to represent radio operators and protect…
Amateur Radio Television (ATV), often called “ham TV,” is a niche part of amateur television where licensed radio operators transmit live video and audio over radio frequencies instead of traditional broadcast networks. It is essentially an extension of amateur (ham) radio, using higher bandwidth signals…
The Baofeng UV-5R Mini handheld radio is a popular and affordable dual-band amateur radio transceiver widely used by beginners and experienced ham radio operators. Designed as a compact version of the original UV-5R, this small and lightweight VHF/UHF walkie talkie offers solid performance for everyday…
HF radio and lightning storms are closely connected because lightning creates strong radio frequency interference that affects HF radio communication (3–30 MHz). High Frequency radio is commonly used for amateur radio (ham radio), marine radio, aviation HF communication, emergency communications, and long-distance shortwave listening. HF…
OpenHamClock is an open-source amateur radio dashboard designed as a modern successor to the original HamClock used by radio amateurs worldwide. It provides a real-time visual display of essential ham radio propagation data, world clocks, DX activity, and space weather information in a single, easy-to-read…
The Radtel P8 PoC radio is a Push-to-Talk over Cellular (PoC) device that looks like a traditional walkie-talkie but communicates using 4G/LTE mobile networks instead of UHF/VHF radio frequencies. This means its effective range is not limited to a few kilometres like standard two-way radios,…
An antenna coupler (also called an antenna tuner or matching network) is a device used in radio systems to ensure impedance matching between a transmitter and an antenna. Most transmitters are designed for a specific impedance, commonly 50 ohms, while antennas often vary depending on…
Amateur radio operators use many different antenna types, each designed for specific bands, space limits, and operating goals. Here’s a clear overview of the most common ones and why hams choose them. Wire Antennas These are some of the simplest and most popular antennas that…
A dipole antenna is a basic radio antenna made of two conductive elements fed at the center. It is typically a half-wavelength long and is widely used as a reference antenna in antenna theory and practice. Dipole antennas work by converting alternating current into electromagnetic…
Interference in Amateur Radio refers to unwanted signals that disrupt radio communication. This interference can reduce signal clarity, make contacts difficult, or completely block communication between amateur radio operators. Radio Frequency Interference (RFI) is one of the most common problems in amateur radio. It often…
Prior to 1989, it was illegal to operate between 50 MHz and 52 MHz in Australia. It was a real pain as that was where all the action was when the band opened up. However, after many requests from the WIA to the DoTC back…
I’ve heard a lot about dipole antennas, and I’ve heard a lot about long wire antennas also. I would say I’ve seen more dipoles than long wire antennas. So why is that? What is the difference between them? Which is better? If one is a…
Repeater-START is a multi-platform app designed for ham radio and radio-operator enthusiasts who need fast access to repeater information. The app provides a detailed repeater map as well as a distance-sorted list, allowing users to easily locate nearby communication points wherever they travel. Because it…
What Is the 6m Band? The 6-meter band, spanning roughly 50–54 MHz, is a section of the VHF spectrum assigned to amateur radio operators. Its wavelength is six meters, and its position between HF and VHF makes it behave like a mix of both services.…
Overview The Anytone AT-778UV is a dual-band VHF/UHF mobile transceiver designed for amateur radio operators. It operates on the 136–174 MHz (VHF) and 400–490 MHz (UHF) bands, offering reliable two-way communication for both ham radio and commercial use (depending on firmware version). Power Output This…
160 meters band is known as the “Gentlemen’s band”. It is right next to the AM commercial band, known as medium wave. The 160-meter band is the radio frequencies between 1.8 and 2 MHz. For many decades it was the lowest radio frequency band allocated…
Have you ever had an antenna and forgotten what it is for? Maybe you have been given one and wasn’t told exactly what it was used for. I got given an antenna at at ham fest because it didn’t sell. Funny enough after I got…
Yes, this popular girl name is actually an Amateur Radio term. Christian, DK8EW, put me onto Olivia after we chatted on VARA HF. I had heard about Olivia before, but he encouraged me to give it ago. Soon I made contact with VK4XP and must…
The Yaesu FT-620 (and its updated version, the FT-620B) is a vintage amateur radio transceiver designed specifically for the 6-meter band (50–54 MHz). Produced in the 1970s, it offers support for AM, CW, and SSB (USB/LSB) modes, making it a versatile rig for its time, especially during the era when 6 meters…
I came across something different, FreeDV. The name FreeDV insinuates it is free, but is it? What is it? And what does it do? They say it will be the new SSB of radio. They say it is clear and goes further when conditions are…
Key Assignment For some reason, not all the key assignment options are in the manual and after a bit of searching, I found no complete list. Hopefully this below helps you in selecting your Key Assignments on the main unit P1-P6 keys, as well as…
I’ve been using the Parks and Peaks app on iphone and ipad for a little while now and quite enjoyed it. There don’t seem to be many iphone apps compared to android, so when there is one, I usually have a look. This one caught my eye as it was not only free, but useful.
After using it for a while, I contacted the author of the app, Sue Southcott, VK5AYL where she was thrilled that I would do a review on this free app, and provided me with a bit more information about her and the app.
The current version is for iphone only at this stage, but I think there are plans to expand this. It allows users to Spot, Alert and export in ADIF and or spreadsheet format.
The app also allows users to search for sites including parks, peaks and silos by site ID. Or you can search by partial site name or by using the inbuilt map.
Setting up the map and connecting site data by longitude/latitude co-ordinates has been Sue’s favourite part. Sue said “I already had the experience of connecting data to mapping systems during my career.
The following awards are handled – WWFF, SOTA, HEMA, IOTA, KRMNPA, SANPCPA, SIOTA, SHIRES, ZLOTA & POTA.
Parks & Peaks is an Australian website that collects data from Amateur Radio operators who get out of their shacks and operate their radios portable in parks or on peaks. It also collects data from those who Spot them.
AU/NZ sites can be downloaded to the device for use when there is no network available.
It will also produce multiple logs for one activation, so if you are on a Summit in a WWFF Park with a Pota reference, you will get 3 logs, one for SOTA, one for WWFF and one for POTA.
There is also a quick way to log activators as I show in the video below.
About Sue VK5AYL….
Sue has had her Advanced Amateur licence for a very long time and it led to her decision to study IT back in the 80s.
For over 30 years, she had a successful career as an IT Manager, Analyst/Programmer, TAFE Lecturer and even my own software business, contracting to many organisations.
Most of her work involved working on client/server applications for large businesses.
In 2014, Sue decided to learn how to write an iOS app and along came Parks & Peaks, which gave me something to work on. After purchasing a Mac Pro Sue had to learn how to use it very quickly, along with the new Apple language.
In 2015, Sue presented version 1 to the WIA AGM in SA. Since then, Sue has released versions 2 and 3 and compared to version 1, they had many more features. Sue told me she loved every minute of developing the app as it has been a massive challenge and allowed her to continue with my love of programming.
Why not have a look at my video on this app where you can see it in full operation:
If you enjoyed that read, please remember to like and subscribe so you get updates as they happen. Below are some more reads you may enjoy from this site:
Orion is an app that isn’t really known in my world, perhaps because it isn’t available on all platforms, or because it does transmit your exact location to everyone on the channel.…
There are several website that tell you what bands are open in your area. Most people paste them on their QRZ page, but there are some examples below that update every hour.…
I’ve been using EchoLink well before smartphones where the only way I knew how to connect to a different station was via the radio. The internet wasn’t as extensive as it is…
The Retevis RT73 and Kydera CDR300UV are identical radios. They are a DMR/FM duel band radio for Amateur radio use. This is great, as most of the early DMR radios available were…
I recently got my hands on a new Baofeng UV-17R Plus Series radio. It didn’t take long at all to arrive and was not expensive at all. People these days pay more…
As per the Yaesu FT-710 manual, the Digital Noise Reduction (DNR) system is designed to reduce the level of ambient noise found on the HF and 50 MHz bands. The (DNR) system…
I recently got the Radioddity M916 Heavy duty antenna magnetic mound with the Radioditty HF-008 all band portable antenna. I had always wanted to use HF more while camping or going on…
The first thing I noticed after receiving the radio was the size of the radio. It is small yet not to small that it is hard to use. It fits comfortably in…
CBL-561 Review The new CBL-561 antenna is strong and light that is fit for mobile work, camping or remote radio use. I plan to use this on our next outback trip! This…
HamClock has always fascinated me, as it seems such an amazing program specifically set up for Amateur Radio. I have seen countless videos on it but the draw back was always needing to have a Raspberry Pi. While I am not afraid to get one, and learn how to use it, I just didn’t feel like taking the plunge into that world just yet. Though I think that world is about to come, and I will end up regretting not doing it sooner!
So, what is HamClock?
Glad you asked. According to their website (https://www.clearskyinstitute.com/ham/HamClock/) HamClock is a kiosk-style application that provides real time space weather, radio propagation models, operating events and other information particularly useful to the radio amateur.
It is designed to provide ham radio enthusiasts with real-time information about the sun’s position, ionospheric conditions, and DX cluster spots. HamClock is an open source application which is a tool for the shack providing live up to date information all on one screen. It was originally written by Elwood Downey WB0OEW.
HamClock displays a map showing the sun’s position, illumination (daylight/darkness), and the “grey line” (the transition between day and night). This information is crucial for understanding propagation conditions, as the grey line is often a prime time for DX (long-distance) communication.
Usually it needs to be installed on Quadra or lynix, but I have recently found out you can install it on Windows.
Installing HamClock on Windows
Guess what, this is possible, and may feel overwhelming at first, but after following the video below, I was able to do it in real time along with this video. I was shocked how easy it was and super surprised I had not done this earlier.
Before doing the video, I suggest you read all the points below it as there were a couple of things I changed.
The video starts with music, but just do what it says. Then the author will talk you through the steps after the initial install.
The bit I got stuck on was setting up Cluster in HamClock. This is about 12:50 into the video, perhaps it was because I had an updated version of HamClock since the above video was done. So, instead, I put in the following settings:
Setting Up HamClock
There are countless ways to set up HamClock. As a starting point, I stuck with the video above as he shows you how to from 13:30. Below is a link to that point in the above video.
This video below is from a friend who also shows you in great detail how to set up your HamClock to get the most of it. Some things are slightly different, but after seeing this, you can have an informed choice.
I found this video below very good also, as it goes into detail regarding the map in HamClock. As you will see it is done by the same person. He talks about the maps and how to customise it easily.
After a Windows Reboot
When you next do a windows reboot, you will need to restart HamClock. To do this, open a CMD window by typing CMD in the windows search menu.
Then type in :
wsl sudo hamclock &
and put in your password you made for lynx and you should be able to open it again. Make sure you do n ot close the comand screen until you are finished.
Summary
Below is what my HamClock looks like. I like the background “terrain” map as well as the night and day showing on the map. I would value your thoughts though, as I know I am about the last one to finally get onto HamClock.
With all of these tools, we should remember propagation shown is using data, but the rest of it is predictions based on knowledge.
If these propagation tools show there isn’t anything happening, always give it a try anyway. You never know without trying. You may be higher than other stations, or put out more power. You might just get an opening before other stations.
All the propagation websites are a summary of conditions recorded and sent in. HamClock is a good tool, it looks good, and gives you a lot of information on the one screen. You can adjust it easily also.
Please tell me your thoughts, and what you think. Do you use it? Perhaps you use it differently and have some advice for me and other readers. Hope you enjoyed the read.
Other Reads
If you enjoyed this read, here are some other ones you may be interested in. Please remember to subscribe and comment if this is helpful.
I recently started using ProScan after years of using FreeScan. I have always enjoyed using FreeScan as it is easy to setup, I can download outputs from the software, and the main reason “it works”. However ProScan seems to be more graphical and has different features also.…
I recently started using ProScan after years of using FreeScan. I have always enjoyed using FreeScan as it is easy to setup, I can download outputs from the software, and the main reason “it works”. However ProScan seems to be more graphical and has different features also.…
I found it hard to find useful information on how to run the OpenGD-77 hotpot mode with Windows 10. At the time of writing this, there is a lot about this topic using a pistar and even android or ISO, but not much with Windows 10. This is my experence with BlueDV and Open GD-77 using a Windows 10 PC.…
If you don’t have one of the latest and greatest expensive scanners, you will struggle to listen to a lot of transmissions. While there is still a lot of Analogue transmissions today, even a lot still on AM especially when it comes to Aviation, however most have gone…
An unusual name, but a catchy name no less, just like Peanut that was written by the same person, David PA7LIM. If you like Peanut, then you will like this project also. This project, like Peanut, includes some amazing coding and thinking.…
Welle.io is a DAB and DAB+ software defined radio (SDR). It runs on Windows, Linux and embedded devices like the Raspberry Pi 2 and 3. You can find the program and where to download it from their website. Using the Software With all these things, the software is…
Here is a free windows program that will connect your PC to: DMR Yaesu Fusion DStar M17 P25 NXDN You can do all this without needing to purchase a radio. I prefer to use a radio, however I thought I would put this review together to help others…
I have been using my Radioddity now for some years and love it. Though upgrading this to the OpenGD77 opened a whole new world and it gets better all the time. One issue I had for a period was not being able to connect to it via my…
When using digital over the radio, it is particularly important you have the correct time. Even a second out will stop you from making contacts. I relied on Windows to update the time and got an email from a helpful amateur telling me my time was out. You…
I’ve been using EchoLink well before smartphones where the only way I knew how to connect to a different station was via the radio. The internet wasn’t as extensive as it is now and you had to dial the node you wanted via the radio. You can still…
Ever heard this sound on HF / VHF / UHF? I know I have more and more recently. After a bit of research, someone told me it was VARAC. https://www.varac-hamradio.com/ As I understand it, the project started with Irad Deutsch 4Z1AC. It is free of charge for amateur…
Flrig is a transceiver control program designed to be used either stand alone or as an adjunct to fldigi (see my review on this). The supported transceivers all have some degree of CAT. The flrig user interface changes to accommodate the degree of CAT support available for the…
If you haven’t seen my previous blog on the NanoVNA Analyser, then I suggest you look at that first before reading this blog. This one will talk about how to connect your NanoVNA to your PC via the USB cable, so I am assuming you know the basics…


 CW Skimmer is a popular amateur radio software program used for decoding Morse code signals on the HF bands. The program is widely used by ham radio operators, DX chasers, and contest stations because it can monitor and decode many CW signals at the same time.…
 ADIF Master is a popular amateur radio logging software tool used for editing and managing ADIF log files. ADIF stands for Amateur Data Interchange Format, which is the worldwide standard used by ham radio operators to share QSO log information between different logging programs and online…
 The 15 metre band is one of the most popular HF amateur radio bands for long-distance communication, offering an excellent balance between reliability and worldwide reach. Frequency Range The standard frequency range for the 15m band is 21.000 MHz to 21.450 MHz. Within this range, different…
 The AOR AR1000XLT is a popular wideband scanner receiver that became well known among radio enthusiasts, amateur radio operators, aviation listeners, and shortwave hobbyists during the late 1980s and early 1990s. The scanner was designed to receive a massive range of radio frequencies, making it one…
 Maximum Usable Frequency (MUF) is an important concept in HF radio propagation and amateur radio communications. It refers to the highest frequency that can be used for reliable communication between two locations by reflecting off the ionosphere. If a radio signal is transmitted above the MUF,…
 World Amateur Radio Day is celebrated every year on April 18, marking the founding of the International Amateur Radio Union (IARU) in 1925. The organisation was established in Paris when amateur radio societies from around the world joined together to represent radio operators and protect access…
 Amateur Radio Television (ATV), often called “ham TV,” is a niche part of amateur television where licensed radio operators transmit live video and audio over radio frequencies instead of traditional broadcast networks. It is essentially an extension of amateur (ham) radio, using higher bandwidth signals to…
 The Baofeng UV-5R Mini handheld radio is a popular and affordable dual-band amateur radio transceiver widely used by beginners and experienced ham radio operators. Designed as a compact version of the original UV-5R, this small and lightweight VHF/UHF walkie talkie offers solid performance for everyday communication,…