OpenHamClock is an open-source amateur radio dashboard designed as a modern successor to the original HamClock used by radio amateurs worldwide. It provides a real-time visual display of essential ham radio propagation data, world clocks, DX activity, and space weather information in a single, easy-to-read interface. Built with modern web technology, OpenHamClock runs in any web browser and adapts to screens ranging from small Raspberry Pi displays to large 4K shack monitors.

The project is community-driven and open source, allowing amateur radio operators to contribute features, host their own instance, or customise the display. Unlike the original HamClock, which relied on specific servers and hardware constraints, OpenHamClock is designed to be flexible, future-proof, and not dependent on a single data source. This ensures long-term reliability for hams who rely on propagation and solar data for HF operation.
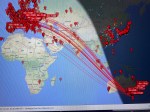
OpenHamClock includes many features familiar to HamClock users, such as a world map with day/night grey line, UTC and local time zones, and real-time solar indices like solar flux, sunspot numbers, and geomagnetic activity. It also displays DX Cluster spots, satellite tracking, and propagation modelling directly on the map, helping operators quickly identify openings on the HF bands.
Because it is web-based, OpenHamClock can be used instantly in a browser or installed locally on devices such as a Raspberry Pi, desktop computer, or via Docker for advanced users. This makes it ideal as a permanent ham shack display or a portable dashboard accessible from anywhere.
OpenHamClock continues the legacy of the original HamClock created by Elwood Downey, WB0OEW, ensuring that amateur radio operators still have access to a powerful propagation monitoring tool, DX spotting map, and space weather dashboard long after the original service ends.
Don’t forget to see my video on this:
If you enjoyed this read, here are some more things you may enjoy:
- Lightning Storm & HF Radio
 HF radio and lightning storms are closely connected because lightning creates strong radio frequency interference that affects HF radio communication (3–30 MHz). High Frequency radio is commonly used for amateur radio (ham radio), marine radio, aviation HF communication, emergency communications, and long-distance…
 - OpenHamClock
 OpenHamClock is an open-source amateur radio dashboard designed as a modern successor to the original HamClock used by radio amateurs worldwide. It provides a real-time visual display of essential ham radio propagation data, world clocks, DX activity, and space weather information in…
 - What is an Antenna Coupler
 An antenna coupler (also called an antenna tuner or matching network) is a device used in radio systems to ensure impedance matching between a transmitter and an antenna. Most transmitters are designed for a specific impedance, commonly 50 ohms, while antennas often…
 - Antennas
 Amateur radio operators use many different antenna types, each designed for specific bands, space limits, and operating goals. Here’s a clear overview of the most common ones and why hams choose them. Wire Antennas These are some of the simplest and most…
 - Dipole Antenna for Portable Use – Make your own!
 A dipole antenna is a basic radio antenna made of two conductive elements fed at the center. It is typically a half-wavelength long and is widely used as a reference antenna in antenna theory and practice. Dipole antennas work by converting alternating…
 - Interference
 Interference in Amateur Radio refers to unwanted signals that disrupt radio communication. This interference can reduce signal clarity, make contacts difficult, or completely block communication between amateur radio operators. Radio Frequency Interference (RFI) is one of the most common problems in amateur…
 - 6m and TV Channel 0
 Prior to 1989, it was illegal to operate between 50 MHz and 52 MHz in Australia. It was a real pain as that was where all the action was when the band opened up. However, after many requests from the WIA to…
 - Dipole Antennas Vs Long Wire Antennas
 I’ve heard a lot about dipole antennas, and I’ve heard a lot about long wire antennas also. I would say I’ve seen more dipoles than long wire antennas. So why is that? What is the difference between them? Which is better? If…
 - The 6-Meter Amateur Radio Band
 What Is the 6m Band? The 6-meter band, spanning roughly 50–54 MHz, is a section of the VHF spectrum assigned to amateur radio operators. Its wavelength is six meters, and its position between HF and VHF makes it behave like a mix…
 - 160 Meters Band160 meters band is known as the “Gentlemen’s band”. It is right next to the AM commercial band, known as medium wave. The 160-meter band is the radio frequencies between 1.8 and 2 MHz. For many decades it was the lowest radio…
- Olivia Digital Mode MFSK
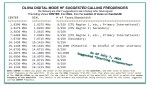 Yes, this popular girl name is actually an Amateur Radio term. Christian, DK8EW, put me onto Olivia after we chatted on VARA HF. I had heard about Olivia before, but he encouraged me to give it ago. Soon I made contact with…