A simple tip that you may always use after reading this.
Often our shacks end up with cables everywhere. It can be a little hard to remember what cable goes where after a few years. It all starts well but as the equipment grows, so do the cables. I have trouble with the power cords in the power boards and what each plug is!
My shack originally only had one cable that went out that hole, “I’ll remember what it is” we all say years later. But sometimes we might upgrade an antenna or radio. In doing so, it is far easier to use the same cable if it is ok, especially if it goes down a wall or through a small hole. After a few changes, the whole thing can become a bit of a mess (not that anyone else needs to know).
Power cables are easier to manage, as I stick a sticker on each plug at the power board to remind me what they go to. So, if I need to change the power board, I know exactly which plug I am pulling out.
But antenna cables are a bit harder. I started writing on a post it notes what this cable was for and taped it to the cable near the plug, but if you swap it to something else, you must change the note. Maybe you forgot last time you changed something or ran out of time. Perhaps after the testing you got so excited about the positive test you never did update the note on your cable.
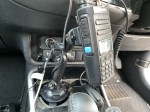
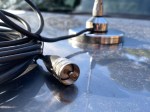
So, I now have a new system. I colour code each cable at each end with electrical tape as shown below in the photo.
Using the same colour code on each end, I can now be sure which cable goes to which end. One of my cables has two of the same colour, which is fine, whatever works for you.
If you do this just before the plug at each end, then you can see which antenna the cable goes into and which radio. You could also do it again at the bottom of the tower or window so you know halfway along the cable.
I then have a list of yellow 1 strip = HF 6m and Red = VHF/UHF etc. if I swap the antennas, I just must change the list. I can double check by going outside to see what the same colour code ends up. The electrical tape will stay the same and will last a lot longer than handwritten notes.
So, what do you do to keep your station in order? Do you just remember? Do you have a system? Why not share it in the comments below so we can all learn from you.
HF radio and lightning storms are closely connected because lightning creates strong radio frequency interference that affects HF radio communication (3–30 MHz). High Frequency radio is commonly used for amateur radio (ham radio), marine radio, aviation HF communication, emergency communications,…
OpenHamClock is an open-source amateur radio dashboard designed as a modern successor to the original HamClock used by radio amateurs worldwide. It provides a real-time visual display of essential ham radio propagation data, world clocks, DX activity, and space weather…
An antenna coupler (also called an antenna tuner or matching network) is a device used in radio systems to ensure impedance matching between a transmitter and an antenna. Most transmitters are designed for a specific impedance, commonly 50 ohms, while…
Amateur radio operators use many different antenna types, each designed for specific bands, space limits, and operating goals. Here’s a clear overview of the most common ones and why hams choose them. Wire Antennas These are some of the simplest…
A dipole antenna is a basic radio antenna made of two conductive elements fed at the center. It is typically a half-wavelength long and is widely used as a reference antenna in antenna theory and practice. Dipole antennas work by…
Interference in Amateur Radio refers to unwanted signals that disrupt radio communication. This interference can reduce signal clarity, make contacts difficult, or completely block communication between amateur radio operators. Radio Frequency Interference (RFI) is one of the most common problems…
Prior to 1989, it was illegal to operate between 50 MHz and 52 MHz in Australia. It was a real pain as that was where all the action was when the band opened up. However, after many requests from the…
I’ve heard a lot about dipole antennas, and I’ve heard a lot about long wire antennas also. I would say I’ve seen more dipoles than long wire antennas. So why is that? What is the difference between them? Which is…
Repeater-START is a multi-platform app designed for ham radio and radio-operator enthusiasts who need fast access to repeater information. The app provides a detailed repeater map as well as a distance-sorted list, allowing users to easily locate nearby communication points…
What Is the 6m Band? The 6-meter band, spanning roughly 50–54 MHz, is a section of the VHF spectrum assigned to amateur radio operators. Its wavelength is six meters, and its position between HF and VHF makes it behave like…
There are several website that tell you what bands are open in your area. Most people paste them on their QRZ page, but there are some examples below that update every hour.
You can see more on their webpage https://www.hamqsl.com/solar.html where all you have to do is paste the code and put on your website. There is a great option to donate also. There is a wealth of information on this website that you can spend hours on.
This data is updated every hour, which is fantastic.
But what if you are not in front of your PC and want to look it up. There is a handy little app I use called Solar Data and Propagation. It is a small app only 12.5Mb in size on the iPhone and it is free. It is also available on Android at only 6.75Mb, I will talk about further down.
Below is the app on an apple device.
While it is only a little app, and doesn’t do a lot, it is a simple app that gives you what propagation is open at your current location. While other apps have heaps of features and functions that you may or may not use often, this little app has just what you would use often.
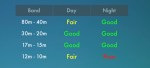
Above are the HF conditions, but you can also see VHF conditions and terrestrial. Adds do pop up from time to time, but the app is free so I don’t see this as a problem.
If you have an Android device, go to the store and search for HF Propagation. It should be the first one on the list with an orange sunshine as the logo.
Once installed, you have a lot of different options available on the first screen.
Scroll down, and you will see the HF then VHF conditions as mentioned for the Apple app.
Conclusion
This little information may save you from running out to the shack and turning everything on to find nothing or trying on the wrong band. As mentioned above, it can be on an apple or android device.
Hopefully, this makes it a little easier for you. Please put in the comments below what apps you enjoy using or let me know what you think.
Repeater-START is a multi-platform app designed for ham radio and radio-operator enthusiasts who need fast access to repeater information. The app provides a detailed repeater map as well as a distance-sorted list, allowing users to easily locate nearby communication points wherever they travel. Because it uses open repeater databases, the information remains current, community-supported, and…
I’ve been using EchoLink well before smartphones where the only way I knew how to connect to a different station was via the radio. The internet wasn’t as extensive as it is now and you had to dial the node you wanted via the radio. You can still do this today but I don’t think…
There are several website that tell you what bands are open in your area. Most people paste them on their QRZ page, but there are some examples below that update every hour. You can see more on their webpage https://www.hamqsl.com/solar.html where all you have to do is paste the code and put on your website.…
It has been a while since I have completed another update, but I have a lot in the making. A broken finger has kept me quiet! HamAlert is an app for both iPhone and Google devices that alerts you as to when a desired station appears on the DX cluster, the Beacon Network, SOTAwatch, POTA…
After talking to a friend just to the north of me, he told me about the app DROID-Star for Android. As I only have apple devices, this wasn’t initially an option for me, however I do have an Android TV box which I use for Amateur Radio, so will review it from that device. At…
The WizNet DMR app is still in beta testing, and at the time of writing this, you have to not only have a currently have a licence as an Amateur Radio Operator, but approved to be part of the beta testing group. You can do this by googling the web site, submitt a few details,…
Orion is an app that isn’t really known in my world, perhaps because it isn’t available on all platforms, or because it does transmit your exact location to everyone on the channel. However there are some benefits to this mode and does add another communication mode to your list. You can also create your own…
It has been a while since I have completed another update, but I have a lot in the making. A broken finger has kept me quiet!
HamAlert is an app for both iPhone and Google devices that alerts you as to when a desired station appears on the DX cluster, the Beacon Network, SOTAwatch, POTA or PSK Reporter. It saves you from checking them all manually.
You can receive different types of alerts including:
DXCC (both actual and callsign home DXCC)
Callsign
IOTA group reference
SOTA summit reference
WWFF/POTA division/reference
CQ zone
Continent
Band
Mode
Time and days of week
Source
Spotter callsign and DXCC
Just download the app from the App Store or google play, create an account, then set what alerts or triggers you want.
Press the three lines up the top left and select triggers. Then press plus to add one. The interface is mostly web based but works well within the app.
My first trigger was using my call sign under any conditions and alert via app
You can easily add more triggers. Select a condition and an Action on what you want the app to do when it meats the desired condition. You can also add in a comment to help you with each trigger.
Once you are done, simply press Done down the bottom of the screen.
Limitations
Limitations menu limits how many times you will be triggered. For example you may want to set a trigger to only alert you once an hour or day.
More information is available on their website at https://hamalert.org/about which even had a forum you can join or add comments about the app.
How do you find this app? Would value your comments below.
HF radio and lightning storms are closely connected because lightning creates strong radio frequency interference that affects HF radio communication (3–30 MHz). High Frequency radio…
OpenHamClock is an open-source amateur radio dashboard designed as a modern successor to the original HamClock used by radio amateurs worldwide. It provides a real-time…
The Radtel P8 PoC radio is a Push-to-Talk over Cellular (PoC) device that looks like a traditional walkie-talkie but communicates using 4G/LTE mobile networks instead…
An antenna coupler (also called an antenna tuner or matching network) is a device used in radio systems to ensure impedance matching between a transmitter…
Amateur radio operators use many different antenna types, each designed for specific bands, space limits, and operating goals. Here’s a clear overview of the most…
I have been using my Radioddity now for some years and love it. Though upgrading this to the OpenGD77 opened a whole new world and it gets better all the time.
One issue I had for a period was not being able to connect to it via my PC. For some time, it worked, then it stopped. It was most frustrating as I could not run the radio as a local repeater anymore. I almost never update the codeplug now and update the firmware every few weeks, but I could not do any of this without my PC connection.
After checking I had the latest community programming software, I was stumped.
Roger, who is behind all the programming of this radio and who lives nearby, kindly gave me some advice over email. He suggested it was a Com-Port issue. And he was correct. So, I have put this together to help others who may have the same problem as I did.
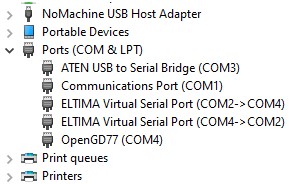
From windows 10, type in the search box Device Manager. Then you will get a box like the following.
If you expand out the Ports section, you can see the issue I had straight away, I had the OpenGD77 on com port 4, and an Eltima Virtual Serial Port on com port 2-4 also.
I disabled the Eltima com ports listed by right clicking on them and nothing seemed to stop working, so then I uninstalled them both. And straight away the com port worked through to the radio like it used to.
Great to have my GD77 back in action! Hopefully this has helped you, if it has, please let me know.
There are some more interesting reads below that you may enjoy also.
OpenHamClock is an open-source amateur radio dashboard designed as a modern successor to the original HamClock used by radio amateurs worldwide. It provides a real-time visual…
An unusual name, but a catchy name no less, just like Peanut that was written by the same person, David PA7LIM. If you like Peanut, then you will like this project also. This project, like Peanut, includes some amazing coding and thinking.…
I found it hard to find useful information on how to run the OpenGD-77 hotpot mode with Windows 10. At the time of writing this, there is a lot about this topic using a pistar and even android or ISO, but not much with Windows 10. This is my experence with BlueDV and Open GD-77 using a Windows 10 PC.…
I recently started using ProScan after years of using FreeScan. I have always enjoyed using FreeScan as it is easy to setup, I can download outputs from the software, and the main reason “it works”. However ProScan seems to be more graphical and has different features also.…
I recently started using ProScan after years of using FreeScan. I have always enjoyed using FreeScan as it is easy to setup, I can download outputs from the software, and the main reason “it works”. However ProScan seems to be more graphical and has different features also.…
There are lots of duel band antennas available, but most required extra mounting brackets. These brackets often restrict you as to where you can mount the antenna…
One of the most underutilised by very cool feature that comes with some digital networks is the ability to send and receive SMS messages. You can send…
I found it hard to find useful information on how to run the OpenGD-77 hotpot mode with Windows 10. At the time of writing this, there is a lot about this topic using a pistar and even android or ISO, but not much with Windows 10. This is my experence with BlueDV and Open GD-77 using a Windows 10 PC.…
This page is just a help to friends I have spoke to who are interested in upgrading the Radioditty GD-77 to the OpenGD77 software. This is not my work, however I really do appreciate Roger and his team have done to put this together. I claim no responsibility if it breaks your radio, however I have not hear this happen now in some time. I am not an expert at all with OpenGD77, I have just put this together to help people who have asked me how to do it.…
Updating the firmware on the GD-77 can be daunting, as you can easily “brick” your radio. So be extremely careful. Make sure you understand why you are…
HF radio and lightning storms are closely connected because lightning creates strong radio frequency interference that affects HF radio communication (3–30 MHz). High Frequency radio is commonly…
OpenHamClock is an open-source amateur radio dashboard designed as a modern successor to the original HamClock used by radio amateurs worldwide. It provides a real-time visual display…
An antenna coupler (also called an antenna tuner or matching network) is a device used in radio systems to ensure impedance matching between a transmitter and an…
Amateur radio operators use many different antenna types, each designed for specific bands, space limits, and operating goals. Here’s a clear overview of the most common ones…
A dipole antenna is a basic radio antenna made of two conductive elements fed at the center. It is typically a half-wavelength long and is widely used…
Interference in Amateur Radio refers to unwanted signals that disrupt radio communication. This interference can reduce signal clarity, make contacts difficult, or completely block communication between amateur…
Repeater-START is a multi-platform app designed for ham radio and radio-operator enthusiasts who need fast access to repeater information. The app provides a detailed repeater map as…
What Is the 6m Band? The 6-meter band, spanning roughly 50–54 MHz, is a section of the VHF spectrum assigned to amateur radio operators. Its wavelength is…
Welle.io is a DAB and DAB+ software defined radio (SDR). It runs on Windows, Linux and embedded devices like the Raspberry Pi 2 and 3.
You can find the program and where to download it from their website.
Using the Software
With all these things, the software is updated regularly. You can see on the page where you download it from, what changes have been made with each version. The first thing I struggled to find was how to tune in the stations. I will show you how to further on in this post.
This is how the program looked while writing this review
Settings
If you select the three dots up the far top right, you can select settings. I recommend keeping them as is unless you want to change something here. The Auto Detect should select your SDR that is connected.
If your keen, you can also check out the Expert Settings from the same area.
Tuning in Stations
Towards the top left of the interface is a All Stations button. To the right of this is three little buttons. Click on this and select Start Station Scan. This will give you a list of stations once it is finished. You can star the ones you like to create a favoritedlist.
Changing Display
You can add displays by pressing the orange plus button down the bottom right. Some of the displays change as you hover over them, others have waterfalls. They can be removed or added as needed. I assume these will change all the time as the program is developed.
Recording
The app allows you to record the station you are listening to. By default, recordings are MP2 files stored in the /tmp folder.
Hotkeys
There are several hotkeys that can be turned on or off. They included m = mute audio, r = start or stop recording, – = switch to previous service, + = switch to the next service and so on.
Slideshow
Some stations transmit a slideshow. I have usually found this is just the station’s logo or the current program’s logo. The program is able to display this after it receives it without errors.
Summary
In summary, I highly recommend this easy to use software with your SDR device. It is extremely easy to set up and get going. At the time of writing this, there are only a couple of YouTube video’s and hardly any reviews. The YouTube video’s appear to be from the developer and just show you how to set it up. I believe this simple program will become popular in time mainly because of how easy it is to setup.
I hope you enjoy the read, please let me know below what you thought or have any comments.
Other Reads
Enjoyed the read, here are some other things you may enjoy.
An unusual name, but a catchy name no less, just like Peanut that was written by the same person, David PA7LIM. If you like Peanut, then you will like this project also. This project, like Peanut, includes some amazing coding and thinking.…
I found it hard to find useful information on how to run the OpenGD-77 hotpot mode with Windows 10. At the time of writing this, there is a lot about this topic using a pistar and even android or ISO, but not much with Windows 10. This is my experence with BlueDV and Open GD-77 using a Windows 10 PC.…
An unusual name, but a catchy name no less, just like Peanut that was written by the same person, David PA7LIM. If you like Peanut, then you will like this project also. This project, like Peanut, includes some amazing coding and thinking.
You can see the dashboard via this link http://europelink.pa7lim.nl/ it is a remarkably similar layout to the Peanut one.
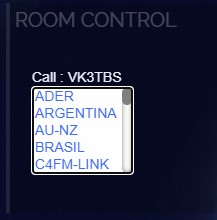
If you open the above dashboard, you will see down the left side in the Room Control section, a message stating your hotspot is not logged in to this reflector.
There are several ways you can connect, but here are a few in no particular order.
BlueDV
A friend of mine, Chris, put this video together. He uses BlueDV to get onto it.
YSF – via your hotspot
As I use an Openspot2, my instructions will show you how I do it, however I am sure you can apply similar to your hotspot should you have a different one.
First you need to connect to the YSF reflector called EUROPELINK, and according to the YSD reflector register, this has an ID number of 00007. If you don’t know how I found this, go to the YSF Reflector Registry page and type in EUROPELINK in the search box, and you can see the ID number of 0007.
Back to the Openspot2, I select Quick Setup, then I select DMR, as I am using a DMR radio, then select YSFReflector then in the Server box, I type in 00007 or EUROPELINK, to select that reflector. Doing this will connect my DMR radio to the YSF system.
Almost instantly, the Room Control section of the dashboard has updated to my call sign and I now have a drop-down list where I can select which room I want to connect to. You can then select the room you want.
As you transmit, you will see your call in the Active QSO’s screen.
While this is not connected to the Peanut Dashboard, there will be rooms that go across to each other. The Online Stations section of the Dashboard has the time stations connected.
There is a new AU-NZ room which is good and was quickly made after it was requested to David. Some rooms link just to themselves, like the English room and so on, while others connect beyond the internet. Remember this reflector will get busier as time goes on.
Also, this setup is still very new, and like Peanut, it took a little while to become popular. Having said that, Peanut took off quickly and given the success of that, and a lot of people at home during the 2020 Pandemic, I believe this will take off quickly also.
Hope you enjoyed this post. Please remember to follow this blog by putting in your email address so you get posts as soon as they are posted.
Want to see other projects that are similar?
Here are some other posts we have done that are similar:
HF radio and lightning storms are closely connected because lightning creates strong radio frequency interference that affects HF radio communication (3–30 MHz). High Frequency radio is commonly used for amateur…
OpenHamClock is an open-source amateur radio dashboard designed as a modern successor to the original HamClock used by radio amateurs worldwide. It provides a real-time visual display of essential ham…
An antenna coupler (also called an antenna tuner or matching network) is a device used in radio systems to ensure impedance matching between a transmitter and an antenna. Most transmitters…
Amateur radio operators use many different antenna types, each designed for specific bands, space limits, and operating goals. Here’s a clear overview of the most common ones and why hams…
A dipole antenna is a basic radio antenna made of two conductive elements fed at the center. It is typically a half-wavelength long and is widely used as a reference…
Interference in Amateur Radio refers to unwanted signals that disrupt radio communication. This interference can reduce signal clarity, make contacts difficult, or completely block communication between amateur radio operators. Radio…
I’ve heard a lot about dipole antennas, and I’ve heard a lot about long wire antennas also. I would say I’ve seen more dipoles than long wire antennas. So why…
Repeater-START is a multi-platform app designed for ham radio and radio-operator enthusiasts who need fast access to repeater information. The app provides a detailed repeater map as well as a…
What Is the 6m Band? The 6-meter band, spanning roughly 50–54 MHz, is a section of the VHF spectrum assigned to amateur radio operators. Its wavelength is six meters, and…
Overview The Anytone AT-778UV is a dual-band VHF/UHF mobile transceiver designed for amateur radio operators. It operates on the 136–174 MHz (VHF) and 400–490 MHz (UHF) bands, offering reliable two-way…
160 meters band is known as the “Gentlemen’s band”. It is right next to the AM commercial band, known as medium wave. The 160-meter band is the radio frequencies between…
After talking to a friend just to the north of me, he told me about the app DROID-Star for Android. As I only have apple devices, this wasn’t initially an option for me, however I do have an Android TV box which I use for Amateur Radio, so will review it from that device.
At the time of writing this review, I must state it is an Early Access version. It has been updated slightly since.
This app connects to D-Star and Yaesu System Fusion reflectors and repeaters via UDP and decodes audio and data in software. No AMBE hardware is required. It is written by Doug McLain.
Start screen to DROID-Star
The two option menus at the top of the screen allow you to Reload DMR IDs, Reload host files, and check the current version. I recommend reloading these.
From here you have the following options:
Mode – select what mode you want, this could be REF, XRF, DCS, YSF, DMR, P25 or NXDN.
Before pressing connect, select your Host, and fill in the other details.
Once working you will be able to listen into the room you select and it will display the call sign and even caller ID (if there is one), on the user that is transmitting.
As I said earlier, this app will no doubt be updated. I will try and keep this review updated as the app changes, but this may not be possible. Thanks for reading, I hope you enjoyed. If there are other apps you would like us to look at or think we should know about, please let me know. Don’t forget to subscribe to our posts by putting in your email address on the above follow us page.
I also spoke to Doug AD8DP, who wrote this app, and he said to mention that the app is very much in beta development stage. He plans on users being able to add custom reflectors/servers and so on. He also wants to add TX ability with the choice between on board software IMBE/AMBE encoding or remote AMBE server. He also said to me that he APK installer file can be downloaded directly here for Amazon Fire users and others without access to the Google Play Store: http://www.dudetronics.com/radio/DroidStar.apk
I have now heard many people use this app with great ease. The biggest question I have had is what is the password. Just put in your DMR network username and password.
One of the good rooms is YSF with Host 0-0-CQ-UK-Aussie. Then again, I am from downunder, but you might hear me on this one.
If you enjoyed this read, please don’t forget to subscribe to our page so you get updates every time we post new updates.
Using DMR with DROID-Star
I have found most people struggle to use this app on DMR. DMR requires a few other options to be set as other networks do not need all these filled out correctly or at all.
After you have installed the software, go to settings area and put in the following. First put in your call sign then your DMR ID number. If you don’t have one, then you will need to get one.
You should then update the ESSID number other than blank. If it is a second radio, I use 2.
Then put in your Password that you put in for your BrandMeister account. If your unsure what that is, go to BrandMeister Self Care area and set it again.
Once the above has been done, click on ‘Update Hosts” then “Update ID files”, and this will make sure everything is updated.
Then return to the main screen and change the mode to DMR. Change the host to BM_3102_United_States (for example, this can be changed later). Then enter the talk group you want to go to adn press the connect button. Press the big blue button and start testing.
I suggest you test it on a quiet talk group and if you have another radio, listen to what you sound like. Adjust the mic gain as often this can be set to high. You don’t want to test it on a very busy talk group – it only upsets people.
Just remember, DROID-Star is being made by a volunteer, so updates will come in time. Currently it is really important you check your audio first as it can be very clear you are using a PC and not a radio.
Hope this has helped. Please let me know. Below are some other interesting reads you may enjoy also.
I bought this wireless keyboard/mouse which was very cheap. It does not come with batteries, but come with a USB dongle. It has a fantastic range since it is 2.4GHz RF. The back also has good grip which apparently isn’t common on all models. You can select what colour you want the plastic to be also.…
OpenHamClock is an open-source amateur radio dashboard designed as a modern successor to the original HamClock used by radio amateurs worldwide. It provides a…
An unusual name, but a catchy name no less, just like Peanut that was written by the same person, David PA7LIM. If you like Peanut, then you will like this project also. This project, like Peanut, includes some amazing coding and thinking.…
I found it hard to find useful information on how to run the OpenGD-77 hotpot mode with Windows 10. At the time of writing this, there is a lot about this topic using a pistar and even android or ISO, but not much with Windows 10. This is my experence with BlueDV and Open GD-77 using a Windows 10 PC.…
I recently started using ProScan after years of using FreeScan. I have always enjoyed using FreeScan as it is easy to setup, I can download outputs from the software, and the main reason “it works”. However ProScan seems to be more graphical and has different features also.…
I recently started using ProScan after years of using FreeScan. I have always enjoyed using FreeScan as it is easy to setup, I can download outputs from the software, and the main reason “it works”. However ProScan seems to be more graphical and has different features also.…
If you don’t have one of the latest and greatest expensive scanners, you will struggle to listen to a lot of transmissions. While there is still a lot of Analogue transmissions today, even a lot still on AM especially when it comes to Aviation, however most have gone to digital.
There are several reasons for this, but put simply, digital seems to have a longer range, is clearer and you can do a lot more using just the one frequency.
For the hobbyist, to make matters hard, there are many digital modes. P25, DMR, NXDM are just a few. Some of these are popular, and some are not. Then within these digital modes are different ways of using them. For example, DMR can have T1, T2 or higher, where T stands for Tier. What this is the radio will do one micro second for T1, then switch to T2 for the next micro second. Effectively you can have two different conversations on the same frequency, and although every second micro second is lost, to the user you wouldn’t know. This is just one example of DMR. You can also transmit text messages, your location and so on, all behind the user that is talking and on the one frequency. So instead of needing to pay for 2 frequencies for two channels, you can have two talk groups on the one frequency.
And this is just the start. It is clear my old scanner won’t cope with this at all.
However, you can do it all at minimal cost on your PC. While your PC isn’t as portable as your scanner, it is a lot cheaper alternative and give you an idea on what you can here.
It is a bit fiddly though, and can take a while to setup. One tick box wrong can silence everything.
Here is what I did, however there are many options, longer than your arm, so do what you think is best for your situation.
When Digital TV came in, a lot of people had trouble receiving it, and additional repeater stations had to be installed along with a lot of home TV antenna’s being upgraded. So, whatever you do, make sure your antenna isn’t letting you down. You can try what you have first if you want, but if it doesn’t work, have a think if you need to upgrade your antenna.
I downloaded AirSpy, a program where you can tune in the frequency and add a lot of plugins if you want to. While this program is rather technical and can be hard for the first-time user, after using it a little while I think it is very well set out. You can see this program in the picture below where I have the number 1 in red on it. I recommend you download the Community Package with Plugins. If you want some tips on how to get going, I recommend going to this page that has an easy step by step setup guide. Remember, there are so many options regarding this software so try not to get overwhelmed. Just look at what you need to, for example, don’t worry at this stage about tracking aircrafts – a good project for tomorrow!
The next step is to buy a SDR. This can cost almost as much or as little as you want. An entry one can cost somewhere between $30 and $50 Australian dollars. However, I recommend you buy it via the AirSpy store, as there have been some imitations out there. This is where I got mine from if that helps you. However there are heaps of other options available on this page also. Before it arrives however, you can use the AirSpy software to tap into other shared SDR users that share their devices over the internet. There may be one close to you. This post isn’t about this though or the detail of setting all this up, as it will go on for to long. It is more about what you can do fairly easily.
An example of my interface. 1 = Airspy screen, 2 = wave, 3 = Dos screen, 4 = Decode box, 5 = Talk Groups
Once you get your dongle, plug in your dongle. Do not install any of the software that it came with (if any), and ensure that you wait a few seconds for plug and play to finish attempting to install the dongle (it will either fail or install Windows DVB-T TV drivers). If you’ve already installed the DVB-T drivers that came on the CD bundled with some dongles, uninstall them first. If you got the same dongle as I did, this is what I did to get it going:
In the folder where you extracted the sdrsharp files find the file called zadig.exe. Right click this file and select “Run as administrator”.
In Zadig, go to “Options->List All Devices” and make sure this option is checked. If you are using Windows 10, in some cases you may need to also uncheck “Ignore Hubs or Composite Parents”.
Once running Zidgig, select “Bulk-In, Interface (Interface 0)” from the drop down list. Note on some PCs you may see something like RTL2832UHIDIR or RTL2832U instead of the bulk in interface. This is also a valid selection. Do not select “USB Receiver (Interface 0) or Interface 1” or anything else or you will overwrite that driver! Double check that USB ID shows “0BDA 2838 00” as this indicates that the dongle is selected.
We need to install the WinUSB driver, so also ensure that WinUSB is selected in the box after the arrow next to where it says Driver (this is the default selection). – Note that there has been some confusion for a few people over this step. The goal is to install the WinUSB driver. So to be clear, the box to the left of the arrow shows the currently installed driver, whereas the box to the right of the arrow shows the driver that will be installed in the next step. The first time you open zadig the box on the left will show either ‘None’, or the default DVB-T drivers installed by Windows (RTL2832UUSB), depending on your Windows configuration and version.
Click Replace Driver. On some PC’s you might get a warning that the publisher cannot be verified, but just accept it by clicking on “Install this driver software anyway”. This will install the drivers necessary to run the dongle as a software defined radio. Note that you may need to run zadig.exe again if you move the dongle to another USB port, or want to use two or more dongles together.
Open SDRSharp.exe and set the “Source” drop down box to ‘RTL-SDR (USB)’. This “Source” tab is on the top left. (Note that the first time you do this you may get a smart screen message indicating that Windows has protected your PC, this is a false alarm. Simply click on “more info” and then “run anyway”).
Press the Play button (the right facing triangle). Your RTL-SDR software radio should now be set up and ready to use! If everything has worked you should be able to start tuning to frequencies.
Important! Don’t forget to also adjust the RF gain settings by pressing the Configure button (looks like a cog) up the top next to the Play button. By default the RF gain is set at zero. A gain of zero will probably receive nothing but very strong broadcast FM – increase the gain until you start seeing other signals.
Decode Digital Signals using DSD Plus
So now your on the air, you can take it to the next level now and decode the digital signals you haven’t been able to in the past.
Uncompressed DSDPlus and DSDPlusDLLs. Copy the DLLs into the extracted DSDPlus folder. Now all the DSD Plus files are in the same folder.
Then extract DSD, then copy SDRSharp.DSD.dll into the Sdrsharp folder. Copy the text in the text file and add it to the plugins.xml file in the Sharsharp folder.
Extract VBCable. Find the setup file (use x64 if you have that pc) and run the file as administrator. Then install driver. You will have to reboot afterwards.
Then have a look from 5:58 in the video below and do the following.
After that, open SDR Sharp.
Go to Audio, and for the output, select cable input – this will pump the audio from the SDR to the Virtual cable input.
From DSD interface, select cable imput here. This will mean the audio from the SDR now goes down the Virtual Cable to the DSD software. Select configure in the DSD interface and change the input audio device number to the input of AirSpy and not something else. Once you have done this, test by changing frequency or pressing the stop button, the blue wave box (number 2 in the above picture) should stop.
If you are not sure what numbers to use, the dos screen that opens when you start DSD has the numbers of input and output devices. Make sure you set this correctly else your input will not work, or you output will give you no sound. Once you have set it correctly, press Create Command Line to update.
On the Decoder Options tab, you can leave it at Auto Detect, but if you know what it is, then you can manually select the mode you want. Once you select the mode you want, press Create command line then ok so the settings get updated.
Tune into the correct frequency that has the digital transmission, then enable aux audio output. In DSD Interface, press enable Aux Audio Output.
Once on a digital frequency, press Start DSD. It then opens a dos screen, this will tell you where the audio output will be, eg speakers. Audio input device will be where you selected on DSD plus, which is the virtual cable.
If it all works, you should hear slot 1 in your left speaker, and slot 2 in your right speaker. If not, check you are on a frequency that has a transmission. Then the graph (2 above) is moving (if not your audio to DSD isn’t getting there), then the dos screen should have lots of text running (if not it may not be a digital transmission).
If your still struggling getting this set up, try the following web site: SDR Users Guide.
There are heaps of more information I could post here, but here are some of the plugins I recommend:
Enjoyed that? Please add your comments below or let us know how you went. I hope it was useful. Remember to subscribe so you don’t miss out on our future posts. Here are some other similar articles you may enjoy:
I recently started using ProScan after years of using FreeScan. I have always enjoyed using FreeScan as it is easy to setup, I can download outputs from the software, and the main reason “it works”. However ProScan seems to be more graphical and has different features also.…
I recently started using ProScan after years of using FreeScan. I have always enjoyed using FreeScan as it is easy to setup, I can download outputs from the software, and the main reason “it works”. However ProScan seems to be more graphical and has different features also.…
An unusual name, but a catchy name no less, just like Peanut that was written by the same person, David PA7LIM. If you like Peanut, then you will like this project also. This project, like Peanut, includes some amazing coding and thinking.…
I found it hard to find useful information on how to run the OpenGD-77 hotpot mode with Windows 10. At the time of writing this, there is a lot about this topic using a pistar and even android or ISO, but not much with Windows 10. This is my experence with BlueDV and Open GD-77 using a Windows 10 PC.…
I recently started using ProScan after years of using FreeScan. I have always enjoyed using FreeScan as it is easy to setup, I can download outputs from the software, and the main reason “it works”. However ProScan seems to be more graphical and has different features also.…
I recently started using ProScan after years of using FreeScan. I have always enjoyed using FreeScan as it is easy to setup, I can download outputs from the software, and the main reason “it works”. However ProScan seems to be more graphical and has different features also.…
One of the most underutilised by very cool feature that comes with some digital networks is the ability to send and receive SMS messages. You can send it fairly easily to another radio, but did you know you can also receive a weather report, see where your last GPS transmitted location is, and send messages to your mobile phone. The best thing is there no cost either.
While not all networks and not all radio’s support sending SMS’s. Some hotspots do and some done also just to make it even more confusing. While I don’t plan to list all networks available, as they there are more all the time, and the settings change also. However, at the time of writing this (2020), the VK-DMR network does not support GPS or SMS (you must turn it off to use the system), but the BrandMeister one does. So, I will talk from here on about the BrandMeister network. If you use a different network, then check with that network first.
BrandMeister Setup
First you need to setup your BrandMeister account to send and receive SMS. From the BrandMeister page, login at the right of the screen. Then under Services on the left side, select selfcare. I usually set the radio brand to either ETSI or Motorola, however this will depend on the radio you have. While you are here, you might want to turn on or off your GPS location and check everything looks good.
Radio Setup
Would you believe most digital radios allow you to send and receive messages right from the screen easily. However not all. Unfortunately, at the time of writing this (2020), the OpenGD-77 does not support text messaging as yet. However, it is on the job list. I do understand that since text messaging isn’t the most used option in digital radio, probably leaving this setup until last is fair enough. However, I have done it on the original GD-77 firmware, and seen it done on other radio’s also.
If your fortunate enough, you may have a hotspot that can do it anyway.
Hotspot Sending
I am not going to talk about every hotspot available, mainly because I don’t own every hotspot available. But I will talk about the OpenSpot as I have a couple of them myself, and I know they work.
From a PC, the menu on the right side has DMR SMS chat that will bring up a box much like the picture below.
262993 GPS and Weather
If you send the message help to destination ID 262993 you will get a prompt much like above. It may take a little while to reply. As I live in Melbourne, you can see above I then sent a private message to 262993 again and typed in the message wx Melbourne, AU. You can see above the message on the left I received. Remember, the reply’s do take a while to come back and usually arrive just as you have given up waiting!
You could also send the message gps help to the same number, 262993, to get an overview of all the GPS commands which includes setting your home position, and so on. If you have transmitted your GPS location with the same callsign you set up in the selfcare then it will reply with your last location sent. If you want to save that as your home location, send GPS SET and it will save your last location as your home location. Then you will get from now on your home location and your last transmitted location.
If you send RSSI to 262993 it will reply with the repeater and connected talk group you were last using. If you send a message INFO *callsign where *callsign is replaced with your call sign you will get a reply when you last spoke. If you have two digital ID numbers, then it will send both of them back to you.
262994 Repeater, POCSAG and dapnet
If you send RPT SMS to 262994 you will get a reply of what static talk groups you are currently connected to.
You can also send a message to a call sign using this 262994 number. For example, if you want to send a message to me, send VK3TBS followed by your message to number 262994. However, I couldn’t get this to work – maybe because I was messaging myself! If you get it to work, please let me know what I did wrong.
262995 SMSC – SMS-ing to a mobile phone
This is taking SMS-ing to the next level. I was even able to SMS my wife who doesn’t have a licence.
To do this, send the following message SMSGTE @[phone number] [message] to 262995. where [phone number] is your country number (e.g. 61 for Australia) followed by the mobile number. Remember to remove the first 0 if you’re in Australia.
There is more information on sending messages to and from your radio to mobile phones on the smsgte.org web site. There is heaps of information under the User Guide menu.
UPDATE – Before I finish, I discovered the hard way that when you send a message from a mobile phone to a radio, I got a bill. I am not sure if it was because I am in Australia, or my phone carrier saw the oppertunity, but I think with a few tests it was only $1 or so.
APRS Chat
APRS is almost a bit easier and can quickly send messages to and from a mobile phone. Once you have done the above setup, I selected APRS chat in my OpenSpot2 dashboard. Then I sent a message with the destination callsign of SMSGTE then the message was @[phone number] [message] there [phone number] is your country number (e.g. 61 for Australia) followed by the mobile number. Remember to remove the first 0 if you’re in Australia.
You can see in the picture below I sent a message Test from hotspot to my phone which appeared instantly. I then sent one back from my phone saying This is from my mobile phone which then appeared instantly. It worked really well.
Other Reads
Hope you enjoyed the above post. Below are some other reads I think you may also enjoy.
OpenHamClock is an open-source amateur radio dashboard designed as a modern successor to the original HamClock used by radio amateurs worldwide. It provides a real-time…


 HF radio and lightning storms are closely connected because lightning creates strong radio frequency interference that affects HF radio communication (3–30 MHz). High Frequency radio is commonly used for amateur radio (ham radio), marine radio, aviation HF communication, emergency communications,…
 OpenHamClock is an open-source amateur radio dashboard designed as a modern successor to the original HamClock used by radio amateurs worldwide. It provides a real-time visual display of essential ham radio propagation data, world clocks, DX activity, and space weather…
 An antenna coupler (also called an antenna tuner or matching network) is a device used in radio systems to ensure impedance matching between a transmitter and an antenna. Most transmitters are designed for a specific impedance, commonly 50 ohms, while…
 Amateur radio operators use many different antenna types, each designed for specific bands, space limits, and operating goals. Here’s a clear overview of the most common ones and why hams choose them. Wire Antennas These are some of the simplest…
 A dipole antenna is a basic radio antenna made of two conductive elements fed at the center. It is typically a half-wavelength long and is widely used as a reference antenna in antenna theory and practice. Dipole antennas work by…
 Interference in Amateur Radio refers to unwanted signals that disrupt radio communication. This interference can reduce signal clarity, make contacts difficult, or completely block communication between amateur radio operators. Radio Frequency Interference (RFI) is one of the most common problems…
 Prior to 1989, it was illegal to operate between 50 MHz and 52 MHz in Australia. It was a real pain as that was where all the action was when the band opened up. However, after many requests from the…
 I’ve heard a lot about dipole antennas, and I’ve heard a lot about long wire antennas also. I would say I’ve seen more dipoles than long wire antennas. So why is that? What is the difference between them? Which is…
 Repeater-START is a multi-platform app designed for ham radio and radio-operator enthusiasts who need fast access to repeater information. The app provides a detailed repeater map as well as a distance-sorted list, allowing users to easily locate nearby communication points…
 What Is the 6m Band? The 6-meter band, spanning roughly 50–54 MHz, is a section of the VHF spectrum assigned to amateur radio operators. Its wavelength is six meters, and its position between HF and VHF makes it behave like…