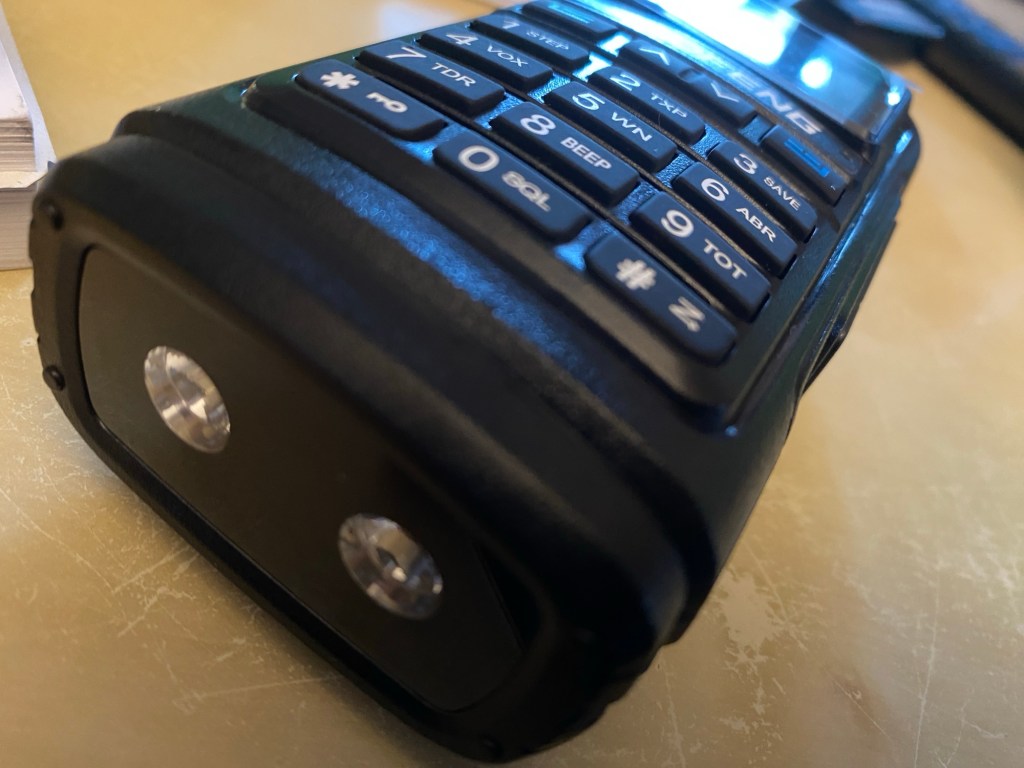
I recently got my hands on a new Baofeng UV-17R Plus Series radio. It didn’t take long at all to arrive and was not expensive at all. People these days pay more for a UHF CB radio than a radio that does all this can do.
You can purchase it via this link: https://www.radioddity.com/products/baofeng-uv-17r-plus However, if you go via this link, you will get a discount: https://radioddity.refr.cc/bensangster
My last Baofeng radio is a GT-3TP which you can still purchase new. It also works well and have always received good reports from it.
The UV-17R Plus is an upgraded version of the UV-17R handheld with the following: extras
- an expanded receiving frequency band (encompassing aviation and police bands in the US),
- an extended battery boost from 1800mAh to 2500mAh (that works out to about 40% more charge),
- a quick USB-C charging plug and cord, and
- it also has a new voice scrambler function.

Some of the things I liked with the new UV-17R Plus Series includes:
- The look and feel of the radio. This includes the bright display, feel and position of the buttons, large LED lights, and easy antenna swapping as the area is wide. I also like the speaker behind the keypad, this saves room and is an area you never cover with your hand either. The text on the display is far easier to read than older models inside and in the sunshine.
- The new USB-C charging is so much better. You don’t have to bring a charging cradle anymore when you leave the house, and can even charge it in the car easily.
- Customising DTMF is easy via the # key. It will also search for a used frequency then will display what CTCSS or DTMF is used. This can quickly be saved as a channel also.
- Secure conversations – I couldn’t test this as I only have one radio, but agree this is a good feature. However, I did talk on it myself and my digital scanner couldn’t decode it.
- The weather feature would be good if you are in a country that uses it. Australia does not. I could see this being a great radio in an emergency with the LED lights.
- The user manual is well put together and entirely in English. A PDF version is available online also.
- The radio can be programmed directly, or your PC via several different software options. I have done a video on this below if you want to see this.
- It comes with an 18-month warranty.

Here is a video where I unbox the radio and show what is included in the package. If it is helpful to you, please press the like button.
The video below is an overview summary of this radio. I’d recommend watching it as it has more details than posted here.
Below is another video showing some of the features that the radio has. While I don’t show you them all in action, it will at least give you an idea of how the radio works.
If you want to get connected into the Baofeng community, have a look at this groups id where others comment and are there to help. https://groups.io/g/BaufangRadios
This is a great radio for the price. It does far more than I thought it would and I am sure will get a lot of use out of it. I was initially concerned it may be hard to use because of the price, however, was pleasantly surprised how easy it was to program.
Below is a video I did showing you how to program the radio via a PC using Chirp-Next.
Programming Tip
Did you know you can program this radio via chirp? Here is a tip you may like.
Hope you have got something from this to help you in the hobby. If you go via this link, you will get a discount: for this radio and anything else on their website https://radioddity.refr.cc/bensangster
There is also a new group io you can join if you want https://groups.io/g/BaofengRadios
If this has been helpful, please let me know. Perhaps you have one of these radios and have thoughts of your own, I would value your commitments below.
Other reads
If you enjoyed this review, please see below some of my other articles.
- Using an Android TV Box for Ham Radio
 If you want to get onto Digital Radio for less (way less) than $100, then you may be interested in this. I have Apple equipment, and therefore miss…
 - Orion Push to Talk
 Orion is an app that isn’t really known in my world, perhaps because it isn’t available on all platforms, or because it does transmit your exact location to…
 - WizNet DMR
 The WizNet DMR app is still in beta testing, and at the time of writing this, you have to not only have a currently have a licence as…
 - The Radio Box
 How do you stop a hand held radio from falling and being damaged? Do you sometimes put the radio down on a bench or desk between overs or…
 - Amateur Radio NetsA list of Radio nets we have gathered from web pages around the world, as well as friends etc.…
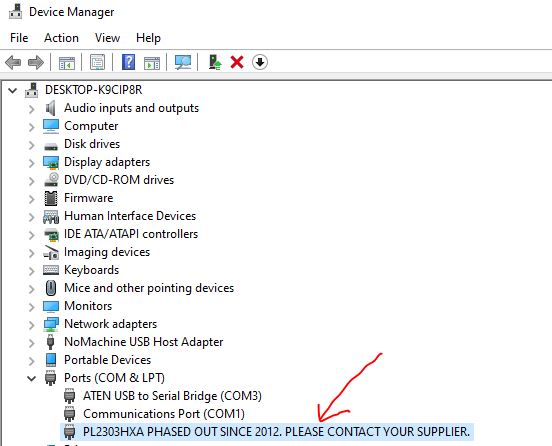
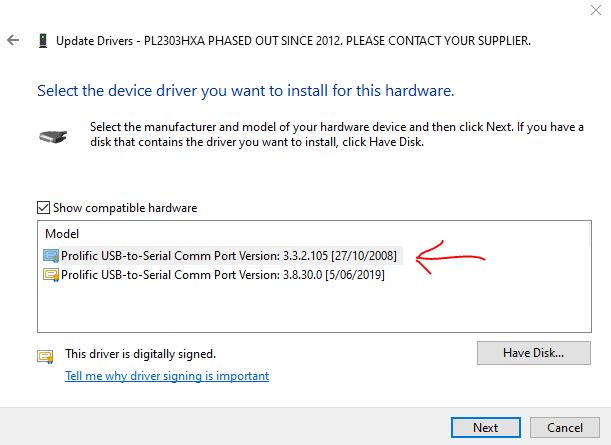
- USB Device Error PL2303HXA
 I went into the device manager and found the error, my cable no longer worked. This same issue happened to a USB Card reader also.…
 - The History of Ham Radio
 A good friend of mine, Mike VK5ZC, put the information below together and asked me to put it on my web site. He has spent a lot of time putting it together with pictures and videos, so I encourage you to have a good read.…
 - Basic Antenna Fundamentals
 A good friend of mine, Mike VK5ZC, put the information below together and asked me to put it on my web site. He has spent a lot of time putting it together with pictures and videos, so I encourage you to have a good read.…
 - Australian DMR RepeatersThere are several DMR networks around the world, and more and more start all the time. The Australian DMR network currently covers the entire country and is for…
- BlueDV Windows 10 GD-77
 I found it hard to find useful information on how to run the OpenGD-77 hotpot mode with Windows 10. At the time of writing this, there is a lot about this topic using a pistar and even android or ISO, but not much with Windows 10. This is my experence with BlueDV and Open GD-77 using a Windows 10 PC.…