Have you ever had an antenna and forgotten what it is for? Maybe you have been given one and wasn’t told exactly what it was used for.
I got given an antenna at at ham fest because it didn’t sell. Funny enough after I got it, many came to me very interested in it. I wasn’t sure what it did, but I could tell someone had put a lot of effort into it.
I had my theories as to what band it was resonate on, but I wanted to be sure. By just looking at it, it gave me many clues, like the length of the antenna, the length of the radials, the amount of radials, and how it was made.
Watch this video as I unlock my theory on what the antenna was made for. See if you can guess. Do you think I am right or wrong? Perhaps you have another theory or even know who made it. I would love to hear in the comments what you think.
If you enjoyed this, below are some more items you may enjoy:
Maximum Usable Frequency (MUF) is an important concept in HF radio propagation and amateur radio communications. It refers to the highest frequency that can be used for reliable communication between two locations by reflecting…
World Amateur Radio Day is celebrated every year on April 18, marking the founding of the International Amateur Radio Union (IARU) in 1925. The organisation was established in Paris when amateur radio societies from…
Amateur Radio Television (ATV), often called “ham TV,” is a niche part of amateur television where licensed radio operators transmit live video and audio over radio frequencies instead of traditional broadcast networks. It is…
The Baofeng UV-5R Mini handheld radio is a popular and affordable dual-band amateur radio transceiver widely used by beginners and experienced ham radio operators. Designed as a compact version of the original UV-5R, this…
HF radio and lightning storms are closely connected because lightning creates strong radio frequency interference that affects HF radio communication (3–30 MHz). High Frequency radio is commonly used for amateur radio (ham radio), marine…
OpenHamClock is an open-source amateur radio dashboard designed as a modern successor to the original HamClock used by radio amateurs worldwide. It provides a real-time visual display of essential ham radio propagation data, world…
The Radtel P8 PoC radio is a Push-to-Talk over Cellular (PoC) device that looks like a traditional walkie-talkie but communicates using 4G/LTE mobile networks instead of UHF/VHF radio frequencies. This means its effective range…
An antenna coupler (also called an antenna tuner or matching network) is a device used in radio systems to ensure impedance matching between a transmitter and an antenna. Most transmitters are designed for a…
Amateur radio operators use many different antenna types, each designed for specific bands, space limits, and operating goals. Here’s a clear overview of the most common ones and why hams choose them. Wire Antennas…
A dipole antenna is a basic radio antenna made of two conductive elements fed at the center. It is typically a half-wavelength long and is widely used as a reference antenna in antenna theory…
Interference in Amateur Radio refers to unwanted signals that disrupt radio communication. This interference can reduce signal clarity, make contacts difficult, or completely block communication between amateur radio operators. Radio Frequency Interference (RFI) is…
Prior to 1989, it was illegal to operate between 50 MHz and 52 MHz in Australia. It was a real pain as that was where all the action was when the band opened up.…
Ever heard this sound on HF / VHF / UHF? I know I have more and more recently.
Listen to the strange data sounds you can hear
After a bit of research, someone told me it was VARAC. https://www.varac-hamradio.com/ As I understand it, the project started with Irad Deutsch 4Z1AC. It is free of charge for amateur radio operators.
This software provides text base communications over HF / VHF / UHF bands (and a few more also!). It is a bit different to FT8 FT4 JT8 etc as this not only gives you a signal report, but you can do a lot of cool things and really make some good friends in the process. I know I have in just the first 2 days. You can type in real time via your radio, and even see when the other person is typing. You can send files, and emails also and send out a beacon every 15 minutes to let people know you are there or see who can hear you on PSK. The software will also let people know when you hear them automatically.
You need the software VARA HF to decode it. VARA HF is essentially a software modem. Whereas VARAC is the chat-based software.
Downloading
Simply go to the address https://www.varac-hamradio.com/download and download the appropriate version. You can download HF or FM depending on what mode you will be using. Down the bottom of this page you can put in your email address and they will send you instructions.
Setting Up VARA HF
VARA FM is also available to be used with UHF and VHF. There is also VARA SAT for geostationary Sat.
VARA HF (as well as VARA FM and VARA SAT) is essentially a software modem that connects your radio to the VARA AC software. VARA HF is for HF only and this is the one I am using and talking about here. Though I understand the others are the same concept, just different radios.
Once installed, select settings, then sound card and update to the settings you use. If you are not sure what device to add, then have a look at windows device manager. Then put in your call sign and registration Key. If you don’t have one, you can just use your call sign for a period. This part of the software you will have to buy at some point, but you get a while to try it before you have to and it really isn’t expensive. There are updates all the time by the look of what is posted on Facebook.
Setting Up VARAC
Go to settings then Rig Control and VARA configurations. Here we need to set the PTT configuration up the top left of this screen. This will be how the software connects to your radio. You also need to setup the frequency control section. Once setup, press the save and exit button.
Using VARAC
Each band has a calling frequency, which you can select up the top left of the default screen via the drop-down box. On the calling frequency, you can receive calls which will be shown on the top blue box. While on the calling frequency, other users can get an automatic signal report from you, or even ping you to see if you are there.
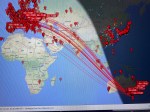
The above picture is the main screen in advanced mode (you can see I have it ticked up the top right). The lower blue box shows that I have sent a beacon, and about to send another one. Prior to that I had a 15min conversation with VK3FFB.
The box up the top right shows anyone currently calling CQ (currently none in the above example, but the band was a bit dead), and the box next to that is the two beacons I can pick up with their signal strength. You can see on the top left I am on the calling frequency of 28.105 Mhz.
If you click on someone calling CQ, VARAC will attempt to connect with that station via the same slot that they are on. The slots are just a different frequency to the main calling frequency.
When calling CQ yourself, you press the purple CALL CQ button then check which slots are available. Select a slot then press the sniffer button and listen to your radio to check no one is there. Remember to turn the volume up for this! If there is traffic on that selected slot, select another slot and sniff that one. Once you have found one, you can press CALL CQ on that box.
VARA AC will now call CQ on the calling frequency then receive on the chosen slot. Should someone join you, you will see it on the bottom blue screen. You can type whatever you want in the bottom new message box and press send, and you can do it for as long as you want, it is not like FT8 with just a signal report. You can also see when the other person is typing a message (if enabled).
You can also send files to each other should you want to. I like to send a QSL card. On the right you can see Send VMail, or you can set yourself to away.
Just above the new message box to the far right, are some canned messages. You can edit these via the settings menu. These will send pre-populated information about yourself to the other person, like your name, QTH, Location and your power. This information will then auto populate on their screen in the boxes just above the New Message box. If they send you one back, it will auto populate on yours so you can either auto log or press log to log the contact with all the information received. This logged information can then be used for a variety of logging programs.
If you are logging on QRZ, you will find VARAC under Dynamic mode.
PSK
One extra feature is you can go to https://pskreporter.info/pskmap.html and put in your call sign and then select VARA. Every 15 minutes VARAC will send out a ping and on PSK you can see who heard you around the world on the map. This 15-minute time can be adjusted in the settings window down the bottom right.
VarAC Do’s and Don’ts
Here is a copy of the code of conduct that should get emailed to you if you put in your email address. Make sure you have a good read as you don’t want to be the one everyone talks about for the wrong reason!
The Don’t: Don’t jam the Calling Frequency (CF). Don’t hold it for more then a few minutes or more then necessary.
The Do: Started a QSO on the CF? It’s OK, but QSY as soon as possible. You have QSY UP/Down buttons or a free-form QSY button where you can select your desired QSY frequency.
The Don’t: Don’t use the PING feature for DXCC/Grid hunting. Pings are not registered as QSOs as only one side sends an SNR report.
The Do: Use PING only as tool to check the link quality with your desired destination.
The Don’t: Don’t use 2300Hz BW on the VarAC CF or on any of the slots.
The Do: Use Only 500Hz on VarAC CF and slots to avoid QRM-ing nearby VarAC QSOs. Use 2300Hz only outside of the slot frequencies.
The Don’t: Don’t QSY to a frequency without checking if it is free.
The Do: VarAC provides you with Sniffers. Right-click on the QSY Up/Down buttons will temporarily QSY to the destination frequency (without keying your PTT) so you can listen before QSY-ing. Same goes for calling CQs: Use the CQ slot sniffer.
The Don’t: Don’t try to send large files over HF. And if the link is slow – don’t send files at all. It will never end. And PLEASE don’t send files over the CF.
The Do: Send files up to 5-10K in high speed and no more than 1-2K in low speed and always on non CF frequencies.
Other information
There is a lot more to learn about VARC, but hopefully this helps as a starting point. Please let me know in the comments if it helped you. I do hope to do a video on it soon.
Special thanks to Irad Deutsch 4Z1AC who helped me in answering questions for this review.
Below are some other interesting reads you may enjoy also.
HF radio and lightning storms are closely connected because lightning creates strong radio frequency interference that affects HF radio communication (3–30 MHz).…
Amateur radio operators use many different antenna types, each designed for specific bands, space limits, and operating goals. Here’s a clear overview…
Interference in Amateur Radio refers to unwanted signals that disrupt radio communication. This interference can reduce signal clarity, make contacts difficult, or…


 Maximum Usable Frequency (MUF) is an important concept in HF radio propagation and amateur radio communications. It refers to the highest frequency that can be used for reliable communication between two locations by reflecting…
 World Amateur Radio Day is celebrated every year on April 18, marking the founding of the International Amateur Radio Union (IARU) in 1925. The organisation was established in Paris when amateur radio societies from…
 Amateur Radio Television (ATV), often called “ham TV,” is a niche part of amateur television where licensed radio operators transmit live video and audio over radio frequencies instead of traditional broadcast networks. It is…
 The Baofeng UV-5R Mini handheld radio is a popular and affordable dual-band amateur radio transceiver widely used by beginners and experienced ham radio operators. Designed as a compact version of the original UV-5R, this…
 HF radio and lightning storms are closely connected because lightning creates strong radio frequency interference that affects HF radio communication (3–30 MHz). High Frequency radio is commonly used for amateur radio (ham radio), marine…
 OpenHamClock is an open-source amateur radio dashboard designed as a modern successor to the original HamClock used by radio amateurs worldwide. It provides a real-time visual display of essential ham radio propagation data, world…
 The Radtel P8 PoC radio is a Push-to-Talk over Cellular (PoC) device that looks like a traditional walkie-talkie but communicates using 4G/LTE mobile networks instead of UHF/VHF radio frequencies. This means its effective range…
 An antenna coupler (also called an antenna tuner or matching network) is a device used in radio systems to ensure impedance matching between a transmitter and an antenna. Most transmitters are designed for a…
 Amateur radio operators use many different antenna types, each designed for specific bands, space limits, and operating goals. Here’s a clear overview of the most common ones and why hams choose them. Wire Antennas…
 A dipole antenna is a basic radio antenna made of two conductive elements fed at the center. It is typically a half-wavelength long and is widely used as a reference antenna in antenna theory…
 Interference in Amateur Radio refers to unwanted signals that disrupt radio communication. This interference can reduce signal clarity, make contacts difficult, or completely block communication between amateur radio operators. Radio Frequency Interference (RFI) is…
 Prior to 1989, it was illegal to operate between 50 MHz and 52 MHz in Australia. It was a real pain as that was where all the action was when the band opened up.…