DMR Explained

With digital radio changing so quickly, below is a bit of an update in regards to DMR radio networks.

DMR stands for Digital Mobile Radio and is an internation standard for digital radios since about 2005. It can contain voice and data. It was created as a standard so it remained low cost and could be used and made by any country.

DMR was designs with three tires where tire 3 is usually for trunked radio networks, however this didn’t start until about 2012. DMR is used between 30MHz and 1GHz

DMR uses 12.5 channel spacing but had two voice channels per frequency. This is done by having the two voice channels on two different time slots. In very basic terms, the radio will listen to 30ms of each time slot and only play the selected one. This means you will miss every second 30 millisecond, but as this is so short, you wouldn’t notice any of the voice missing unless the signal is weak.

Within each time slot, you can have talk groups. So, if you are not on the right frequency, time slot and talk group, you may not hear anything or be heard.

DMR Conventional

This can be either DMR Duplex (as in a base repeater) or DMR Simplex ( where uses talk direct to each other without a repeater). Radios can be lower in transmission power, and best suited to individuals or companies in outdoor recreation, small business, or other applications that do not require a lot of radio users and wide-area coverage. However a repeater can be used to widen the range of a DMR network.

DMR Capacity Plus

This is a single site network, is one with no central control channel. All radios on this system scan each frequency at that site continually. There is a maximum 6 frequencies / 12 channels (tier 1 and 2). This could be a Motorola Solutions Cap+ network, PA People Cap+ network and so on. There can be up to 1600 users per site.

Occasionally you will come across a 1 frequency Cap+ site with no second frequency. However single frequency DMR Capacity Plus systems are often preferred to standard conventional because of the following reasons:

  • Capacity. You can easily have 4-6 talk groups on a single repeater.
  • System wide All Call. You can easily contact every radio when doing a capacity plus all-call if their radio is on and in range.
  • System wide Private Call. You can easily connect to your private call recipient if their radio is on and in range.
  • System wide radio ping and disable. A radio ping can ping a users radio to see if it is on and in range.
  • With Conventional DMR you must be on the right slot and correct talk group in order to do any of the above.

DMR Connect Plus

This is a multi-site Trunked linked by IP and has a centralised control channel. An example of this is the Orion Network commenced in Australia in 2010 with Connect Plus. Also they started the Orion CapMax Tier 3 in 2019, the longer term aim is to move all Connect Plus users over to CapMax Tier 3 and eventually shut down the Connect Plus network. This has already happened in Queensland.
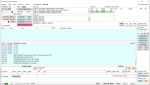
An example is the Orion Con+ on DSD (Site 1-XX).

DMR Capacity Max Tier 3

This is a multi-site Trunked with a centralised control channel with advanced radio features (integrated data applications such as GPS services, text messaging, data services and dispatch console capability). Examples include the Orion CapMax on DSD (Site H2-XXX).

Please let me know what your thoughts about this are. Did it help you? Is there something else you want to know?


If you enjoyed this, below are some other posts you may enjoy also:

  • Olivia Digital Mode MFSK
    Yes, this popular girl name is actually an Amateur Radio term. Christian, DK8EW, put me onto Olivia after we chatted on VARA HF. I had heard about Olivia before, but he encouraged me to give…
  • FreeDV
    I came across something different, FreeDV. The name FreeDV insinuates it is free, but is it? What is it? And what does it do? They say it will be the new SSB of radio. They…
  • HamClock
    HamClock has always fascinated me, as it seems such an amazing program specifically set up for Amateur Radio. I have seen countless videos on it but the draw back was always needing to have a…
  • NanoVNA H4 USB Control to PC
    If you haven’t seen my previous blog on the NanoVNA Analyser, then I suggest you look at that first before reading this blog. This one will talk about how to connect your NanoVNA to your…
  • Flrig
    Flrig is a transceiver control program designed to be used either stand alone or as an adjunct to fldigi (see my review on this). The supported transceivers all have some degree of CAT. The flrig…
  • VARA – VARAC
    Ever heard this sound on HF / VHF / UHF? I know I have more and more recently. After a bit of research, someone told me it was VARAC. https://www.varac-hamradio.com/ As I understand it, the…
  • DXHeat.com
    DXHeat.com is a great website that can update you the current conditions on each band. The website has filtering of incoming DX Spots which can be displayed instantly using great graphical tools. From the main…
  • EchoLink CQ
    I’ve been using EchoLink well before smartphones where the only way I knew how to connect to a different station was via the radio. The internet wasn’t as extensive as it is now and you…
  • NetTime
    When using digital over the radio, it is particularly important you have the correct time. Even a second out will stop you from making contacts. I relied on Windows to update the time and got…
  • GD-77 Won’t connect to PC
    I have been using my Radioddity now for some years and love it.  Though upgrading this to the OpenGD77 opened a whole new world and it gets better all the time. One issue I had…
  • DudeStar
    Here is a free windows program that will connect your PC to: DMR Yaesu Fusion DStar M17 P25 NXDN You can do all this without needing to purchase a radio. I prefer to use a…

Hotspot Fixing Packet Loss with AutoCal

The thing with digital communications, it can be extremely complicated. It only takes one tick box to be ticked incorrectly to take your station off the air.  Just as easily one tick box will get you on the air and sounding great.

With Analogue, it was all about antenna gain, SWA, power and height.  Digital is vastly different, especially via a hotspot, as it is all about lack of power, mic gain and packet loss.  Packet loss can be tricky and is often put down to a bad internet connection.  However, that is not always the reason, and if your internet is good, and your packet loss is above 1%, then it can get tricky to know why.

Assuming you have a good connection, you have your hotspot close to your modem if it is via wifi and your radio is also close to your hotspot, then here is something you may want to try.  I will explain how to do it using an OpenSpot, as that is what I am using, however, most hotspots may have the same or similar features.

After many years of using the same hotspot, I noticed more and more the hotspot didn’t seem to recognise my signal from my radio.  I could hear fine, and my hotspot even said it was receiving my signal, but my call didn’t come up on the dashboard and the other person couldn’t receive my signal unless it did come up on the dashboard.

It started 3 in 1 times I would trigger the hotspot like normal, then it changed to 1 in 3.  It got worse before it made the hotspot almost unusable.

My hotspot, an OpenSpot2, has a AutoCal option and will analyse an incoming signal and tries to find out the frequency difference between the OpenSpot and the transmitter. They suggest that you only run AutoCal feature if the openSPOT2 shows BER above 1% for your radio’s transmission, as errors in the voice stream usually won’t be noticeable if the BER is below 1%.

You can see this on the OpenSpot by going to the Status screen and open the BER graph and transmit. A quicker way is to look when you transmit on the dashboard of your OpenSpot, you can see below the BER is next to the B, and this example has a loss of 1.3%.

Dashboard showing BER loss.

With the Openspot, press the quick setup button, select the type of radio you are using (I am using a DMR radio), and then you can see the AutoCal button.

All you need to do is press that AutoCal button.  Then scroll down and you will see it doing the three phases. Make sure the correct modem mode is selected. Hold the PTT button on your radio until all three phases are completed, the bottom of the screen should say Modem Receiving at the bottom. It may update your frequency offset and then make sure you save.

AutoCal analyzes an incoming transmission and tries to find out the frequency difference (RX offset) between the openSPOT2 and the transmitter.

Once complete, you can try the echo test to check you are working well.

Then you can return to normal use and the BER should have reduced to well below 1%.

OpenSpot have more information here in their user manual.

I hope this helped you, and if you enjoyed it, here are some other posts I have done. Please don’t forget to put your email address in to make sure you get the latest posts.

OpenSpot from the Start

I have spoken to a few people who have felt a bit overwhelmed setting up their OpenSpot from the start. In saying that, I have always been surprised how many people are on digital, some of them have no computer experience at all.  It only takes one tickbox to be selected wrongly and you are off the air totally.  So clearly there are a lot of helpful Amateurs out there.  This website is my way of helping, as I can’t be all over the world to help.  I have put things of interest as I find them on my site.  If you find it interesting, please subscribe or let me know.

In saying that, OpenSpot has been setup to be as easy as possible with a lot of thought behind it.  While I am not claiming this is the best hotspot, I am saying I have two of them and found them great to use at home, mobile, and portable.

This is what I do with my openspot2.

Starting from the beginning

Plug your OpenSpot2 in

Turn your mobile phone wifi (or could use a tablet or laptop with wifi) on and connect to your openSPOT2 AP

If the popup page does not show up (it may take a while to load), type in openspot2.local in a web browser

A welcome screen will ask you to select your country

Scan or manually select your home wifi

Press connect and type in your password for your home wifi

After pressing ok, you will get a message saying this hotspot is going to connect to the wifi now instead of directly connecting to your phone

You can then connect to it via your phone or device that is connected to the home wifi.  I recommend you do this via a pc as you get more functions on screen, however you can do it via a mobile phone with a smaller screen. To connect, go to openspot2.local in a web browser.  However, if you have two openspot2’s on your network, as I do, you will need to log into your network modem and check the actual ip address of your openspot.

If you can not find it on your network, then I suggest you go back to your phone and see if you can connect to your openspot again via wifi.  If it is not there, you may need to unplug the power cord and plug it back in a minute or so later, or press the button next to the power cord until the light goes white to reset it and start again.

Once you connect via the wifi network to your Openspot for the first time you will get a Quick Setup Screen.

Put in your call sign and the DMR ID will auto populate.  You can put in your NXDN ID also.

Select the type of radio you will be using to connect to the OpenSpot.

Type in the frequency you want to use while using the Openspot.  Make sure it is a different frequency to all other hotspots so you don’t get hotspot feedback. Keep colour code as 1. Then select the network you want to connect to.

Enjoyed the read? Don’t forget to subscribe. Below are some other interesting reads:

SMS via Radio or Hotspot

One of the most underutilised by very cool feature that comes with some digital networks is the ability to send and receive SMS messages. You can send it fairly easily to another radio, but did you know you can also receive a weather report, see where your last GPS transmitted location is, and send messages to your mobile phone. The best thing is there no cost either.

While not all networks and not all radio’s support sending SMS’s. Some hotspots do and some done also just to make it even more confusing. While I don’t plan to list all networks available, as they there are more all the time, and the settings change also. However, at the time of writing this (2020), the VK-DMR network does not support GPS or SMS (you must turn it off to use the system), but the BrandMeister one does. So, I will talk from here on about the BrandMeister network. If you use a different network, then check with that network first.

BrandMeister Setup

First you need to setup your BrandMeister account to send and receive SMS. From the BrandMeister page, login at the right of the screen. Then under Services on the left side, select selfcare. I usually set the radio brand to either ETSI or Motorola, however this will depend on the radio you have. While you are here, you might want to turn on or off your GPS location and check everything looks good.

Radio Setup

Would you believe most digital radios allow you to send and receive messages right from the screen easily. However not all. Unfortunately, at the time of writing this (2020), the OpenGD-77 does not support text messaging as yet. However, it is on the job list. I do understand that since text messaging isn’t the most used option in digital radio, probably leaving this setup until last is fair enough. However, I have done it on the original GD-77 firmware, and seen it done on other radio’s also.

If your fortunate enough, you may have a hotspot that can do it anyway.

Hotspot Sending

I am not going to talk about every hotspot available, mainly because I don’t own every hotspot available. But I will talk about the OpenSpot as I have a couple of them myself, and I know they work.

From a PC, the menu on the right side has DMR SMS chat that will bring up a box much like the picture below.

DMR SMS Chat in OpenSpot

262993 GPS and Weather

If you send the message help to destination ID 262993 you will get a prompt much like above. It may take a little while to reply. As I live in Melbourne, you can see above I then sent a private message to 262993 again and typed in the message wx Melbourne, AU. You can see above the message on the left I received. Remember, the reply’s do take a while to come back and usually arrive just as you have given up waiting!

You could also send the message gps help to the same number, 262993, to get an overview of all the GPS commands which includes setting your home position, and so on. If you have transmitted your GPS location with the same callsign you set up in the selfcare then it will reply with your last location sent. If you want to save that as your home location, send GPS SET and it will save your last location as your home location. Then you will get from now on your home location and your last transmitted location.

If you send RSSI to 262993 it will reply with the repeater and connected talk group you were last using. If you send a message INFO *callsign where *callsign is replaced with your call sign you will get a reply when you last spoke. If you have two digital ID numbers, then it will send both of them back to you.

262994 Repeater, POCSAG and dapnet

If you send RPT SMS to 262994 you will get a reply of what static talk groups you are currently connected to.

You can also send a message to a call sign using this 262994 number. For example, if you want to send a message to me, send VK3TBS followed by your message to number 262994. However, I couldn’t get this to work – maybe because I was messaging myself! If you get it to work, please let me know what I did wrong.

262995 SMSC – SMS-ing to a mobile phone

This is taking SMS-ing to the next level. I was even able to SMS my wife who doesn’t have a licence.

To do this, send the following message SMSGTE @[phone number] [message] to 262995. where [phone number] is your country number (e.g. 61 for Australia) followed by the mobile number. Remember to remove the first 0 if you’re in Australia.

There is more information on sending messages to and from your radio to mobile phones on the smsgte.org web site. There is heaps of information under the User Guide menu.

UPDATE – Before I finish, I discovered the hard way that when you send a message from a mobile phone to a radio, I got a bill. I am not sure if it was because I am in Australia, or my phone carrier saw the oppertunity, but I think with a few tests it was only $1 or so.

APRS Chat

APRS is almost a bit easier and can quickly send messages to and from a mobile phone. Once you have done the above setup, I selected APRS chat in my OpenSpot2 dashboard. Then I sent a message with the destination callsign of SMSGTE then the message was @[phone number] [message] there [phone number] is your country number (e.g. 61 for Australia) followed by the mobile number. Remember to remove the first 0 if you’re in Australia.

You can see in the picture below I sent a message Test from hotspot to my phone which appeared instantly. I then sent one back from my phone saying This is from my mobile phone which then appeared instantly. It worked really well.

Other Reads

Hope you enjoyed the above post. Below are some other reads I think you may also enjoy.

  • HamClock
    HamClock has always fascinated me, as it seems such an amazing program specifically set up for Amateur Radio. I have seen countless videos on it…
  • NanoVNA H4 USB Control to PC
    If you haven’t seen my previous blog on the NanoVNA Analyser, then I suggest you look at that first before reading this blog. This one…
  • Flrig
    Flrig is a transceiver control program designed to be used either stand alone or as an adjunct to fldigi (see my review on this). The…
  • VARA – VARAC
    Ever heard this sound on HF / VHF / UHF? I know I have more and more recently. After a bit of research, someone told…
  • EchoLink CQ
    I’ve been using EchoLink well before smartphones where the only way I knew how to connect to a different station was via the radio. The…

Portable Hot Stop with Battery Pack

The new OpenSpot3 has come out with an internal battery. You might ask why? Well there is two common issues that is mostly raised with almost all hot spots. One is the range – I have addressed this in my BlueDV post if you want to make your own long range hotspot. However the other issue is it isn’t very portable.

I have two OpenSpot2 hotspots and enjoy them very much. I can cross modes easily all by using the one radio. You used to have to get one radio per band which was a lot more expensive. Anyway I can take the OpenSpot2 in the car and plug it into the car battery and run it via my mobile phone which works well. However what if I want to go for a bike ride or walk without the car?

The main issue is not having the battery of the car when you walk or ride your bike. This is perhaps one reason why the OpenSpot3 has an internal battery. For the rest of us, you can still do it.

Below is a picture of my setup. I took this picture in outback South Australia. At the top of the picture is a small pocket size battery which actually has two USB plugs, so I could plug in my HotSpot and my mobile phone. It even has a torch on it and has a lot of charge (15,000 mAh 2.4 Amp) so it wasn’t the cheapest one available. I could have gone a lot cheaper however we also used this battery pack for other things while we were in remote Australia for several days.

To the left of the photo is my GD-77, my hotspot and my phone. With this setup, I was able to talk the world!

Some other reads you may enjoy

My Radio Diddity GD-77

Starting in digital can be a little overwhelming to start with, no matter how many years you have had your licence. I even had a digital scanner for many years prior to starting in the digital world of Amateur Radio.

After working out what digital radio is, what you can do on it and how it worked, I then started researching what equipment was required.

According to other reviews at the time I was looking, many people claimed that the RadioDitty GD-77 was the best value for money.

My Radioditty GD-77 while on holidays

After a month or so of using the RadioDitty GD-77 through repeaters, I purchased an OpenSpot2. I did a lot of research prior to this, and had settled on the OpenSpot1, however when I went to purchase it, only the OpenSpot2 details. It happened to be the week it was launched, so there were no reviews available at the time.

Currently my digital setup is very simple, it just has:

  • One hand held radio, the Radio Ditty GD-77, this came with charger, USB cable and remote microphone
  • OpenSpot2 Hotspot. This came with a power cable.

With this simple setup I am able to talk the world via

  • The BrandMeister network
  • The Australian VK-DMR network
  • Other DMR networks around the world, eg New Zealand, Canada etc
  • YSF Reflectors
  • C4FM
  • NXDN Reflectors
  • SharkRF servers

The above is just to name a few networks. Each of the above networks range from a few Talk Groups, to thousands upon thousands of them from all over the world.

In 2019, my family went for a huge five week trip through outback Australia. We went to some of the most remote parts of the world. We had to carry a lot of water, food and supplies. We also had to carry extra battery power to charge fridges etc. I would have liked to have taken a HF radio with us given the outback probably didn’t have a lot of interference, however we simply didn’t have enough room, or power.

Instead we took a very simple setup, my GD-77, my openspot2 and a small battery back that ran my openspot and mobile phone. Even without power, I was able to talk the world with a little mobile reception or wifi.

Many people have many radio’s for different networks, making it hard to keep updated, and obviously cost a lot. My digital setup costed far less than it costed me to get on 2m/70cm many years ago. And did I mention, this radio also does analogue, so yes, you can use this radio on 2m and 70cm simplex or via the repeaters and no one will know you are actually talking on a digital radio.

The only down site is it is a little hard to program and navigate the channels. The radio is built for commercial operations, and not really for amateur radio, however it can be done. Commercial operations usually have a small number of talk groups or repeaters/frequencies, where as amateur radio uses a lot. However once you nut it out, it isn’t really that hard.

You might want to upgrade to the OpenGD-77 though as it is a lot easier. I show you how to do that here.

Other things to read

Here are some other posts I have done on similar topics