
I found it hard to find useful information on how to run the OpenGD-77 hotpot mode with Windows 10. At the time of writing this, there is a lot about this topic using a pistar and even android or ISO, but not much with Windows 10. This is my experence with BlueDV and Open GD-77 using a Windows 10 PC.
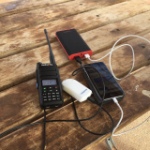
Someone once asked me after reading this page, why would you want to do this? So I have added this paragraph to try and explain. One reason is to extend your hotspot range. For example, if you use a normal regular hotspot, it will only have a small range around or in the house. If you want to go for a walk or dig in the garden, you either have to take a battery pack to plug your hotspot in and your mobile plus your radio. This is something I have done many time, especially while camping and in outback Australia – I have added a photo of it below. However if you have a spare digital radio, then you can plug in your GD77 into an external antenna and via BlueDV as explained below, and then almost run your own 5W repeater into the talk group you want. I have done this and been able to walk several kms from home and still have full access yet only taking my GD77 radio with me. The other reason you can do this is because you can. To make your own repeater is a bit of fun.

Before you read on, it should be noted that the Open GD-77 firmware and software is changing all the time, so some of the steps below may change. I will do my best to keep this page up to date, however please message me or leave a comment if you have any suggestions.
First install the Open GD-77 firmware and comm driver. There are instructions on my other post here.
Then once complete, make sure your GD77 is plugged into your USB on your PC. Then type in Device manager in the Windows 10 search box to open the Device Manager. Go to Ports and there you should see OpenGD77 followed by a COM number. If you do not, then you need to install the Comm Driver again. Take note of this Com number.
Now open the GD-77 CPS Community Edition and once loaded make sure it has an Extras menu between the View and Language menus. Click on the Extras menu and select OpenGD77 support. Click on Read codeplug and make sure that works. Obviously you need the radio plugged in and turned on to do this.
Now download the latest BlueDV install file from the following web site. Make sure you select the Windows version. There may be beta versions available if you want to try them.
Download and then install the msi file inside the zip file.
Keep the radio plugged into the USB port on your PC. Turn on the radio and press the green button to go into the OpenGD77 menu. Scroll down to options and then go up to Hotspot and when on hotspot press the right button until it changes to BlueDv. Press the green button to save.
Next open BlueDV and once opened, click on Menu then Setup. Put in your callsign, then change the serial port radio to the Com port noted earlier. Tick on RX/TX Colors, enter in the Frequency you wish to use, enter your DMR ID in both boxes, then select the Brandmeister DMR Master server you want to connect to and put in your password. Select Save to save these settings and close the setup box.
Now turn on Serial (top left under menu) by pressing the slide switch to the left, and DMR in the BlueDV interface. If you can not turn on DMR then you have the same problem I did, then you have not turned your radio on correctly or turned the hotspot mode on. If you have not turned on the hotspot, see two paragraphs above. Then, make sure the radio is in VFO mode by pressing the red button, you should see two lines of frequencies. Make sure they are both the frequency you are using in BlueDV. Turn your radio off, connect the cable and plug it into the PC, then hold down the small black button above the blue button and PTT button, and while holding the button, turn the radio on. The radio should say Hotspot along the top of the screen.
It should now work. Adjust your power level on this radio and plug into a nice antenna, then you can use another DMR radio on the same frequency and you now have your own hotspot that will cover an area that your GD77 will cover.

If you put in the DStar or Fusion settings, you can cross mode across to these networks also if you use the latest BlueDV version.
For more information, here is a video I found that got me going with this project. If you look at this video from 6:34 you can see how to do it without BlueDV and using MMDVMHost instead.
I hope you have found this useful. Please see below some other similar articles I have written that might be of interest. Please leave me some feedback if this has been of some help.
- Radioddity GD77
 After using this radio for years, this is my summary…
 - Retevis RT73 – Kydera CDR300UV
 The Retevis RT73 and Kydera CDR300UV are identical radios. They…
 - Converting dB to S-metre
 The S-meter is an instrument on most radio receivers that…
 - VARA – VARAC
 Ever heard this sound on HF / VHF / UHF?…
 - DXHeat.com
 DXHeat.com is a great website that can update you the…
- Radioddity GD77After using this radio for years, this is my summary…
- GD-77 Won’t connect to PC
 I have been using my Radioddity now for some years…
 - SMS via Radio or Hotspot
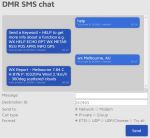 One of the most underutilised by very cool feature that…
 - Portable Hot Stop with Battery Pack
 The new OpenSpot3 has come out with an internal battery.…
 - BlueDV Windows 10 GD-77
 I found it hard to find useful information on how to run the OpenGD-77 hotpot mode with Windows 10. At the time of writing this, there is a lot about this topic using a pistar and even android or ISO, but not much with Windows 10. This is my experence with BlueDV and Open GD-77 using a Windows 10 PC.…
 - Upgrade to OpenGD77
 This page is just a help to friends I have spoke to who are interested in upgrading the Radioditty GD-77 to the OpenGD77 software. This is not my work, however I really do appreciate Roger and his team have done to put this together. I claim no responsibility if it breaks your radio, however I have not hear this happen now in some time. I am not an expert at all with OpenGD77, I have just put this together to help people who have asked me how to do it.…
 - The Radio Box
 How do you stop a hand held radio from falling…
 - Updating GD-77 Firmware
 Updating the firmware on the GD-77 can be daunting, as…
 - My Radio Diddity GD-77
 Starting in digital can be a little overwhelming to start with, no matter how many years you have had your licence.…

Is there a way to change the talkgroup on BlueDV without having a second DMR radio?
LikeLike
Hi yes but you would need something like this http://www.pa7lim.nl/ambepage/
LikeLike
Sweet, Thanks for the info. Looks like another GD-77 would be the more frugal route for me.
LikeLike
You have the same conclusion as me. Cheaper and using a radio. Sounds better also. Happy radioing
LikeLike
So, to understand all. I can’t use gd77 like a bluedv supported dongle and use pc to TX with my sound card?
LikeLike
Hey Greg, I thought of that myself and the answer from what I understand currently is no. It can be used like a repeater with a good long range depending on your antenna which is very cool. Understand this is opposite to the way you were asking.
LikeLike
Ok, understood. Thanks for fast reply. 73
LikeLike
Have a good day
LikeLike